For anybody who has a bit of a technical, problem-solving mind (I'm going to guess that's literally anybody reading this), there's a high likelihood that you have not only played with or owned a Rubik's cube but also attempted to solve one using a step-by-step guide.
Notation
Most guides are written using 'Singmaster Notation' where F denotes a clockwise rotation of the side facing the solver, U' is an anticlockwise rotation of the uppermost layer, and so on.
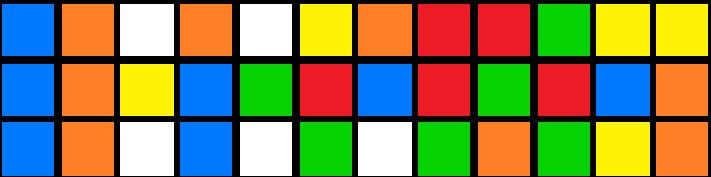
This notation is used to describe not only solving steps but also scrambles when applied to an already solved cube. The following scramble, for example:
L R' D2 U' B D2 F2 D F' L2 F2 R' D' L R2 D U2 L F' L' B2 D U R2 F' D' L' R D2 U
Produces this:
Kana Flick
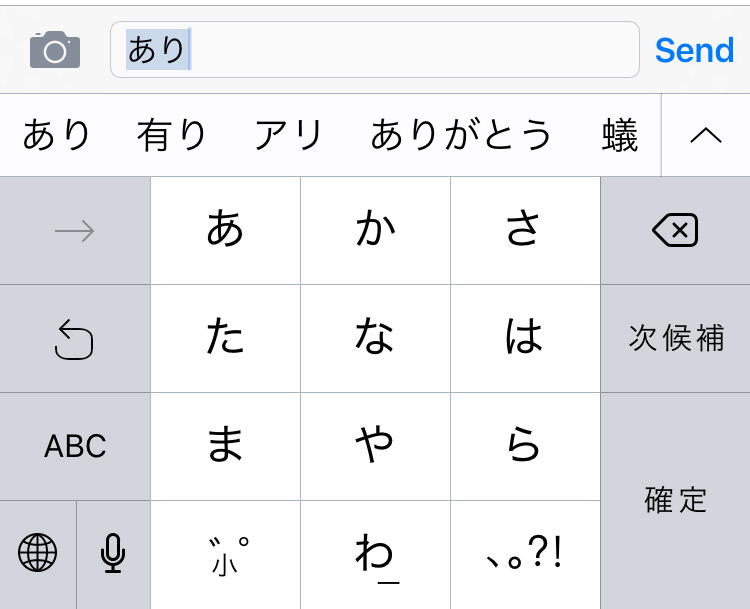
In seemingly unrelated news, the standard way to type Japanese characters on a smartphone is using a Kana Flick Keyboard.
This style of keyboard groups characters together so that you essentially touch the key to select the consonant, move in one of four directions (or stay still) to select the vowel and let go to confirm. Put that way, describing it takes a lot longer than actually doing it.
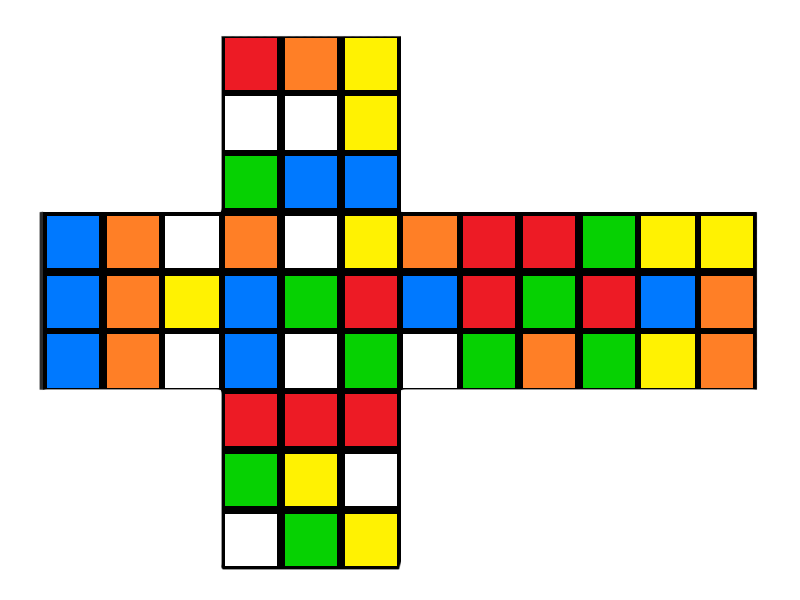
Rubik's flickboard
This is a long preamble to say that I was thinking through a new game design the other day when I had an idea about a variation on the kana flick keyboard that could be used to enter Rubik's cube move notation:
Note: It doesn't yet include 'fat' moves (lowercase variations which denote moving two slices of the cube rather than just one), E, S or rotations (x, y, z).
It only works on iOS for now because it was a Sunday-evening sofa hack while rewatching Voyager on Netflix.
Imagine you're on a bank heist. You're literally right in the middle of the job. Your expert team consists of some very talented criminals. There's The Hacker, The Driver, The Money Man, The Explosives Expert, You.
While The Hacker is rewriting the safe door control circuit's firmware to speed up the clock and release the time-lock, you find the computer controlling the security cameras. Do you make a note on a ToDo list?
Remind the Hacker to delete the security footage [ ]
Or do you grab the mouse and select File > Delete Security Footage?
(Yes, it is that easy, you specifically chose this bank to hit because it has terrible security)
Once you leave the building, there's a bit of confusion and The Explosives Expert ends up in the driving seat. The Driver is in the back! The police are one block away. Do you all get out, rearrange, let the driver get in the front? Or do you just start driving? The Explosives Expert may not know the exact route but, remember, The Driver is right there, able to give directions.
And that is literally exactly what developing a software product is like.
Product
The role of the Product Owner is fairly well known, well defined and ubiquitous across agile teams. But we know that everybody in the team is responsible for the product. The PO might be an expert in certain areas of understanding the customers' mindset or prioritisation but everyone is responsible for the product. Everyone owns the product but, in this instance, there is one person with the title Product Owner.
Quality
In the same way, everyone working on a product is responsible for the quality. If you're working on the database and you find that the drop-down menu occasionally disappears, there are multiple ways you could deal with it.
You could just ignore it. It's not the databases's fault, after all.
You could file a ticket in the system for someone else to pick up.
You could figure out a reproducible test-case.
You could pop open the web inspector and check the console, poke around a bit.
You could check out the code and fix it.
There are a lot of ways you could do this, depending on your abilities and your available time but whatever you do – as long as it's not just ignoring the problem – you are taking a step to improve the quality of the product.
The QA might be an expert in writing test cases or have the kind of brain that would think of using a base64-encoded png as a username but that doesn't mean quality begins and ends with them. They are the Quality Owner. Everyone is responsible for quality, but it's the Quality Owner's priority.
Architecture
And so we come to the Architecture Owner. Even now, a couple of decades after the Agile Manifesto with repeated swings for and against it, Agile and Architecture have an uneasy relationship or, at least, a poorly-defined one.
The image of The Architect as the keeper of the book, the writer of the specification still triggers rebellion in the minds of those who zealously misunderstand agile practices. Of course, there can't be a predestined development plan when the destination is unknown. But that doesn't mean you blindly run headlong into every problem. You look around, you keep aware of your surroundings, of other projects. If nothing else, you stay aware of your situation to know if you're doing something you've done before. If you are, you can look at how you solved this in the past and do the same or better this time round. This is everyone's responsibility but it's also Architecture.
"The last time I did a job in this town, the bank had a silent alarm system. You might want to cut the wires on this one before it's triggered this time."
Agile architecture is about looking a little bit forward and a little bit back. How will this work next year? How did we solve it last year? Is another team working on the same thing? Did they? Will they? Any prototyping done to figure out the next step of the journey is architecture.
Just as development, quality, product, design, business are all essential parts of any project, so is architecture. The Architecture Owner doesn't only do architecture and isn't the only person to do architecture tasks. It is merely their priority. They may have additional expertise or experience, they may be faster at building prototypes or drawing boxes-and-arrows but they are as integral a part of the product development team as anyone else.
To be effectively agile, everyone should care ultimately about creating the product.
Practicality
This is all good in theory. What does this actually mean? Is 'Architecture Owner' a full-time job? Does an architect architect all day long?
Well, is Product Owner a full-time job? QA? Explosives Expert? For a lot of teams, it is. But not all. A particularly small team might have an Engineer who acts as part-time PO. A larger team will have a dedicated person for each role. What you are is not what you do. The whole point of this is that being the owner of a domain doesn't make you solely and exclusively responsible.
In many cases, the person who assumes the AO role will be a strong engineer who can jump on any part of the codebase and be effective quickly (because in addition to being experienced engineers, they understand the architecture and the motivations behind the architecture) and who coaches others to think more architecturally and be effective quickly.
Notes
In the decade or so since I first wrote this, the role of architecture in agile has come and gone and come back a couple of times. I find myself directing people to the same articles repeatedly so I figured it was time to update and publish this.
There are many other articles on agile architecture, most of which are written much more seriously than this.
I think I've figured out the next break-out TV competition show: The Great British Web App
Round 1: The Microsite
Each team is presented with a PSD and a Word doc. You've got 1 hour to slice up the images, mark up the content and deploy a microsite advertising an event. The judges are harsh on anyone demoing on localhost.
Round 2: The Magazine
Using the tools, frameworks and languages of your choice, design, develop and deploy a magazine-style web site with full CMS and social media share buttons.
Teams are judged on semantic markup, SEO friendliness and accessibility audit score.
Round 3: The Masterpiece
Your chance to show off. You have 4 hours to build the shiniest, scrollbar-misusing, WebGL-heavy, experimental web masterpiece possible to match the client brief "Anything, as long as it pops!".
You only get points if it's mobile-friendly and works on IE 6.
Prize
The Winners of the Grand Finale get a copy of Dreamweaver 4 and enrolled in a Coursera course on how to retrain as a baker...
Bonus Technical challenge for the celebrity edition
Rebuild a classic HTML element using the latest web technologies - implement <marquee> using Web Components or <blink> using Web Sockets.
I've been doing a lot of work in Vue recently so when I was asked to evaluate using Web Components on an upcoming project, I approached it with a Vue-ish mindset.
I've not really kept my eye on Web Components for the last couple of years beyond seeing original proposals being superceded and import specs being replaced. Just seeing those things on the periphery were enough to make me think "Meh... I'll have a look later when it's all died down".
Now, I know that Web Components !== Vue. But, I was interested in what knowledge could be migrated from one technology to the other. If I were building an actual web app, I'd definitely use Vue. Building a boxful of reusable, shareable UI elements, though... let's find out.
I'm not going to build anything too complex to start with. How about an "Planet Summary" panel? A simple panel that renders summary information about a planet given a JSON object.
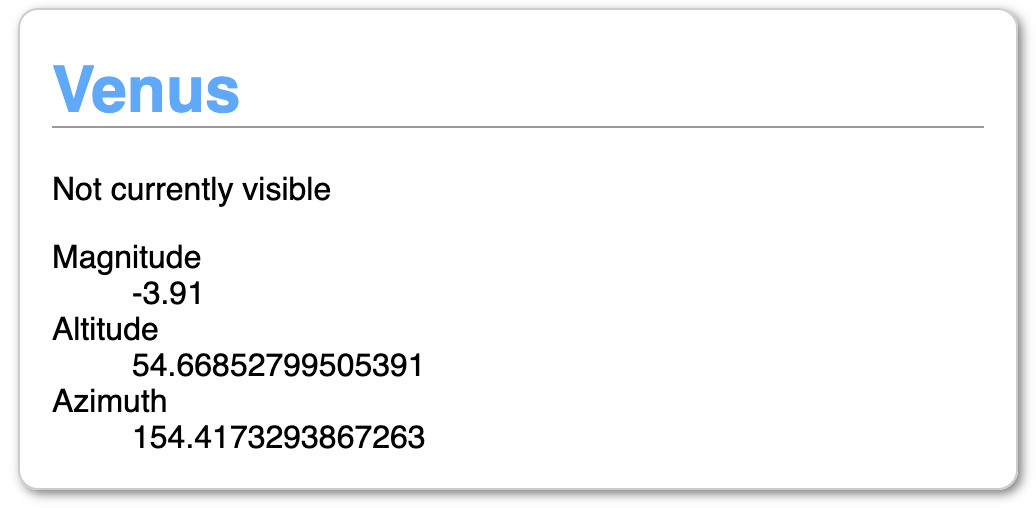
I have an API that returns JSON information about where in the sky to find planets when given your latitude and longitude. For example, if you're standing slightly south of the centre of Berlin and want to know where Venus is, you'd make this request:
In this case, it determines Venus isn't visible because, even though it's above the horizon, it's not bright enough given the time of day (about 6pm).
We want to make a little UI card that displays this information.
Mapping Vue features to Web Components
Vue
Web Component
Notes
name
class name
data
instance properties
props
attributes
these are not reactive by default. Attributes have to be specifically observed (see watch).
watch
attributeChangedCallback
first, register your watched attributes with `observedAttributes` then process them in attributeChangedCallback
computed
getters
methods
class methods
mounted
connectedCallback
called async so the component may not be fully ready or may have been detached. Use Node.isConnected to protect against calling a dead node
componentWillUnmount
disconnectedCallback
style block
style block inside template
styles are scoped by default
template block
literal template
JS literal templates (backtick strings) are nowhere near as powerful for templating as an actual template library.
Vue template features such as `v-for` can be replicated with vanilla JS but a single-purpose template library (such as `lit-html`) is a good idea.
NOTE: I am deliberately not using Webpack. I realise that actual applications would be using additional tooling but I want to see what we can do without it.
The first thing that clicked with me was when I realised that computed properties and getters are identical. Nice.
Here's Vue code to return the planet name or a default string:
The only real difference at this level is the data binding. In Vue, props passed from a parent element to a child are automatically updated. If you change the data passed in, the child updates by default. With Web Components, you need to explicitly say you want to be notified of changes.
This is basically the same as setting a watch in Vue. Data that changes in a slightly less tightly-bound fashion can be watched and the changes trigger updates further down.
Watches
Watches in Vue:
watch: {
  altitude(newValue, oldValue) {
    ...
  }
}
With Web Components, registering a watch and reacting to changes are separate:
Vue contains full templating support – for loops, conditional rendering, seamless passing around of data. Natively, you have literal templates and that's about it.
To create a list of planets, you'd use the v-for directive and loop over your planets array.
Vue:
<ul>
  <li v-for="planet in planets">
    <planet-summary :planet="planet"></planet-summary>
  </li>
</ul>
This needs to be explicitly included in every component as they are standalone whereas Vue automatically handles DOM updates.
CSS
Due to the fact that Web Components live in a separate document fragment, There are complications around sharing styles between the host page and the component which are nicely explained on CSS Tricks. The biggest benefit, on the other hand, is that all styles are scoped by default.
Vue without Webpack (or other tooling) also has its own complications around styles (specifically scoping styles) but if you're building a Vue application, it is much more straightforward to specify which styles are global and which are scoped.
All in all, pretty much everything between basic Vue Components and Web Components can be mapped one-to-one. The differences are all the stuff around the basic construction of the components.
I'd say that if you're looking to build completely standalone, framework-free reusable components, you'll be able to accomplish it with the Web Components standard. You just might have a bit of extra lifting and boilerplate to deal with.
On the other hand, if you're already planning on building a full web application with data management and reactive components, use the tools available to you.