-
-
Same place, different time
This is the same tune recorded in two completely different styles.
Piano & double-bass:
Lo-fi hip-hop:
-
Stand in the Sunset
I decided to re-record an old tune.
-
Line-by-line: Flat Cube Web Component
Line-by-Line breakdowns go into excessive – and sometimes unnecessary – detail about a specific, small project. Be prepared for minutiae.
Here, I'll go through the FlatCube web component line-by-line. It is a single web component that draws a flattened-out representation of a Rubik's Cube (or other 3x3 twisty puzzle) based on a string passed in that describes the positions of the pieces. A cube contains six faces. A face contains nine pieces.
You'll probably want to have the full code open in another window to see this in context.
The component
Usage
<flat-cube facelet="UUUUUUUUURRRRRRRRRFFFFFFFFFDDDDDDDDDLLLLLLLLLBBBBBBBBB" />Line-by-line
First, all WebComponents must extend the
HTMLElementclass. If you're building with a library such as LitElement, you might extend a different class but that class will ultimately extendHTMLElement.class FlatCube extends HTMLElement {The
constructoris called every time a FlatCube element is created, not just once per page load.constructor() {We have to call the constructor on HTMLElement so that all the behind-the-scenes plumbing is taken care of.
NOTE: If we don't do this, we can't use
this.super();Now set up some internal variables for the FlatCube itself.
this.facesbecomes an array representing the order of faces in the facelet string.this.faces = 'URFDLB'.split(''); this.facelet = false;We attach the shadow DOM to this element so that we can access it easily during the
renderphase.this._shadowRoot = this.attachShadow({ mode: 'open' });Then we create the template (see below) and trigger the first render to actually show the element on screen.
    this.template = this.createTemplate();
    this.render();
 }
Style
It isn't essential to separate the component's
CSSinto another method but I like to do it to keep everything nice and tidy.style() {By using template literals, we can write a block of plain CSS.
return `The
:hostCSS selector references the element itself. It's kinda likethisbut in CSS.NOTE: It can only be used from inside the Shadow DOM
:host {I want this component to be able to be used inline or as a block item so I'm specifying
inline-block. If the context it ends up being used in requires it to be block, it's possible to wrap it in another element.display: inline-block;Skinning and scaling
In this web component, one of the main goals of the implementation was the ability to easily change the size of the component and the colours of the faces.
Luckily, CSS variables make it super easy to make components skinnable and the calc function is very useful for scaling.
The base measurement
All the dimensions – the full component width, the faces, the individual pieces – are multiples of the
--flat-cube-face-widthvalue. This is passed in from the containing CSS by specifying a value for--flat-cube-facebut if it is not specified, we want a fallback of100px.--flat-cube-face-width: var(--flat-cube-face, 100px); }Now the styles for the complete element. Set position to be
relativeso that we can absolutely position the individual faces..flat-cube { position: relative;And specify the element to be the height of 3 faces and the width of 4. This is where the
calcfunction comes in handy, especially in a web component intended to be reusable and seamlessly scalable.height: calc(3 * var(--flat-cube-face-width)); width: calc(4 * var(--flat-cube-face-width));I'm using
outlinerather than border for the lines between the pieces so I want to add a 1px margin around the outside to prevent clipping.margin: 1px; }Each individual face shares the same class
.face {Use the value passed in as the base measurement.
  height: var(--flat-cube-face-width);
  width: var(--flat-cube-face-width);
Each face is absolutely positioned inside the containing
.flat-cubeelement.position: absolute;But rather than specify exact positions for each individual piece in a face, we use flexbox to lay them out automatically. We draw the pieces in order then let them wrap onto the next line,
  display: flex;
  flex-wrap: wrap;
I wanted to specify the width of each piece as a simple ⅓ of the face width. In order to do that, I used
outlinerather thanborderasborderactually takes space in the element whereoutlinedoesn't.outline: 1px solid var(--flat-cube-outer, black); }These are simply the
topandleftpositions of the individual faces. We don't really need to go line-by-line here..U-face { top: 0; left: var(--flat-cube-face-width); } .L-face { top: var(--flat-cube-face-width); left: 0; } .F-face { top: var(--flat-cube-face-width); left: var(--flat-cube-face-width); } .R-face { top: var(--flat-cube-face-width); left: calc(2 * var(--flat-cube-face-width)); } .B-face { top: var(--flat-cube-face-width); left: calc(3 * var(--flat-cube-face-width)); } .D-face { top: calc(2 * var(--flat-cube-face-width)); left: var(--flat-cube-face-width); }Using the child selector to access the pieces inside the face.
.face > div {As I mentioned above, we want to calculate the width of the pieces simply as ⅓ of a face so we use
outline. The alternative would be to calculate the pieces as (⅓ of (the face width minus 2 * the internal border width)). That sounds mistake-prone.width: calc(var(--flat-cube-face-width)/3); height: calc(var(--flat-cube-face-width)/3); outline: 1px solid var(--flat-cube-inner, black); }Again, this is just colours. We don't need to go line-by-line. The only thing to note is that each piece has a fallback colour specified in case the containing application doesn't pass one in.
.U-piece {
  background-color: var(--flat-cube-up, #ebed2b);
}
.L-piece {
  background-color: var(--flat-cube-left, #ff6b16);
}
.F-piece {
  background-color: var(--flat-cube-front, #6cfe3b);
}
.R-piece {
  background-color: var(--flat-cube-right, #ec1d35);
}
.B-piece {
  background-color: var(--flat-cube-back, #4db4d7);
}
.D-piece {
  background-color: var(--flat-cube-down, #fffbf8);
}
And finally, we close off our template literal and end the
stylemethod.`; }Template
Now we build up the actual DOM of the element. We've done a lot of styling so far but, technically, we've nothing to apply the styles to. For that, we're going to build up the structure of faces and pieces then attach the styles.
structure() {At this point, we have a couple of choices. We can either build this structure once and update it or build it fresh every time we need to make a change. The latter is easier to write but the former has better performance. So let's do that.
This is the
createTemplatemethod we called in theconstructor. It is called only once for each instance of the component so we don't need to go through the whole building process every time.createTemplate() {First, create a new
template. Templates are designed for exactly this case – building a structure once and reuse it several times.const template = document.createElement('template');Then we attach the styles we defined earlier:
template.innerHTML = `<style>${this.style()}</style>`;And, finally, actually create the first element that actually appears in the component. This is the div that contains everything. We also add the
.flat-cubeclass to it.const cubeElement = document.createElement('div'); cubeElement.classList.add('flat-cube');The
this.facesarray we defined in the constructor comes back here. We loop over each face we require and create the DOM for it.this.faces.forEach((face, i) => {A
divto contain the face with the shared.faceclass for the size and the specific class for the position and colour –.U-face,.B-face, etc.const faceElement = document.createElement('div'); faceElement.classList.add('face'); faceElement.classList.add(`${face}-face`);Now we create the individual pieces. If we wanted to make this component customisable so that it could represent cubes with a different number of pieces(2x2, 4x4, 17x17, etc.), we'd use a variable here instead of
9.for (let j=0; j < 9; j++) {Now we call out to the preparePiece method (see below) without an element to make sure the piece has the right class assigned to it before we append the piece to the face.
        faceElement.appendChild(this.preparePiece(i, j));
      }
By the time we get here, we have a
facediv with 9piecedivs appended. Now we can add that to thecube.cubeElement.appendChild(faceElement); });Do that for each face and we have a div containing a completed
flat-cubewhich we can append to the template.template.content.appendChild(cubeElement);And return the template to the
constructor.return template; }Updating
Now we have the structure in a template, we can grab a copy of it any time we need to update the cube.
updateTemplate() {Passing
truetocloneNodemeans we get a deep clone (containing all the nested faces and pieces) rather than a shallow clone (just the top-level element).const update = this.template.content.cloneNode(true);We loop over each
faceand then each piece (div) in eachfaceto update it.update.querySelectorAll('.face').forEach((face, i) => { face.querySelectorAll('div').forEach((piece, j) => {We're using the same method here as we did to create the individual pieces (code reuse is A Good Thing) but this time we're passing in the piece we already have rather than asking the method to create a new one.
this.preparePiece(i, j, piece);The
updatevariable now contains an updated DOM representing the currentfaceletstring.}); }); return update; }This method takes the
i(index of the face) andj(index of the piece) we need to figure out which colour this piece needs to be. It also takes an optional argument ofpiece. If we don't provide that – the way we do in the initialcreateTemplatecall – piece will be a newly created div. If we do provide that argument, we'll update whatever is passed in instead.preparePiece(i, j, piece = document.createElement('div')) {We have to map the facelet string – default: "UUUUUUUUU...etc" – into the two-dimensional structure of faces and pieces. Okay, technically, it's a one-dimensional mapping of a two-dimensional mapping of a three-dimensional structure. But... let's just not.
    const start = (i * 9) + j;
    const end = (i * 9) + j + 1;
This means "If we don't have a facelet string, just colour the piece according to what face it is in, otherwise, colour it according to the i,j position in the facelet string".
piece.className = !this.facelet ? `${this.faces[i]}-piece` : `${this.facelet.slice(start, end)}-piece`;Once we've updated the piece, return it so it can be included in the content.
    return piece;
  }
We call this method in the constructor and every time we want to update.
render() {Empty out the element content
this._shadowRoot.innerHTML = '';And replace it immediately with the content we generate with the update method from above.
    this._shadowRoot.appendChild(this.updateTemplate());
  }
This is how we register the component to listen for changes. This getter returns an array listing the attributes we want to listen for.
static get observedAttributes() {There's only one attribute we care about listening to. Any change to the
faceletattribute will cause us to re-render.return ['facelet']; }The other part of registering for changes to the attributes. This is the handler that is invoked with the
nameof the changed attribute (useful when you're listening to a lot of attributes), theoldValue(before the change) and thenewValue(after the change).attributeChangedCallback(name, oldValue, newValue) {We only care about the
newValuebecause we've only registered a single listener and we don't need the oldValue.this.facelet = newValue;Then we trigger a new render to update the state of the element.
    this.render();
  }
And we close out our
FlatCubeclass.}Listening for events
The final part of the puzzle is to register our new element with the browser so that it knows what to do when it sees our element. We do this by passing our new element to the
CustomElementRegistry.I like to check if my element has already been registered. Without this, including the script twice by accident will trigger an error that the user of the component isn't necessarily going to recognise.
if (!window.customElements.get('flat-cube')) {To register, you pass the tag name you want to use and the element class.
NOTE: tag names for custom components must contain a hyphen.
  customElements.define('flat-cube', FlatCube);
}
And that's it. Every line looked at and, hopefully, explained.
Let me know what you would have done differently or if there are any (ideally small) projects you'd like me to look at line-by-line.
-
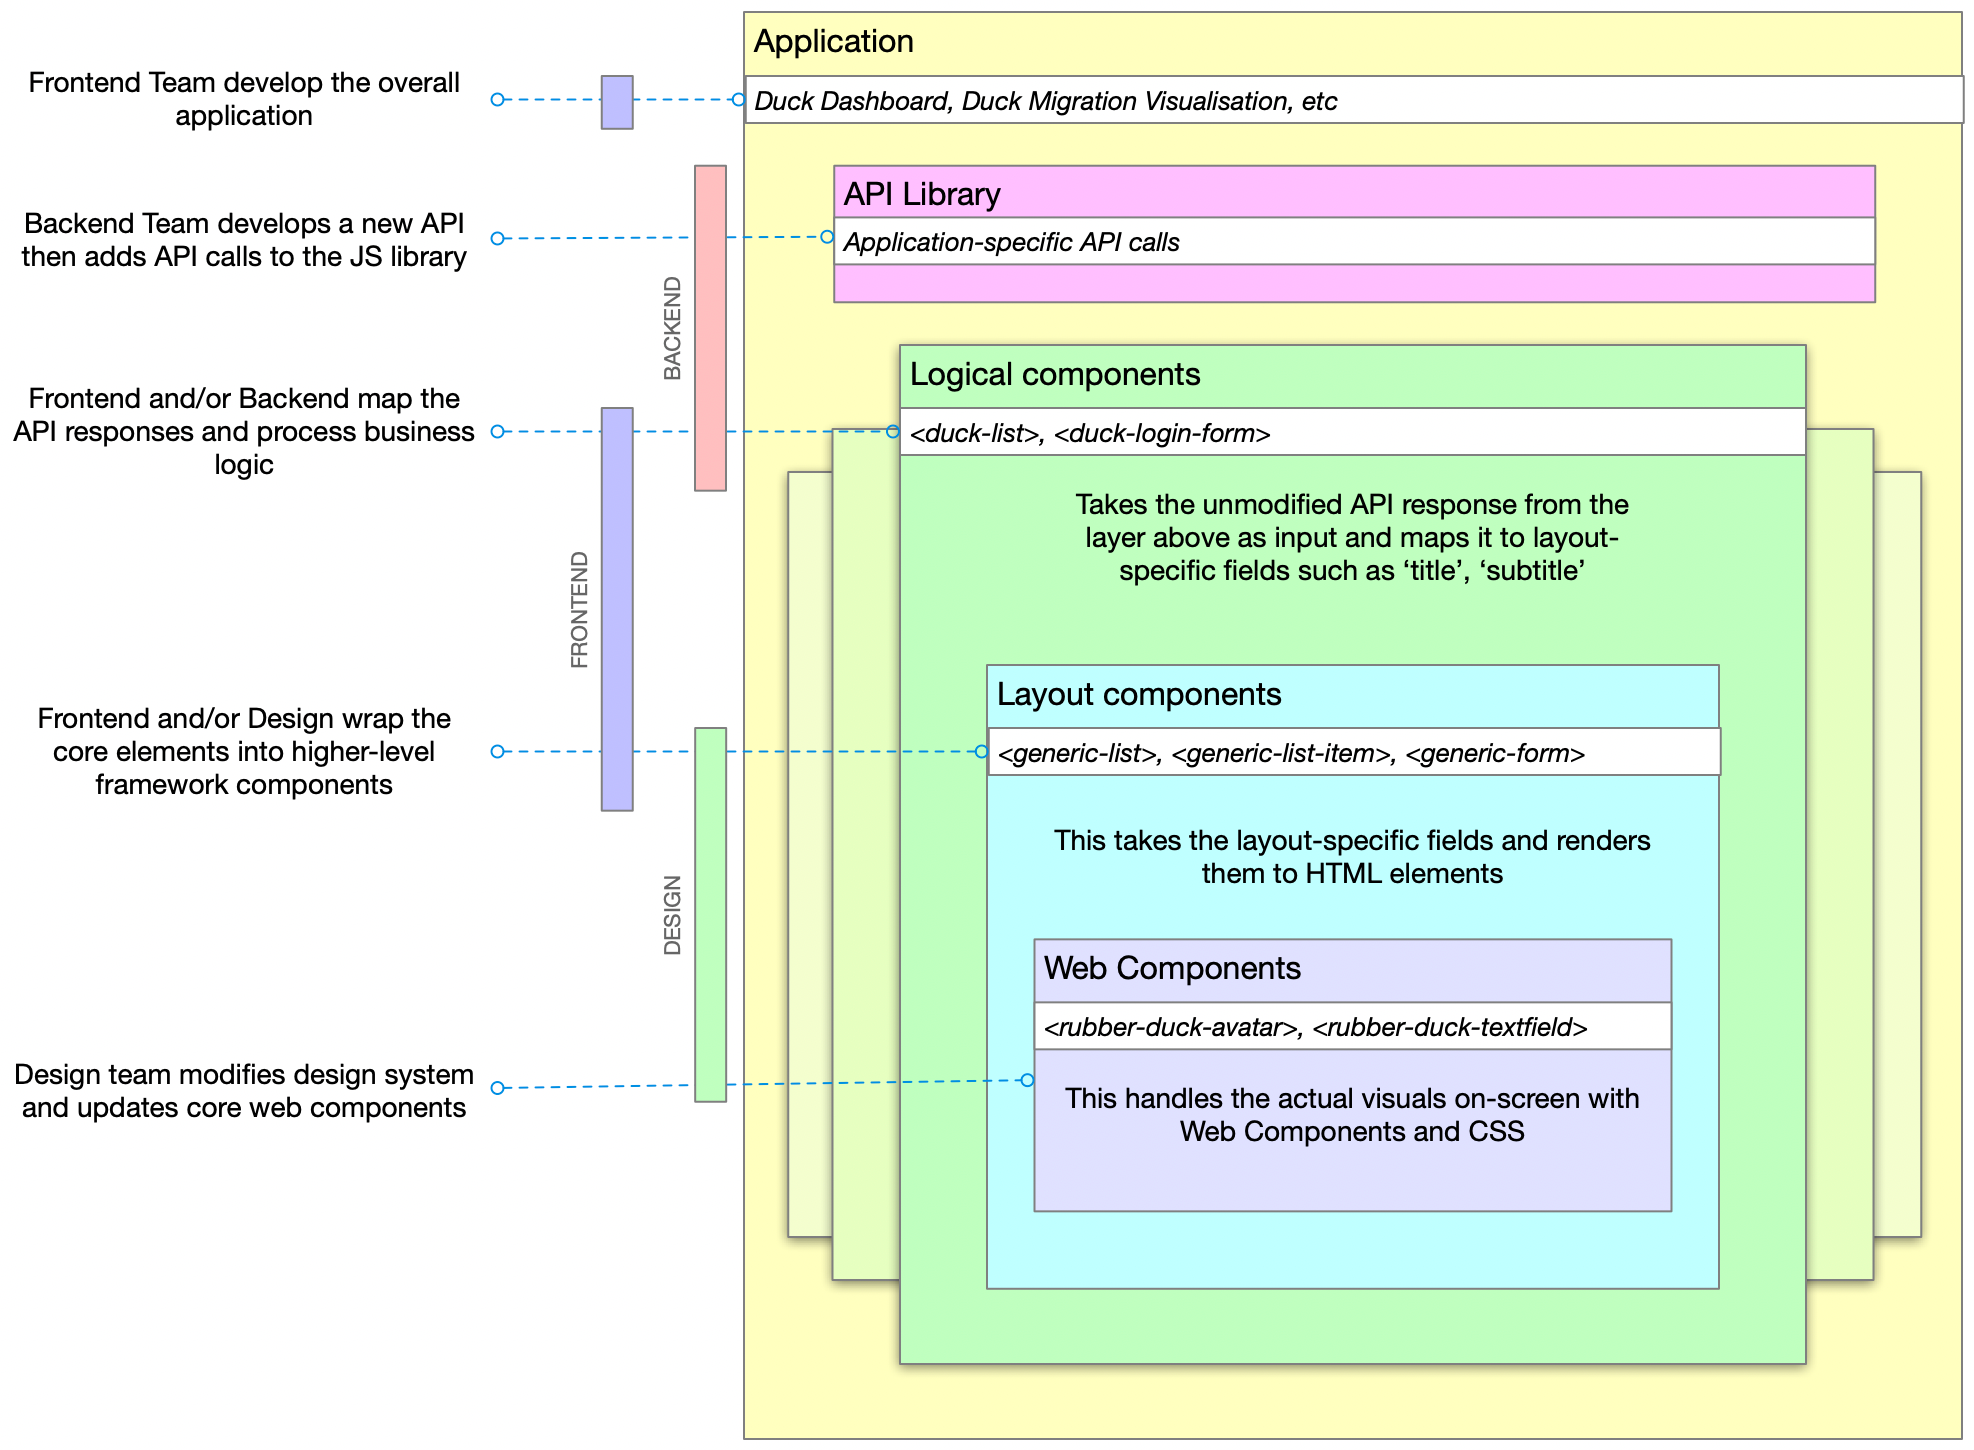
Application Layers
On recent web app projects in HERE Tracking, I've been using a layered component structure that fits particularly well with frontends that access and interact with JSON APIs.
The primary reason for structuring our apps this way is that it gives us a lot of freedom in our workflow and still fits well within the larger HERE structure with horizontal design teams that align across the multiple products. This works as a way to enable parallel contributions from everybody across the engineering teams.
The layers are:
- Application
- Library (JS library to access the API)
- Logical (maps business objects to layout concepts)
- Layout (renders layout components)
- Components (low level elements and design)
And, generally, these layers are within the areas of expertise of the Backend, Frontend and Design specialists.
It shouldn't be necessary to say this but just to make sure I'm not misunderstood: it's important to note that none of these roles is limited to the scope below, this is just a general 'areas of expertise' guide. See my previous post about shared responsibilities.
- Backend teams create the API and implement the JS library. If possible, also implement the basic logical component which performs whatever business logic is required.
- Frontend teams build the application out of components, further maintain the logical components and the mapping between logical and layout components
- Design teams implement the core web components and company-wide design system of UX, UI, mental models, etc. This layer can also be based upon an open-source design system such as Carbon or Material.
Of course, the backend team can modify the web components if they have the inclination just as the design team couuld make improvements to the database if they are able to improve the product.
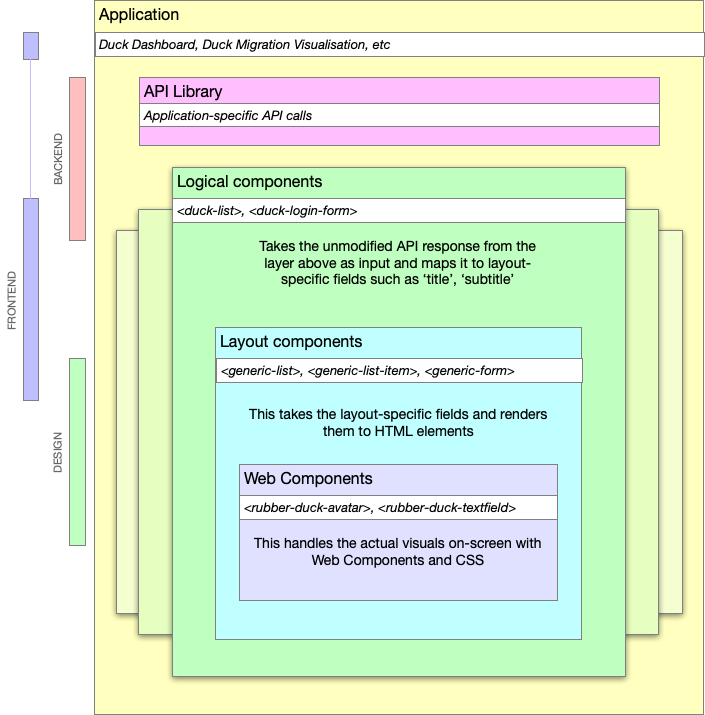
Example
NOTE: The example below is mostly Vue-like but this layered approach doesn't rely on any framework, language or coding style. It's a way to split and share responsibilities.
Rubber Duck Inc. make GPS-enabled rubber ducks. They have a dashboard where customers can see the location of their ducks. The dashboard includes an overview list of ducks.
Backend
The Backend team extend the Duck definition (stored in their duck-ument database) to include a new 'icon' field then update the
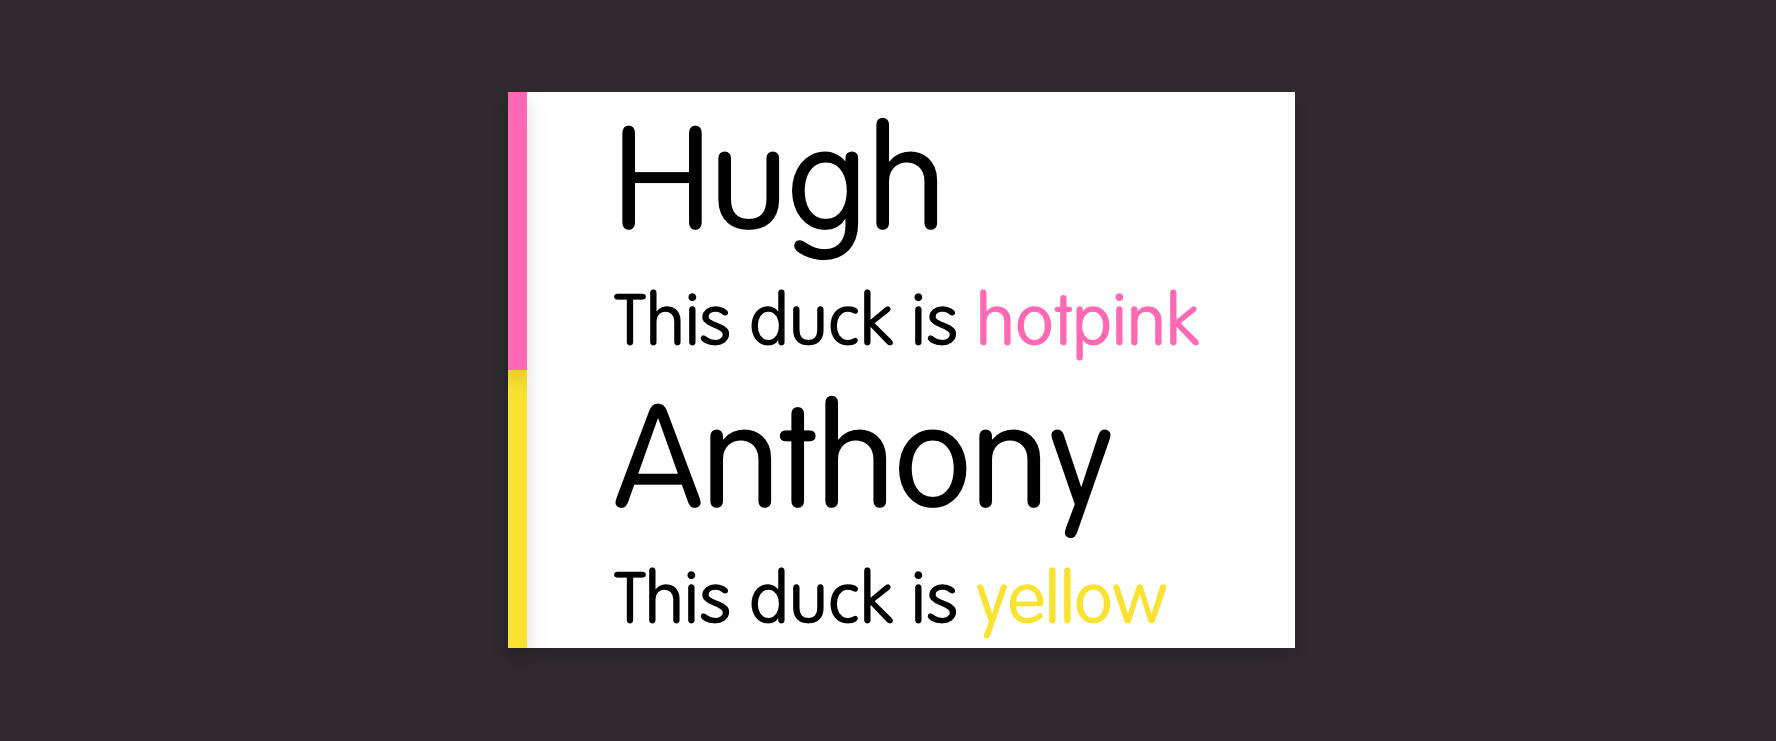
GET /ducksendpoint that allows you to receive a list of all the ducks you own.Sample response:
{
  "data": [{
    "id": 123,
    "name": "Hugh",
    "colour": "hotpink,
    "icon": "star",
  }, [{
    "id": 321,
    "name": "Anthony",
    "colour": "yellow",
    "icon": "dot",
  }],
  "count": 2
}
They check to see if the JS library needs updating (if they are using automated code generation, this might already be done). It doesn't, it already returns the full
dataarray of the response:fetch(`${api}/ducks`) .then(response => response.json) .then(json => json.data)The data is rendered in the web app using a logical web component
<duck-list :ducks="ducks"/>The engineer digs one step deeper (into the 'logical' or 'application components' library) and sees that the
duck-listcomponent wraps thegeneric-listcomponent but with a few modifications to the data structure.<template> <generic-list :items="items"/> </template> <script> : props: { ducks: Array, }, data() { return { items: this.ducks.map(duck => ({ title: duck.name, subtitle: `This duck is ${duck.colour}`, })) }; }, : </script>And then modifies it to also pass the icon into the
generic-listso that each item looks like:{ title: duck.name, subtitle: `This duck is ${duck.colour}`, icon: duck.icon }Frontend
In a parallel task, the frontend specialist can be improving the
generic-listcomponent. This component doesn't do much except create a set ofgeneric-list-itemelements.<template> <ul> <generic-list-item for="item in items" :item="item"> </ul> </template>Each
generic-list-itemis built from basic web components from the company's DuckDesign language:<template> <li> <rubber-duck-title>{{title}}</rubber-duck-title> <rubber-duck-subtitle>{{subtitle}}</rubber-duck-subtitle> </li> </template>Frontend can then improve this to take advantage of the new data structure. Handily, there's a
rubber-duck-avatarcomponent. That should work here:<template> <li> <rubber-duck-avatar if="icon">{{icon}}</rubber-duck-icon> <rubber-duck-title>{{title}}</rubber-duck-title> <rubber-duck-subtitle>{{subtitle}}</rubber-duck-subtitle> </li> </template>Design
So close, except the alignment's not quite right... Frontend has a chat with design and they decide that, while this could be solved in the
generic-list-itemcomponent (or even in theduck-listor the application layer), having an icon next to a title is a more generic requirement so it should be solved in the lowest design component layer:rubber-duck-avatar + rubber-duck-title { margin-left: 0; }Design tweaks the alignment of the
rubber-duck-avatarcomponent and deploys it company-wide to all product teams. Every team benefits from the shared library, the DuckDashboard team gets to show off their new duck icons, everybody helped complete the product story and nobody got hurt.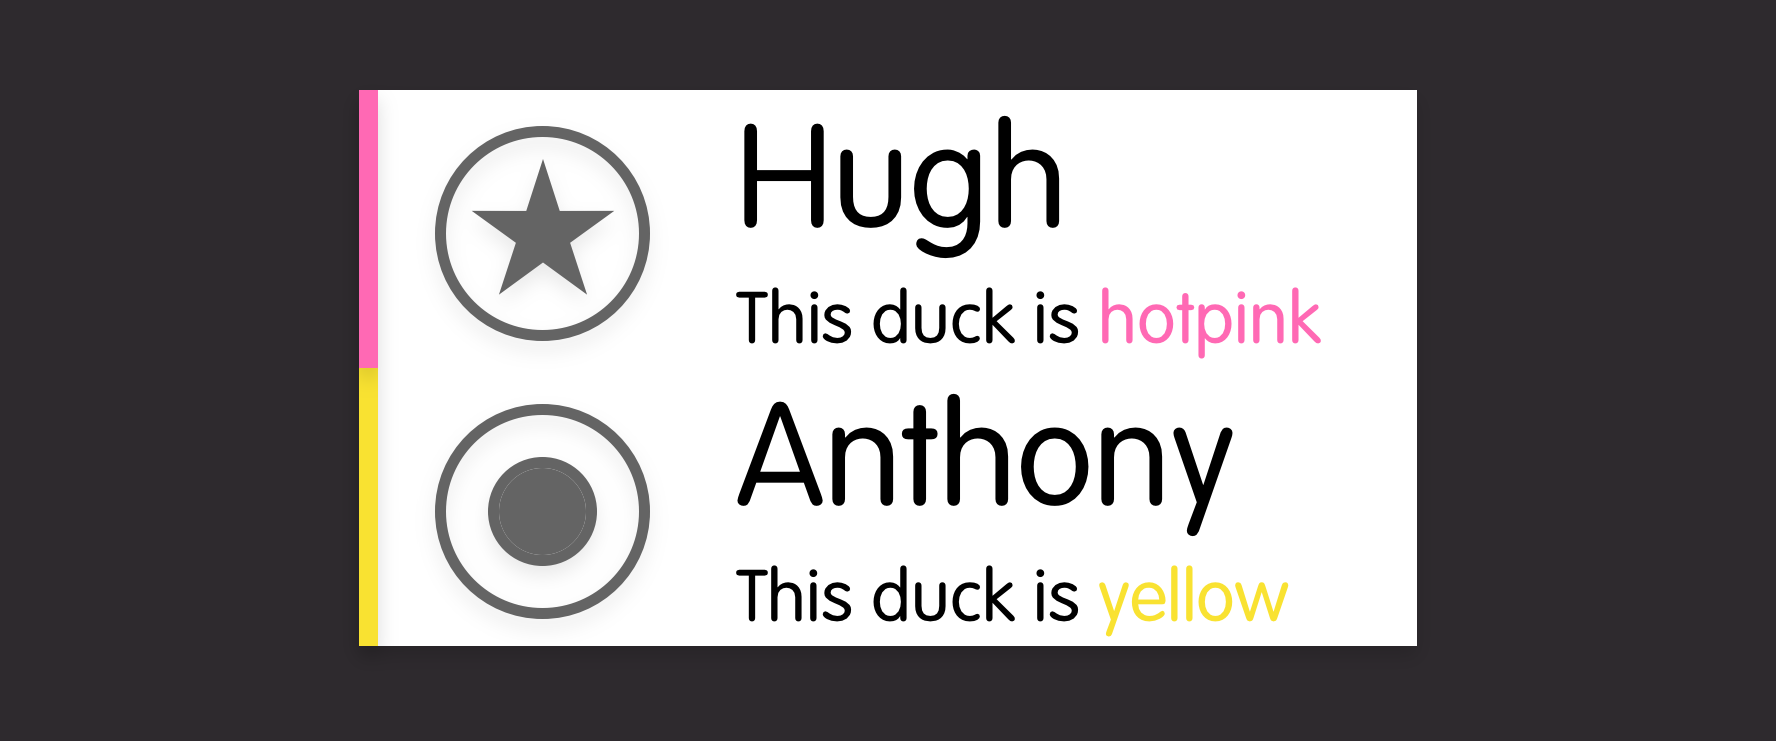
Conclusion
Admittedly, this does lead to having multiple individual repositories for a single application
- dashboard-app
- duck-api.js
- dashboard-components
- layout-components
- duck-design-web-components
But it does give each team the flexibility to contribute beyond their core area and not be blocked by other teams.
Let me know what you think or how you'd improve it. Do you already use an approach like this?