I was playing around with the flick keyboard from the last post and decided that I could do with a way to draw the cube. There are plenty of existing cube render tools out there (https://codepen.io/Omelyan/pen/BKmedK, http://joews.github.io/rubik-js/, https://cubing.net/api/visualcube/) but I felt like making my own because I needed something to do with my hands while watching the second season of Dead To Me.
What came out was a self-contained web component using CSS variables, fallback styles and calculations to produce a nicely customisable element:
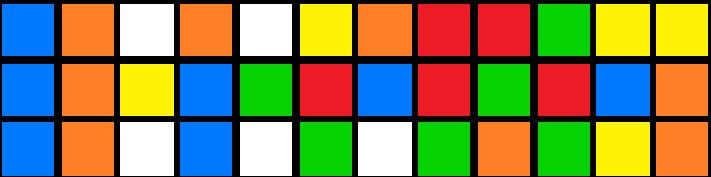
Default cube
<flat-cube facelet="UUUUUUUUURRRRRRRRRFFFFFFFFFDDDDDDDDDLLLLLLLLLBBBBBBBBB" />Scrambled with "M' U F R E R E2 M' U' M' F2"
<flat-cube facelet="BDDFBFUURDRBUUBLDULLFULRDUFLBUDFRDDFRLBRDFLLFRFULRBRBB" />Same again but with different colours:
:root {
--flat-cube-up: blanchedalmond;
--flat-cube-left: orangered;
--flat-cube-front: lawngreen;
--flat-cube-right: rebeccapurple;
--flat-cube-back: dodgerblue;
--flat-cube-down: darkslategrey;
--flat-cube-inner: white;
--flat-cube-outer: white;
}
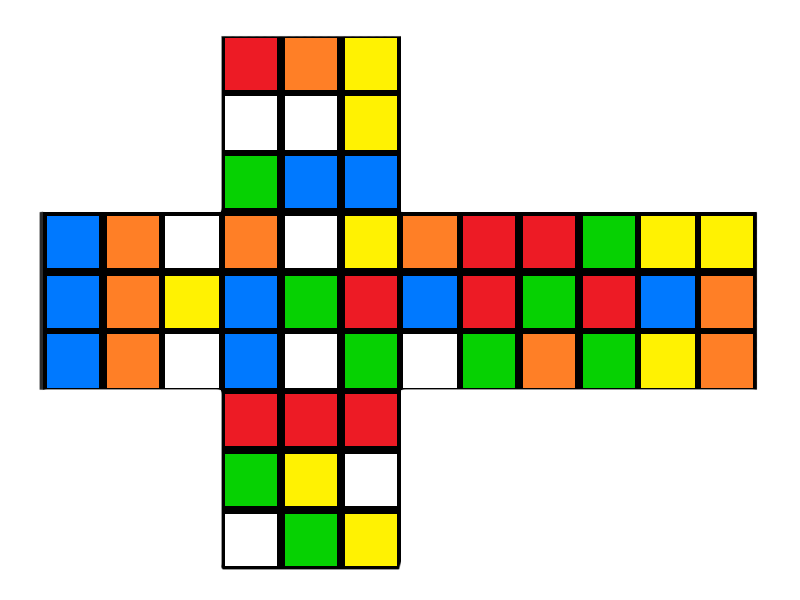
}The configuration of the pieces is defined by a "facelet" string. This is a way of representing a configuration of a 3x3 twisty puzzle by enumerating the faces like this:
             +------------+
             | U1  U2  U3 |
             |            |
             | U4  U5  U6 |
             |            |
             | U7  U8  U9 |
+------------+------------+------------+------------+
| L1  L2  L3 | F1  F2  F3 | R1  R2  R3 | B1  B2  B3 |
|            |            |            |            |
| L4  L5  L6 | F4  F5  F6 | R4  R5  R6 | B4  B5  B6 |
|            |            |            |            |
| L7  L8  L9 | F7  F8  F9 | R7  R8  R9 | B7  B8  B9 |
+------------+------------+------------+------------+
             | D1  D2  D3 |
             |            |
             | D4  D5  D6 |
             |            |
             | D7  D8  D9 |
             +------------+
For example, a solved cube is represented by:
UUUUUUUUURRRRRRRRRFFFFFFFFFDDDDDDDDDLLLLLLLLLBBBBBBBBBWhile the scrambled version shown above is:
BDDFBFUURDRBUUBLDULLFULRDUFLBUDFRDDFRLBRDFLLFRFULRBRBBI chose this representation purely because I've seen it used in other cube modelling projects.
In my demo page, I include the https://github.com/ldez/cubejs library and use that to translate move strings into facelet strings. It would be possible to include this directly in the web component and would improve the usability at the cost of a bit of extra complexity inside the component. That would allow using the component like this:
<flat-cube moves="M' U F R E R E2 M' U' M' F2" />Which does look nicer.
Style
Throughout the component, I have tried to use CSS variables and the calc function as much as possible to allow the component to be restyled and scaled as needed while offering sensible fallbacks.
For example, the styles to define a face include a calculated size with a fallback:
:host {
  --flat-cube-face-width: var(--flat-cube-face, 100px);
}
.face {
  height: var(--flat-cube-face-width);
  width: var(--flat-cube-face-width);
  outline: 1px solid var(--flat-cube-outer, black);
}
While the faces each have a CSS variable to allow styling them along with a fallback:
.U-piece {
  background-color: var(--flat-cube-up, #ebed2b);
}