


-
-
Personalised Podcasts
I've been working on a fun little side project for a while – The Morning Briefing: a personalised podcast.
I listen to a lot of tech and business news podcasts but something like Morning Brew Daily works on the US news cycle. I wanted a morning show that was ready for whenever o'clock in the morning you get up in your country.
After learning about NotebookLM, I set about wrangling a herd of LLMs, TTSs and RSS and came up with a proof-of-concept "Podcast on Demand". I can pick the virtual presenters, they discuss the latest stories from whatever topics I've subscribed to, add in a bed of music and I've got a customised podcast ready for me when I wake up.
And it all runs locally without using OpenAI or Google!
Here's a podcast from a couple of months ago:
-
Teaching a New Dog Old Tricks
What do Prince of Persia, Apollo 11, and Spacewar! have in common?
They were built by geniuses, powered by sheer grit, and written in programming languages that have mostly been buried with floppy disks and punch cards. They’re ancient, brittle, and borderline unreadable by modern standards—and yet, they’re masterclasses in creative problem-solving. The kind of code that teaches you how to think, not just how to import a library.
One of the reasons I enjoy building Komment is that I get to use it to read these projects without having to dust off old Assembly references – I don’t have to be fluent in Pascal, 6502 Assembly, or ye olde pre-ANSI C to learn from them.
⸻
🕰 Why Old Code Still Has Something to Teach Us
We tend to think the past has nothing for us—especially in tech. Everything moves so fast. New frameworks, new languages, new “best practices” every 18 months.
But when you look at the code behind something like the original Prince of Persia, you see a developer solving incredibly hard problems with almost no resources. No GPU. No high-level abstractions. Just a few kilobytes and some really clever hacks.
Studying that codebase is like looking at a stunning cathedral. Then getting closer and seeing it's built with lego. Then getting closer and seeing that the lego bricks were hand carved.
The codebase has some clever things to learn from but it’s like trying to learn German by sitting down with a copy of Goethe printed in Fraktur. It’s possible. But it’s going to take a long time to figure out what's actually going on.

The Problem with Legendary Codebases
Here’s the experience of trying to learn from one of these classic codebases:
- You download the repo. It’s full of files with extensions you’ve never seen.
- The comments are in all caps. Some are in French. Some lie.
- There’s no structure. No docs. Just a cryptic main loop and prayer.
You want to understand the sprite engine. Instead, you’re 400 lines deep in something called MOVE.S that appears to control both jumping and wall collisions and maybe the music system? It’s chaos. Beautiful, historical chaos.
Enter Komment: The Code Archaeologist’s Toolkit
One of my favourite things to do with Komment is point it at one of these projects and have the system parse the codebase and turn it into something much easier to grok.
And it comes with diagrams
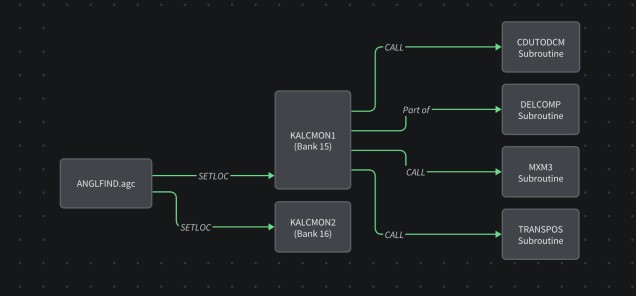
🕹 Case Study: Following the Flow of Spacewar!
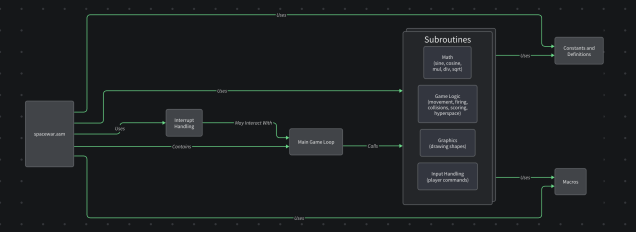
Take Spacewar!—one of the earliest digital games, built in 1962. It was designed on a PDP-1, a machine that predated basically everything except carbon.
I threw it into one of our pipelines and got out a breakdown of how it does what it does.
You’re no longer staring into the abyss. You’re walking through the code like a museum exhibit, with a helpful guide whispering in your ear.
Check out the Spacewar! wiki on Komment
-
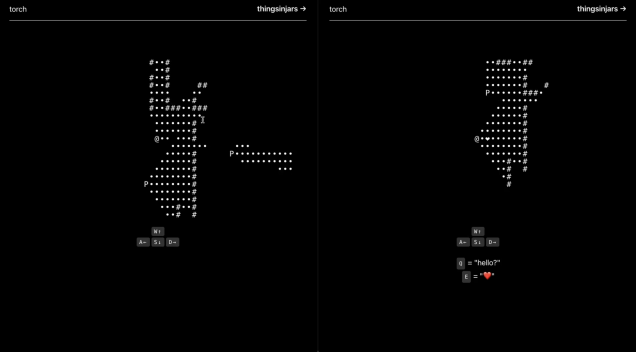
Torch? Again?
It must be re-run season.
After recently rebuilding Torch in ASCII using Phoenix and Elixir, I was inspired to do it yet again but with the original ray-casting-on-canvas look.
This is a super-simple express server with websockets and in-memory state. The more complicated multi-player raycasting makes a return this time though (no list comprehension shortcuts when we're doing it this way, unfortunately.
I still think there's some fun to be had in this game and maybe in another 15 years or so, I'll rebuild it again.
Github Repo: https://github.com/thingsinjars/torch-js
-
Torch in Phoenix
In an old, old callback, I decided to revisit a game design from… almost 14 years ago?!
I was looking for an excuse to play with Elixir and Phoenix and decided the best thing to do would be grabbing an old idea and throwing some new tech at it.
And, to mix things up, why not restyle it to look like a very old idea?
Using ASCII for this meant that I could actually do a lot of the visibility and ray casting using simple list comprehension (i.e. intersect all other player's 'lighted' cells with the current player's 360 ray cast visibility)
Github Repo: https://github.com/thingsinjars/torch
-
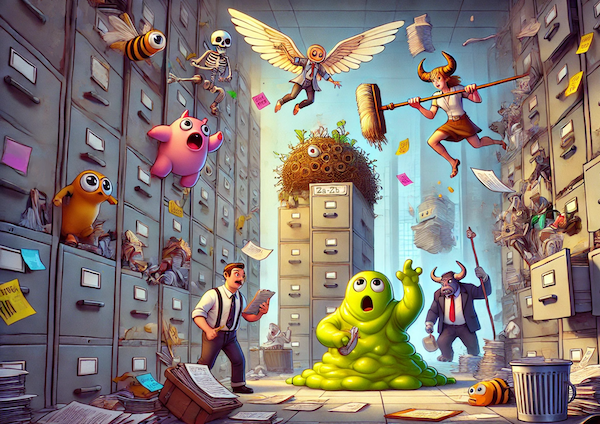
Monster Coffee Break
I wrote an RPG Adventure Guide.
I've been having fun recently with Lasers & Feelings and initially just wanted to make a quick little hack based in a fun and colourful world. Ideas turned into notes turned into scenarios turned into enhancements...
Long story short, I ended up with a 30 page adventure guide, two conflict mechanics, a bunch of set pieces and inspiration and a load of colourful characters.

Monster Coffee Break combines RPG, fantasy and comedy horror tropes with the heady and intoxicating world of corporate bureaucracy.
MonsterCorp is a sprawling corporate office catering to all kinds of monsters, from goo blobs to banshees to vampire bats. Employees run everything from nightmarish supply chains to scream-powered HR seminars.
The office is absurdly bureaucratic. Monsters need forms, signatures, and permits for everything.
This is definitely not a full RPG system. It just grew out of my own notes while playing with Lasers & Feelings. It's meant to inspire your own game, provide some interesting ideas and generally be a bit daft.
Some things might not make sense, some might not work. That's fine, just roll with it.
Aside: I then used the opportunity to create a simple little one-page website for it and throw in some fun CSS to do with scroll snapping.
-
Snex – Multiplayer Snake
It's been a few years since I built anything in Elixir so I decided this weekend to refresh my memory.
Rather than build yet another location-based API, I decided to try a game.
Combining super-simple gameplay and Phoenix Channels, I eventually ended up with Snex - Multiplayer Snake.

On page load, you are assigned a random session ID so you can copy-paste the URL and share it with any one to play on the same board.
I've currently got it deployed on Gigalixir.
The performance on the deployed version isn't great due to network latency. Essentially, the game ticks every 100ms and sends an update to each player so if you're moving left then press down, typically the server will process one more
leftevent before yourdownarrives. There are plenty of blog posts about handling latency, not just in multiplayer online games but also specific discussions on multiplayer online snake. I decided I could either dig into refreshing my knowledge of that or stick with refreshing my knowledge of Elixir and Phoenix. I went with the latter. -
Operations: A Maths Game
Operations
1+ players
The aim is to get the highest number possible after using each of your tokens.
There is 1 die
Each player has 4 tokens with different symbols on:
+−×÷Each player rolls the die and the number they get is their starting number.
Lowest score starts. If there's a draw, youngest of those starts.
Each round:
- Roll the die
- Choose one of your operations.
- Perform your operation with the new number and your existing number. Try to get the highest score
- Discard your operation token. You only get to use each operation once.
Note: When the calculation is a division with a remainder, you can either discard the remainder or continue with decimals, depending on who is playing.
Example game:
2 players.
A rolls 2, B rolls 3. A has the lowest starting number so they start
- Round 1
- A rolls a 4. They decide to use their
+operation. They now have 6. - B rolls a 1. They use their
÷. They still have 3.
- A rolls a 4. They decide to use their
- Round 2
- A rolls 6. They use their
×. They have 36. - B rolls 5. They use their
×. B now has 15
- A rolls 6. They use their
- Round 3
- A rolls another 6. They've already used their
×so they have to either subtract 6 or divide by 6. They use−. They have 30 - B rolls 2. They
+it. B has 17
- A rolls another 6. They've already used their
- Round 4
- A rolls another 6! Now they only have their
÷left. They have to divide 30 by 6. Now they have 5. - B rolls 3. They have their
−left. B has 14.
- A rolls another 6! Now they only have their
B wins.
Variations
- For advanced maths, add in the power and root symbols
^√ - Try to get the lowest score instead of the highest.
- Try to get the lowest score without going below zero.
-
Pi-ku
A what? A pi-ku?
To quote Maths Week Scotland:
A pi-ku is a poem that follows the form of a haiku, but instead of the 5-7-5 haiku pattern, the syllables in a pi-ku follow the number of digits in the mathematical constant pi (π).
So, instead of 5-7-5, a pi-ku would follow the pattern 3-1-4 (-1-5-9-2…etc.)
Of course, I couldn't avoid having a go myself, could I?
Approximation of Pi
Pi is three
Well...
Three and a bit.
…ish.
The 'bit' is quite small.
Full-time Score of the Final of the World Circle Geometry Ratio Tournament 2023
Radius:
2
Diameter:
1
Subjectively Reviewing areas of Mathematics
Algebra?
Fine.
Geometry?
Fun.
Trigonometry?
Partial Differential Equations?
Both Good.
Fractal Geometry?
Looks simple at first.
Gets... tricky
When you look closer.
Marginal
Fermat's Last?
Gasp!
I Found a Proof!
Which,
Unfortunately...
This poem is too short to contain. -
RFID Timesheet
I've done a lot of projects over the holidays. This is a quick collection of notes to remind myself later.
I used an RC522 RFID scanner (originally part of a Tonuino project) and wired it to a Particle Photon. Whenever an RFID tag was held to it, it would publish an event containing the ID of the card to the Particle Cloud. When the card was removed, it would publish a blank event. This is the code from the Photon:
// Photon   RFID-RC522
//   A2         SDA
//   A3         SCK
//   A4         MISO
//   A5         MOSI
//   D2         RST
//   GND        GND
//   3V3        3.3V

#include
#include

#define LED_PIN     D7

constexpr uint8_t RST_PIN = D2;          // Configurable, see typical pin layout above
constexpr uint8_t SS_PIN =  A2;           // Configurable, see typical pin layout above

MFRC522 mfrc522(SS_PIN, RST_PIN);  // Create MFRC522 instance

uint32_t lastMillis = 0;
bool wasPresent = false;

void setup() {
    pinMode(LED_PIN, OUTPUT);
	Serial.begin(9600);		// Initialize serial communications with the PC
	while (!Serial);		// Do nothing if no serial port is opened (added for Arduinos based on ATMEGA32U4)
	SPI.begin();			// Init SPI bus
	mfrc522.PCD_Init();		// Init MFRC522
	mfrc522.PCD_DumpVersionToSerial();	// Show details of PCD - MFRC522 Card Reader details
	Serial.println(F("Scan PICC to see UID, SAK, type, and data blocks..."));
}

void loop() {
	// Look for new cards
	if ( ! mfrc522.PICC_IsNewCardPresent()) {
	    if(wasPresent) {
	        if(! mfrc522.PICC_IsNewCardPresent()) {
	          Serial.println("No card");
	          Particle.publish("rfid_scan", "", 60, PRIVATE);
	          wasPresent = false;
	        }
	    } else {

	    }
		return;
	}

	// Select one of the cards
	if ( ! mfrc522.PICC_ReadCardSerial()) {
		return;
	}

    char cardID[32] = "";

    for (byte i = 0; i < mfrc522.uid.size; i++) {
     char hex[4];
     snprintf(hex, sizeof(hex), "%02x", mfrc522.uid.uidByte[i]);
     strncat(cardID, hex, sizeof(cardID));
    }

    if (millis() - lastMillis < 1000) {
        return;
    }
    lastMillis = millis();

	if(!wasPresent) {
	    wasPresent = true;
	    Particle.publish("rfid_scan", cardID, 60, PRIVATE);
	    Serial.printlnf("Card: %s", cardID);

	    // Turn on the LED
	    digitalWrite(LED_PIN, HIGH);

	    // Leave it on for one second
	    delay(1s);

	    // Turn it off
	    digitalWrite(LED_PIN, LOW);

	    // Wait one more second
	    delay(1s);
	}

	// Dump debug info about the card; PICC_HaltA() is automatically called
	//mfrc522.PICC_DumpToSerial(&(mfrc522.uid));
}
I then used IFTTT to read these events and write them to a Google Spreadsheet. This is the IFTTT Excel code:
{{CreatedAt}} |||{{EventContents}}||| =IF(ISODD(ROW()), "Started", "Stopped") ||| =IF(ISEVEN(ROW()),ROUND(((DATEVALUE(REGEXEXTRACT(INDIRECT(ADDRESS(ROW(),COLUMN()-3,4)), "w+ d{2}, d{4}")) + TIMEVALUE(REGEXEXTRACT(INDIRECT(ADDRESS(ROW(),COLUMN()-3,4)), "d{2}:d{2}[A|P]M$"))) - ( DATEVALUE(REGEXEXTRACT(INDIRECT(ADDRESS(ROW()-1,COLUMN()-3,4)), "w+ d{2}, d{4}")) + TIMEVALUE(REGEXEXTRACT(INDIRECT(ADDRESS(ROW()-1,COLUMN()-3,4)), "d{2}:d{2}[A|P]M$")))) * 24, 2),"")|||
=IFERROR(VLOOKUP(INDIRECT(ADDRESS(ROW(), COLUMN()-3),4), I$3:J$10, 2, FALSE), "")
We now have a physical time tracker that can be used to log time spent on individual projects. Super-handy for Jenni's freelance work.
-
IoT Button
I've done a lot of projects over the holidays. This is a quick collection of notes to remind myself later.
I took the insides out of an old IKEA Spøka nightlight and squeezed in a Particle Photon, a battery shield and a battery then soldered the nightlight's on/off switch onto some jumper cables and wired that in. I now have an internet-connected button that looks cute.

Still no idea what to do with it but it’s fun.
Here's the code that's running on the Photon:
int led = D7; // Built-in LED
int pushButton = D6; // Old Spøka momentary switch
bool wasUp = true;
void setup() { pinMode(led, OUTPUT); pinMode(pushButton, INPUT_PULLUP); }
void loop() { int pushButtonState;
pushButtonState = digitalRead(pushButton);
if(pushButtonState == LOW) { // If we push down on the push button digitalWrite(led, HIGH); // Turn ON the LED if(wasUp) { Particle.publish("Spooky pressed"); wasUp = false; } } else { digitalWrite(led, LOW); // Turn OFF the LED wasUp = true; }
}
When you press the button, you get a message published to the Particle Cloud.
-
HERE Maps Web Component
At the weekend, I found myself starting another little side project that needed a map. And, predictably, I chose to use a HERE map.
In my day job, I use a lot of Vue but I do tend to prefer web components where possible, wrapping them in Vue only where necessary. This, then, is the natural outcome:
Now I can embed HERE maps with a single web component.
<here-map api-key="1234-54321"
  latitude="52.5"
  longitude="13.4"
  zoom="12"
></here-map>
Or include markers directly:
<here-map api-key="1234-54321" latitude="52.5" longitude="13.4" zoom="12"> <here-map-marker latitude="52.5" longitude="13.4" /> <here-map-marker latitude="52.501" longitude="13.405" icon="https://cdn3.iconfinder.com/data/icons/tourism/eiffel200.png" /> </here-map> -
Tape EP
I've been on a bit of a 70s/80s funk/soul organ thing recently. Think 'Vulfpeck' plays the 'Theme from Hill Street Blues'…
-
Using Web APIs to generate music videos

Plan
A very simple web app that generates a music visualisation from an audio file and renders it to a downloadable movie file. Most importantly, it does this all on the client side.
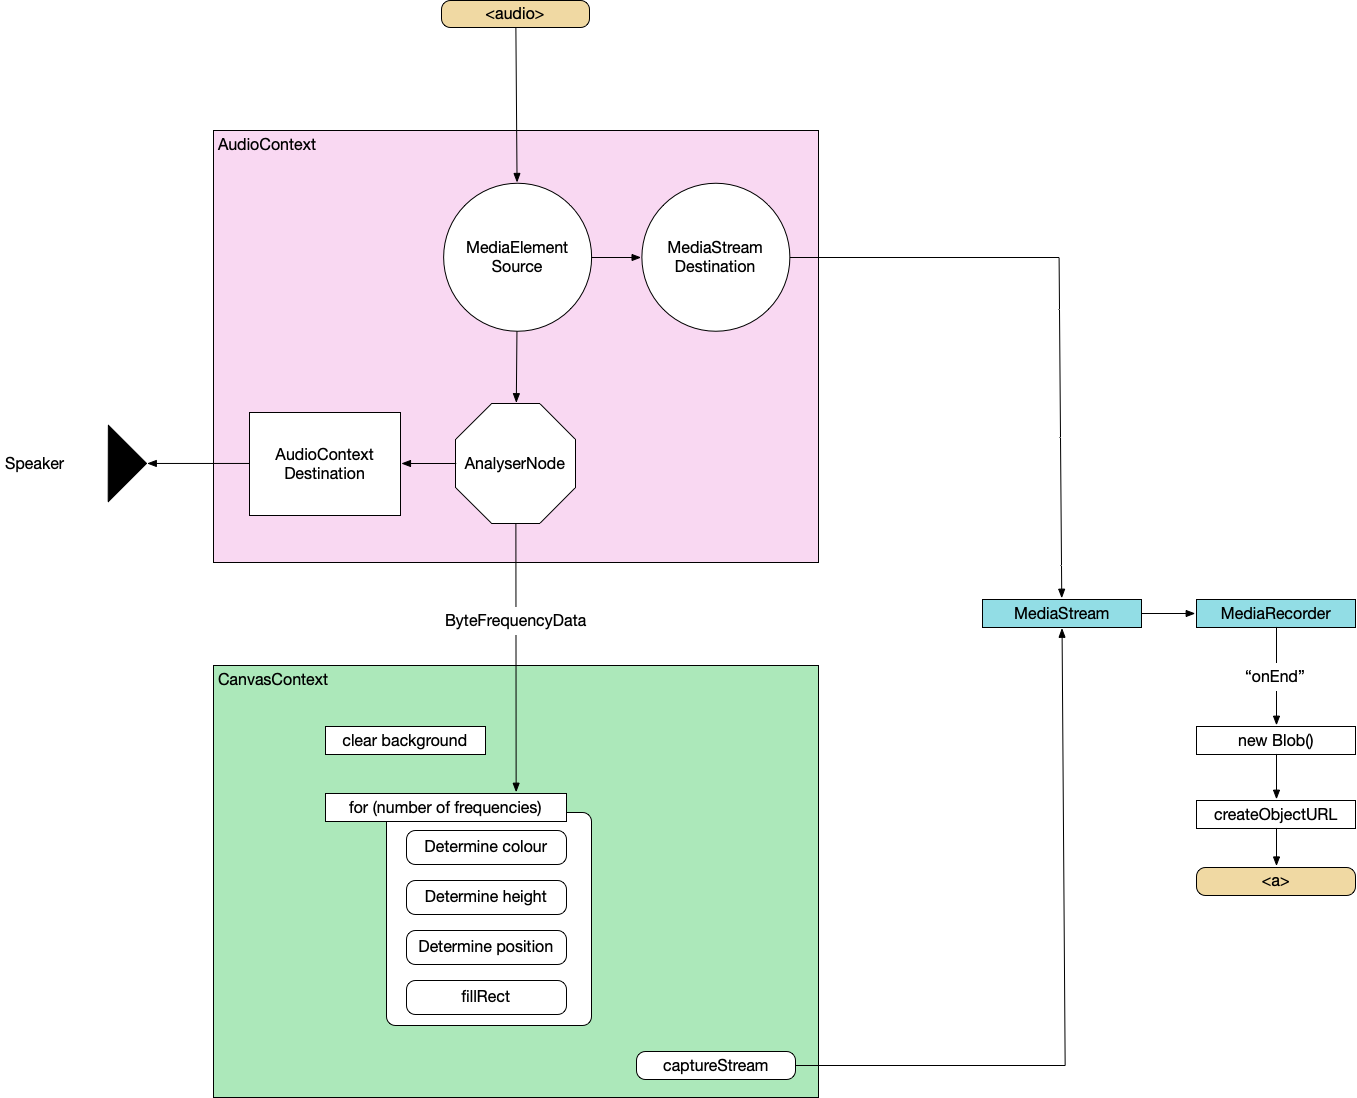
To do this, we'll combine the Web Audio API, Canvas API and MediaStream Recording API. I'll not be providing the complete source code as we go through it but just enough to point you in the right direction.
For more detail, I recommend the following:
I've used this as the basis to create all the music videos for my next album. You can see examples in my previous post.
TL;DR
Here's the complete architecture of what we're building:
And here's the finished build: All-In-One Music Visualiser
Basic HTML
First, let's just set up some basic HTML to show the visualisation, hold the audio and take in some parameters.
<canvas></canvas>
<audio controls></audio>

<label>Track title:
  <input type="text" id="track" placeholder="Track title">
</label>
<label>Artist name:
  <input type="text" id="artist" placeholder="Artist name">
</label>
<label>Audio File:
  <input type="file" id="file" accept="audio/*" />
</label>
Read in audio file
const audio = document.querySelector('audio');
audio.src = URL.createObjectURL(document.querySelector('[type=file]').files[0]);
audio.load();
Web Audio API
Wire up Web Audio
Create an AudioContext, source the audio from the
<audio>element, prepare a streaming destination for later and connect theinto theout.const context = new AudioContext(); const src = context.createMediaElementSource(audio); const dest = context.createMediaStreamDestination(); src.connect(dest);Attach an analyser node
We want our visualisation to react to the music so we need to wire in an AnalyserNode. Thankfully, this handles all the complicated audio processing so we don't need to worry about it too much. We also attach the analyser to the destination node of the AudioContext so that we can hear it through the computer speakers. Not strictly necessary but it's nice to be able to hear what we're doing.
const analyser = context.createAnalyser();
src.connect(analyser);
analyser.connect(context.destination);
Prepare to sample frequency
the
fftSizeis essentially "How detailed do we want the analysis to be?". It's more complicated than that but this is all the detail we need for now. Here, we're using 64 which is very low but 512, 1024 and 2048 are all good. It depends on the actual visualisations you want to produce at the other end.The
smoothingTimeConstantis approximately "How much do we want each sample frame to be like the previous one?". Too low and the visualisation is very jerky, too high and it barely changes.analyser.fftSize = 64; analyser.smoothingTimeConstant = 0.8; const bufferLength = analyser.frequencyBinCount; // Prepare the array to hold the analysed frequencies const frequency = new Uint8Array(bufferLength);Finally grab the values from the
<input>elements.const titleText = document.querySelector("#track").value.toUpperCase(); const artistText = document.querySelector("#artist").value.toUpperCase();Canvas API
Now we do the standard canvas setup – grab a reference to the canvas, set our render size (doesn't need to be the same as the visible size of the canvas) and prepare a
2dcontext.Prepare Canvas
const canvas = document.getElementById("canvas");
canvas.width = 1280;
canvas.height = 720;
const ctx = canvas.getContext("2d");
Render loop
Execute this on every render frame.
function renderFrame() {
  // schedule the next render
  requestAnimationFrame(renderFrame);

  // Grab the frequency analysis of the current frame
  analyser.getByteFrequencyData(frequency);

  // Draw the various elements of the visualisation
  // This bit is easy to modify into a plugin structure.
  drawBackground(ctx);
  drawBars(ctx, frequency);
  drawText(ctx, titleText, artistText);
}
The various visualisation elements:
function drawBackground(ctx) {
  ctx.fillStyle = 'white';
  ctx.fillRect(0, 0, canvas.width, canvas.height);
}
function drawBars(ctx, frequency) { const widthOfEachBar = (canvas.width / frequency.length); // Loop over data array for (let i = 0; i < frequency.length; i++) { const heightOfThisBar = frequency[i]; // Base the colour of the bar on its index const h = 360 * index; // Base the saturation on its height const s = 100 * (heightOfThisBar/256); const l = 50; const color = `hsl(${h}, ${s}%, ${l}%)`; ctx.fillStyle = color; // Add a little shadow/glow around each bar ctx.shadowBlur = 20; ctx.shadowColor = color; // Draw the individual bar ctx.fillRect(x, canvas.height - heightOfThisBar, widthOfEachBar - 1, heightOfThisBar); x += (widthOfEachBar); } }function drawText(ctx, titleText, artistText) { ctx.fillStyle = 'white'; ctx.textAlign = 'center'; ctx.font = '4em sans-serif'; ctx.fillText(titleText, canvas.width/2, canvas.height/2 - 25); ctx.fillText(artistText, canvas.width/2, canvas.height/2 + 25); }By this point, we can load a supported audio file and see some pretty pictures reacting to the music.
MediaRecorder
This section is copied almost word-for-word from StackOverflow
First, we'll create a combined
MediaStreamobject from the audio data and the canvas data.const chunks = []; // here we will store our recorded media chunks (Blobs) const stream = canvas.captureStream(); // grab our canvas MediaStream let combined = new MediaStream([ ...stream.getTracks(), ...dest.stream.getTracks(), ]);Next, we start recording that data chunk-by-chunk. We'll save it as webm.
const rec = new MediaRecorder(combined, {
  audioBitsPerSecond : 128000,
  videoBitsPerSecond : 2500000,
  mimeType : 'video/webm'
});
When the recorder receives a chunk of data, store it in memory.
rec.ondataavailable = (e) => chunks.push(e.data);When we finish recording, combine the chunks and send them to an export method
rec.onstop = (e) => exportVid(new Blob(chunks, { type: "video/webm" }));
rec.start();
This is sometime necessary to avoid async timing issues when loading the audio data. It doesn't hurt, at least.
audio.addEventListener("durationchange", () => {
  setTimeout(() => rec.stop(), Math.floor(audio.duration * 1000));
}
The final video export. We convert the combined chunks (the Blob) into an object URL and create an anchor that lets us download it from the browser.
function exportVid(blob) {
  const a = document.createElement("a");
  a.download = "myvid.webm";
  a.href = URL.createObjectURL(blob);
  a.textContent = "download";
  document.body.appendChild(a);
}
This export call will be triggered after the audio has finished. You load an audio file, watch the visualisation play through, when it's finished, you click the download link and you get a webm.
So now, we have the basis for a complete music video generator – audio in, video file out.
Try the basic version out – All-In-One Music Visualiser.
Or watch a video generated using this basic version (as a bonus, this music was also automatically generated in the browser but that's a topic for another day):
Don't forget, you can also find me on Spotify.
-
Music Visualisation
While working on my next album (Minimum Viable Product of a Misspent Youth), I decided to have a go at building a music visualiser.
No particular reason why, I've just never done it before. It involves attaching a Web Audio API Analyser Node to a Canvas then outputting the whole thing using a MediaRecorder.
The next post has details on how the basics of this approach works and how to build your own and here are a couple of examples of the visualisations.
btw, while you're waiting, why not check out my previous albums on Spotify?
-
It’s A Ghost's Life
Here's a fun, spooky little song for Hallowe’en.
Writing the lyrics took about 5 minutes. Writing the music took another 5. Recording and mastering it took about an hour.
Making the darned Pac-Man maze inside Minecraft took about 6 hours. No joke.
I think this means I'm better at recording music than I am at playing Minecraft and I'm okay with that.
-
Awsm Street
My lovely other half and I have launched an online shop selling unisex kids' clothes:

The idea came about after child #1 complained about the clothes in the shops getting duller and more grey the older he got. One Skateboarding Unicorn sketch later and Awsm Street was born.
You can now find Highland Cow Hoodies, Porridge t-shirts and Kid-friendly day planners.
-
Same place, different time
This is the same tune recorded in two completely different styles.
Piano & double-bass:
Lo-fi hip-hop:
-
Stand in the Sunset
I decided to re-record an old tune.
-
Line-by-line: Flat Cube Web Component
Line-by-Line breakdowns go into excessive – and sometimes unnecessary – detail about a specific, small project. Be prepared for minutiae.
Here, I'll go through the FlatCube web component line-by-line. It is a single web component that draws a flattened-out representation of a Rubik's Cube (or other 3x3 twisty puzzle) based on a string passed in that describes the positions of the pieces. A cube contains six faces. A face contains nine pieces.
You'll probably want to have the full code open in another window to see this in context.
The component
Usage
<flat-cube facelet="UUUUUUUUURRRRRRRRRFFFFFFFFFDDDDDDDDDLLLLLLLLLBBBBBBBBB" />Line-by-line
First, all WebComponents must extend the
HTMLElementclass. If you're building with a library such as LitElement, you might extend a different class but that class will ultimately extendHTMLElement.class FlatCube extends HTMLElement {The
constructoris called every time a FlatCube element is created, not just once per page load.constructor() {We have to call the constructor on HTMLElement so that all the behind-the-scenes plumbing is taken care of.
NOTE: If we don't do this, we can't use
this.super();Now set up some internal variables for the FlatCube itself.
this.facesbecomes an array representing the order of faces in the facelet string.this.faces = 'URFDLB'.split(''); this.facelet = false;We attach the shadow DOM to this element so that we can access it easily during the
renderphase.this._shadowRoot = this.attachShadow({ mode: 'open' });Then we create the template (see below) and trigger the first render to actually show the element on screen.
    this.template = this.createTemplate();
    this.render();
 }
Style
It isn't essential to separate the component's
CSSinto another method but I like to do it to keep everything nice and tidy.style() {By using template literals, we can write a block of plain CSS.
return `The
:hostCSS selector references the element itself. It's kinda likethisbut in CSS.NOTE: It can only be used from inside the Shadow DOM
:host {I want this component to be able to be used inline or as a block item so I'm specifying
inline-block. If the context it ends up being used in requires it to be block, it's possible to wrap it in another element.display: inline-block;Skinning and scaling
In this web component, one of the main goals of the implementation was the ability to easily change the size of the component and the colours of the faces.
Luckily, CSS variables make it super easy to make components skinnable and the calc function is very useful for scaling.
The base measurement
All the dimensions – the full component width, the faces, the individual pieces – are multiples of the
--flat-cube-face-widthvalue. This is passed in from the containing CSS by specifying a value for--flat-cube-facebut if it is not specified, we want a fallback of100px.--flat-cube-face-width: var(--flat-cube-face, 100px); }Now the styles for the complete element. Set position to be
relativeso that we can absolutely position the individual faces..flat-cube { position: relative;And specify the element to be the height of 3 faces and the width of 4. This is where the
calcfunction comes in handy, especially in a web component intended to be reusable and seamlessly scalable.height: calc(3 * var(--flat-cube-face-width)); width: calc(4 * var(--flat-cube-face-width));I'm using
outlinerather than border for the lines between the pieces so I want to add a 1px margin around the outside to prevent clipping.margin: 1px; }Each individual face shares the same class
.face {Use the value passed in as the base measurement.
  height: var(--flat-cube-face-width);
  width: var(--flat-cube-face-width);
Each face is absolutely positioned inside the containing
.flat-cubeelement.position: absolute;But rather than specify exact positions for each individual piece in a face, we use flexbox to lay them out automatically. We draw the pieces in order then let them wrap onto the next line,
  display: flex;
  flex-wrap: wrap;
I wanted to specify the width of each piece as a simple ⅓ of the face width. In order to do that, I used
outlinerather thanborderasborderactually takes space in the element whereoutlinedoesn't.outline: 1px solid var(--flat-cube-outer, black); }These are simply the
topandleftpositions of the individual faces. We don't really need to go line-by-line here..U-face { top: 0; left: var(--flat-cube-face-width); } .L-face { top: var(--flat-cube-face-width); left: 0; } .F-face { top: var(--flat-cube-face-width); left: var(--flat-cube-face-width); } .R-face { top: var(--flat-cube-face-width); left: calc(2 * var(--flat-cube-face-width)); } .B-face { top: var(--flat-cube-face-width); left: calc(3 * var(--flat-cube-face-width)); } .D-face { top: calc(2 * var(--flat-cube-face-width)); left: var(--flat-cube-face-width); }Using the child selector to access the pieces inside the face.
.face > div {As I mentioned above, we want to calculate the width of the pieces simply as ⅓ of a face so we use
outline. The alternative would be to calculate the pieces as (⅓ of (the face width minus 2 * the internal border width)). That sounds mistake-prone.width: calc(var(--flat-cube-face-width)/3); height: calc(var(--flat-cube-face-width)/3); outline: 1px solid var(--flat-cube-inner, black); }Again, this is just colours. We don't need to go line-by-line. The only thing to note is that each piece has a fallback colour specified in case the containing application doesn't pass one in.
.U-piece {
  background-color: var(--flat-cube-up, #ebed2b);
}
.L-piece {
  background-color: var(--flat-cube-left, #ff6b16);
}
.F-piece {
  background-color: var(--flat-cube-front, #6cfe3b);
}
.R-piece {
  background-color: var(--flat-cube-right, #ec1d35);
}
.B-piece {
  background-color: var(--flat-cube-back, #4db4d7);
}
.D-piece {
  background-color: var(--flat-cube-down, #fffbf8);
}
And finally, we close off our template literal and end the
stylemethod.`; }Template
Now we build up the actual DOM of the element. We've done a lot of styling so far but, technically, we've nothing to apply the styles to. For that, we're going to build up the structure of faces and pieces then attach the styles.
structure() {At this point, we have a couple of choices. We can either build this structure once and update it or build it fresh every time we need to make a change. The latter is easier to write but the former has better performance. So let's do that.
This is the
createTemplatemethod we called in theconstructor. It is called only once for each instance of the component so we don't need to go through the whole building process every time.createTemplate() {First, create a new
template. Templates are designed for exactly this case – building a structure once and reuse it several times.const template = document.createElement('template');Then we attach the styles we defined earlier:
template.innerHTML = `<style>${this.style()}</style>`;And, finally, actually create the first element that actually appears in the component. This is the div that contains everything. We also add the
.flat-cubeclass to it.const cubeElement = document.createElement('div'); cubeElement.classList.add('flat-cube');The
this.facesarray we defined in the constructor comes back here. We loop over each face we require and create the DOM for it.this.faces.forEach((face, i) => {A
divto contain the face with the shared.faceclass for the size and the specific class for the position and colour –.U-face,.B-face, etc.const faceElement = document.createElement('div'); faceElement.classList.add('face'); faceElement.classList.add(`${face}-face`);Now we create the individual pieces. If we wanted to make this component customisable so that it could represent cubes with a different number of pieces(2x2, 4x4, 17x17, etc.), we'd use a variable here instead of
9.for (let j=0; j < 9; j++) {Now we call out to the preparePiece method (see below) without an element to make sure the piece has the right class assigned to it before we append the piece to the face.
        faceElement.appendChild(this.preparePiece(i, j));
      }
By the time we get here, we have a
facediv with 9piecedivs appended. Now we can add that to thecube.cubeElement.appendChild(faceElement); });Do that for each face and we have a div containing a completed
flat-cubewhich we can append to the template.template.content.appendChild(cubeElement);And return the template to the
constructor.return template; }Updating
Now we have the structure in a template, we can grab a copy of it any time we need to update the cube.
updateTemplate() {Passing
truetocloneNodemeans we get a deep clone (containing all the nested faces and pieces) rather than a shallow clone (just the top-level element).const update = this.template.content.cloneNode(true);We loop over each
faceand then each piece (div) in eachfaceto update it.update.querySelectorAll('.face').forEach((face, i) => { face.querySelectorAll('div').forEach((piece, j) => {We're using the same method here as we did to create the individual pieces (code reuse is A Good Thing) but this time we're passing in the piece we already have rather than asking the method to create a new one.
this.preparePiece(i, j, piece);The
updatevariable now contains an updated DOM representing the currentfaceletstring.}); }); return update; }This method takes the
i(index of the face) andj(index of the piece) we need to figure out which colour this piece needs to be. It also takes an optional argument ofpiece. If we don't provide that – the way we do in the initialcreateTemplatecall – piece will be a newly created div. If we do provide that argument, we'll update whatever is passed in instead.preparePiece(i, j, piece = document.createElement('div')) {We have to map the facelet string – default: "UUUUUUUUU...etc" – into the two-dimensional structure of faces and pieces. Okay, technically, it's a one-dimensional mapping of a two-dimensional mapping of a three-dimensional structure. But... let's just not.
    const start = (i * 9) + j;
    const end = (i * 9) + j + 1;
This means "If we don't have a facelet string, just colour the piece according to what face it is in, otherwise, colour it according to the i,j position in the facelet string".
piece.className = !this.facelet ? `${this.faces[i]}-piece` : `${this.facelet.slice(start, end)}-piece`;Once we've updated the piece, return it so it can be included in the content.
    return piece;
  }
We call this method in the constructor and every time we want to update.
render() {Empty out the element content
this._shadowRoot.innerHTML = '';And replace it immediately with the content we generate with the update method from above.
    this._shadowRoot.appendChild(this.updateTemplate());
  }
This is how we register the component to listen for changes. This getter returns an array listing the attributes we want to listen for.
static get observedAttributes() {There's only one attribute we care about listening to. Any change to the
faceletattribute will cause us to re-render.return ['facelet']; }The other part of registering for changes to the attributes. This is the handler that is invoked with the
nameof the changed attribute (useful when you're listening to a lot of attributes), theoldValue(before the change) and thenewValue(after the change).attributeChangedCallback(name, oldValue, newValue) {We only care about the
newValuebecause we've only registered a single listener and we don't need the oldValue.this.facelet = newValue;Then we trigger a new render to update the state of the element.
    this.render();
  }
And we close out our
FlatCubeclass.}Listening for events
The final part of the puzzle is to register our new element with the browser so that it knows what to do when it sees our element. We do this by passing our new element to the
CustomElementRegistry.I like to check if my element has already been registered. Without this, including the script twice by accident will trigger an error that the user of the component isn't necessarily going to recognise.
if (!window.customElements.get('flat-cube')) {To register, you pass the tag name you want to use and the element class.
NOTE: tag names for custom components must contain a hyphen.
  customElements.define('flat-cube', FlatCube);
}
And that's it. Every line looked at and, hopefully, explained.
Let me know what you would have done differently or if there are any (ideally small) projects you'd like me to look at line-by-line.
-
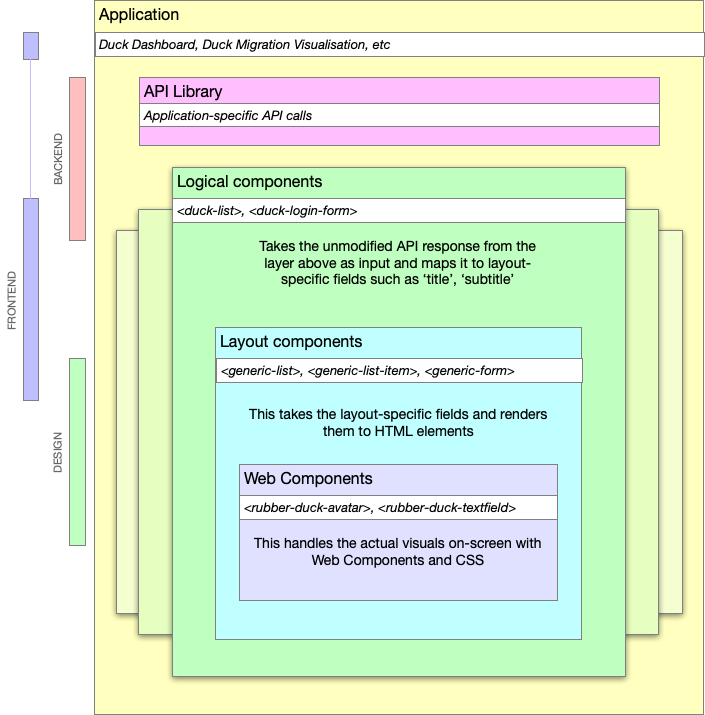
Application Layers
On recent web app projects in HERE Tracking, I've been using a layered component structure that fits particularly well with frontends that access and interact with JSON APIs.
The primary reason for structuring our apps this way is that it gives us a lot of freedom in our workflow and still fits well within the larger HERE structure with horizontal design teams that align across the multiple products. This works as a way to enable parallel contributions from everybody across the engineering teams.
The layers are:
- Application
- Library (JS library to access the API)
- Logical (maps business objects to layout concepts)
- Layout (renders layout components)
- Components (low level elements and design)
And, generally, these layers are within the areas of expertise of the Backend, Frontend and Design specialists.
It shouldn't be necessary to say this but just to make sure I'm not misunderstood: it's important to note that none of these roles is limited to the scope below, this is just a general 'areas of expertise' guide. See my previous post about shared responsibilities.
- Backend teams create the API and implement the JS library. If possible, also implement the basic logical component which performs whatever business logic is required.
- Frontend teams build the application out of components, further maintain the logical components and the mapping between logical and layout components
- Design teams implement the core web components and company-wide design system of UX, UI, mental models, etc. This layer can also be based upon an open-source design system such as Carbon or Material.
Of course, the backend team can modify the web components if they have the inclination just as the design team couuld make improvements to the database if they are able to improve the product.
Example
NOTE: The example below is mostly Vue-like but this layered approach doesn't rely on any framework, language or coding style. It's a way to split and share responsibilities.
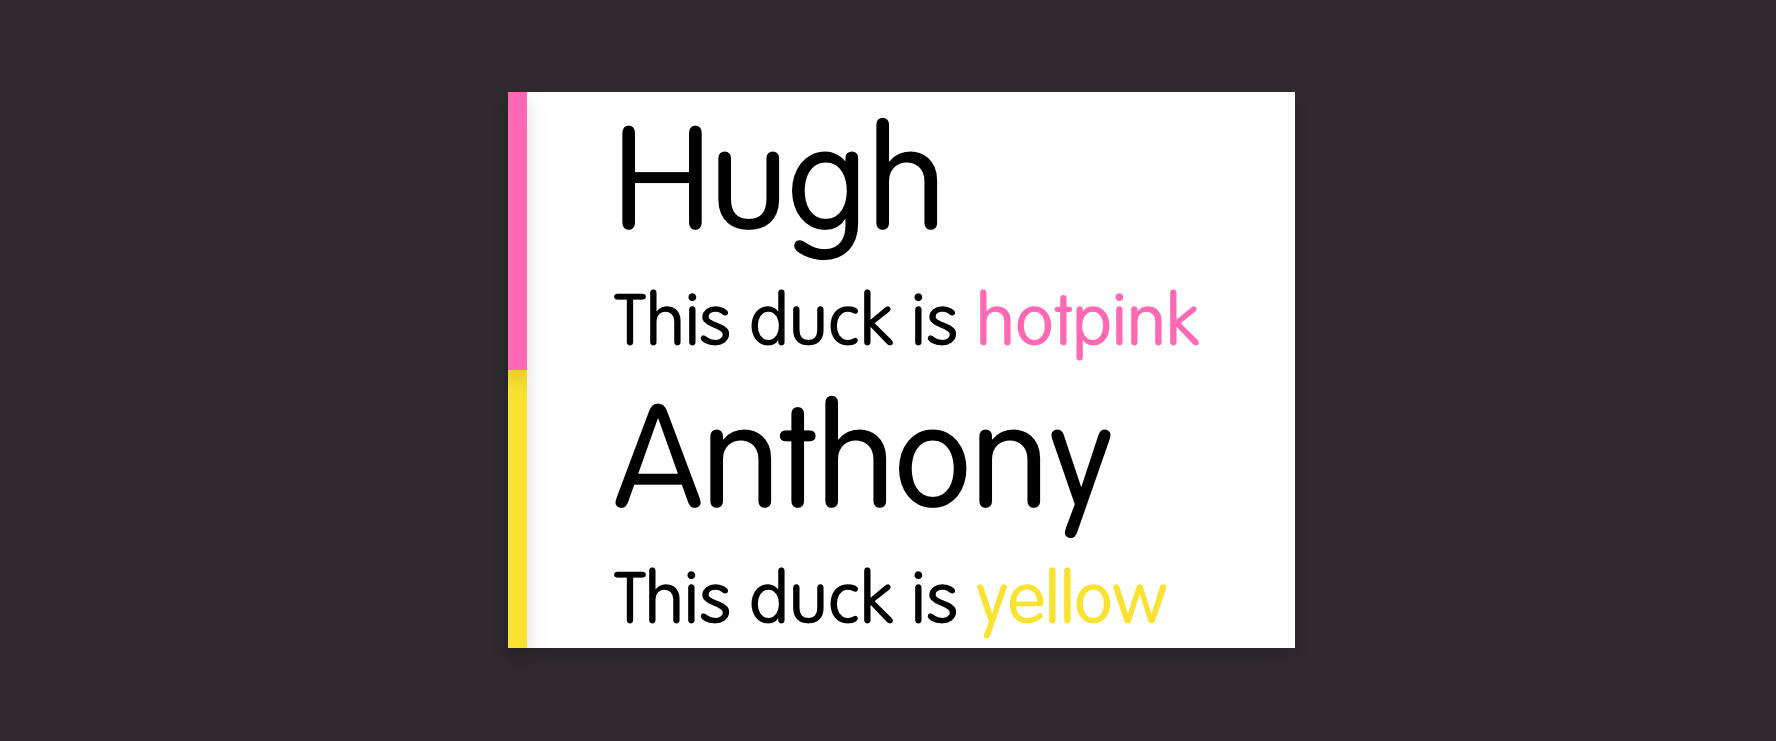
Rubber Duck Inc. make GPS-enabled rubber ducks. They have a dashboard where customers can see the location of their ducks. The dashboard includes an overview list of ducks.
Backend
The Backend team extend the Duck definition (stored in their duck-ument database) to include a new 'icon' field then update the
GET /ducksendpoint that allows you to receive a list of all the ducks you own.Sample response:
{
  "data": [{
    "id": 123,
    "name": "Hugh",
    "colour": "hotpink,
    "icon": "star",
  }, [{
    "id": 321,
    "name": "Anthony",
    "colour": "yellow",
    "icon": "dot",
  }],
  "count": 2
}
They check to see if the JS library needs updating (if they are using automated code generation, this might already be done). It doesn't, it already returns the full
dataarray of the response:fetch(`${api}/ducks`) .then(response => response.json) .then(json => json.data)The data is rendered in the web app using a logical web component
<duck-list :ducks="ducks"/>The engineer digs one step deeper (into the 'logical' or 'application components' library) and sees that the
duck-listcomponent wraps thegeneric-listcomponent but with a few modifications to the data structure.<template> <generic-list :items="items"/> </template> <script> : props: { ducks: Array, }, data() { return { items: this.ducks.map(duck => ({ title: duck.name, subtitle: `This duck is ${duck.colour}`, })) }; }, : </script>And then modifies it to also pass the icon into the
generic-listso that each item looks like:{ title: duck.name, subtitle: `This duck is ${duck.colour}`, icon: duck.icon }Frontend
In a parallel task, the frontend specialist can be improving the
generic-listcomponent. This component doesn't do much except create a set ofgeneric-list-itemelements.<template> <ul> <generic-list-item for="item in items" :item="item"> </ul> </template>Each
generic-list-itemis built from basic web components from the company's DuckDesign language:<template> <li> <rubber-duck-title>{{title}}</rubber-duck-title> <rubber-duck-subtitle>{{subtitle}}</rubber-duck-subtitle> </li> </template>Frontend can then improve this to take advantage of the new data structure. Handily, there's a
rubber-duck-avatarcomponent. That should work here:<template> <li> <rubber-duck-avatar if="icon">{{icon}}</rubber-duck-icon> <rubber-duck-title>{{title}}</rubber-duck-title> <rubber-duck-subtitle>{{subtitle}}</rubber-duck-subtitle> </li> </template>Design
So close, except the alignment's not quite right... Frontend has a chat with design and they decide that, while this could be solved in the
generic-list-itemcomponent (or even in theduck-listor the application layer), having an icon next to a title is a more generic requirement so it should be solved in the lowest design component layer:rubber-duck-avatar + rubber-duck-title { margin-left: 0; }Design tweaks the alignment of the
rubber-duck-avatarcomponent and deploys it company-wide to all product teams. Every team benefits from the shared library, the DuckDashboard team gets to show off their new duck icons, everybody helped complete the product story and nobody got hurt.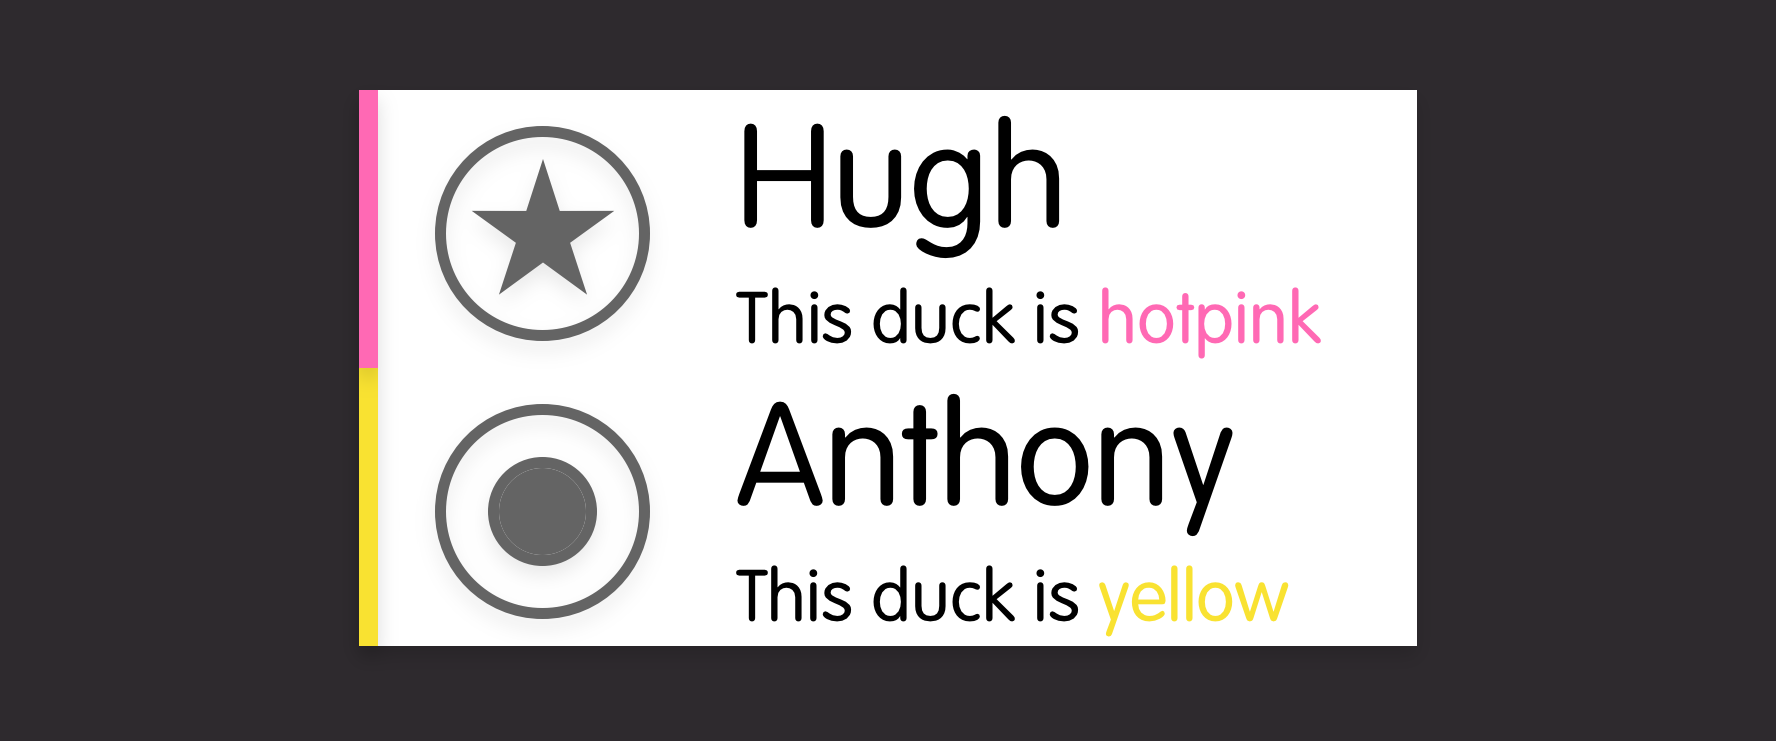
Conclusion
Admittedly, this does lead to having multiple individual repositories for a single application
- dashboard-app
- duck-api.js
- dashboard-components
- layout-components
- duck-design-web-components
But it does give each team the flexibility to contribute beyond their core area and not be blocked by other teams.
Let me know what you think or how you'd improve it. Do you already use an approach like this?
-
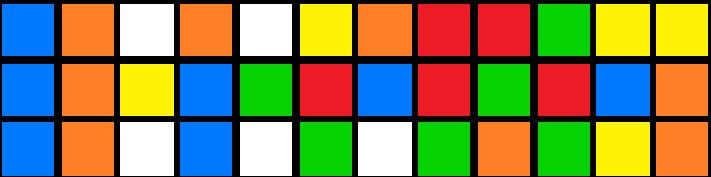
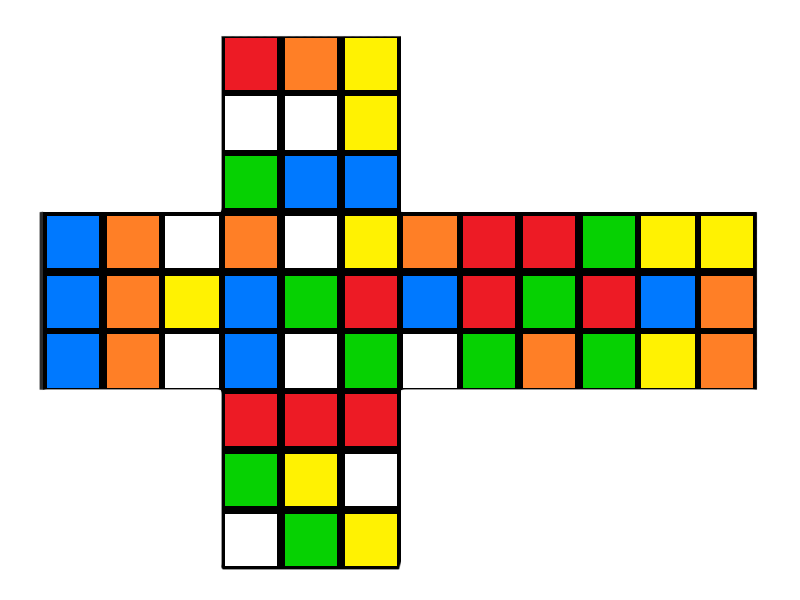
Colouring a Rubik's Cube with CSS variables
I was playing around with the flick keyboard from the last post and decided that I could do with a way to draw the cube. There are plenty of existing cube render tools out there (https://codepen.io/Omelyan/pen/BKmedK, http://joews.github.io/rubik-js/, https://cubing.net/api/visualcube/) but I felt like making my own because I needed something to do with my hands while watching the second season of Dead To Me.
What came out was a self-contained web component using CSS variables, fallback styles and calculations to produce a nicely customisable element:
Default cube
<flat-cube facelet="UUUUUUUUURRRRRRRRRFFFFFFFFFDDDDDDDDDLLLLLLLLLBBBBBBBBB" />Scrambled with "M' U F R E R E2 M' U' M' F2"
<flat-cube facelet="BDDFBFUURDRBUUBLDULLFULRDUFLBUDFRDDFRLBRDFLLFRFULRBRBB" />Same again but with different colours:
:root {
    --flat-cube-up: blanchedalmond;
    --flat-cube-left: orangered;
    --flat-cube-front: lawngreen;
    --flat-cube-right: rebeccapurple;
    --flat-cube-back: dodgerblue;
    --flat-cube-down: darkslategrey;

    --flat-cube-inner: white;
    --flat-cube-outer: white;
  }
}
The configuration of the pieces is defined by a "facelet" string. This is a way of representing a configuration of a 3x3 twisty puzzle by enumerating the faces like this:
             +------------+
             | U1  U2  U3 |
             |            |
             | U4  U5  U6 |
             |            |
             | U7  U8  U9 |
+------------+------------+------------+------------+
| L1  L2  L3 | F1  F2  F3 | R1  R2  R3 | B1  B2  B3 |
|            |            |            |            |
| L4  L5  L6 | F4  F5  F6 | R4  R5  R6 | B4  B5  B6 |
|            |            |            |            |
| L7  L8  L9 | F7  F8  F9 | R7  R8  R9 | B7  B8  B9 |
+------------+------------+------------+------------+
             | D1  D2  D3 |
             |            |
             | D4  D5  D6 |
             |            |
             | D7  D8  D9 |
             +------------+
For example, a solved cube is represented by:
UUUUUUUUURRRRRRRRRFFFFFFFFFDDDDDDDDDLLLLLLLLLBBBBBBBBBWhile the scrambled version shown above is:
BDDFBFUURDRBUUBLDULLFULRDUFLBUDFRDDFRLBRDFLLFRFULRBRBBI chose this representation purely because I've seen it used in other cube modelling projects.
In my demo page, I include the https://github.com/ldez/cubejs library and use that to translate move strings into facelet strings. It would be possible to include this directly in the web component and would improve the usability at the cost of a bit of extra complexity inside the component. That would allow using the component like this:
<flat-cube moves="M' U F R E R E2 M' U' M' F2" />Which does look nicer.
Style
Throughout the component, I have tried to use CSS variables and the calc function as much as possible to allow the component to be restyled and scaled as needed while offering sensible fallbacks.
For example, the styles to define a face include a calculated size with a fallback:
:host {
  --flat-cube-face-width: var(--flat-cube-face, 100px);
}
.face {
  height: var(--flat-cube-face-width);
  width: var(--flat-cube-face-width);
  outline: 1px solid var(--flat-cube-outer, black);
}
While the faces each have a CSS variable to allow styling them along with a fallback:
.U-piece {
  background-color: var(--flat-cube-up, #ebed2b);
}
In action
-
Rubik's Keyboard
For anybody who has a bit of a technical, problem-solving mind (I'm going to guess that's literally anybody reading this), there's a high likelihood that you have not only played with or owned a Rubik's cube but also attempted to solve one using a step-by-step guide.
Notation
Most guides are written using 'Singmaster Notation' where F denotes a clockwise rotation of the side facing the solver, U' is an anticlockwise rotation of the uppermost layer, and so on.
This notation is used to describe not only solving steps but also scrambles when applied to an already solved cube. The following scramble, for example:
L R' D2 U' B D2 F2 D F' L2 F2 R' D' L R2 D U2 L F' L' B2 D U R2 F' D' L' R D2 UProduces this:
Kana Flick
In seemingly unrelated news, the standard way to type Japanese characters on a smartphone is using a Kana Flick Keyboard.
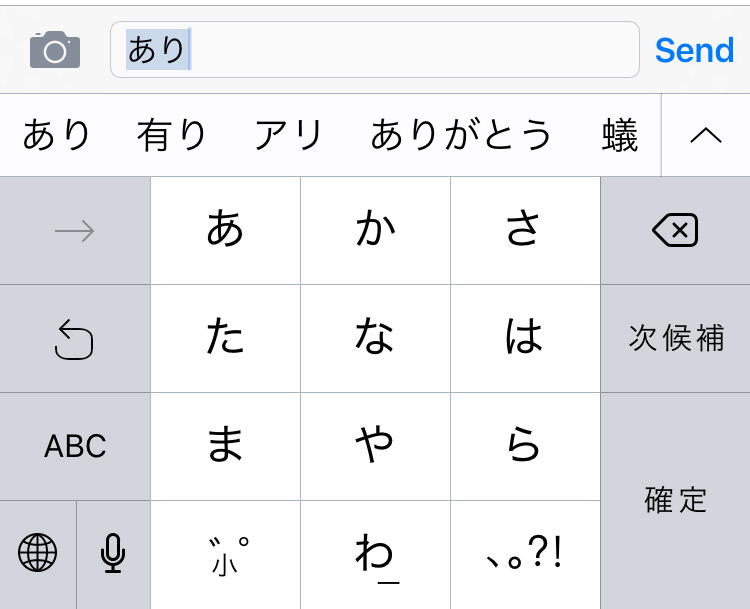
This style of keyboard groups characters together so that you essentially touch the key to select the consonant, move in one of four directions (or stay still) to select the vowel and let go to confirm. Put that way, describing it takes a lot longer than actually doing it.
Rubik's flickboard
This is a long preamble to say that I was thinking through a new game design the other day when I had an idea about a variation on the kana flick keyboard that could be used to enter Rubik's cube move notation:
Note: It doesn't yet include 'fat' moves (lowercase variations which denote moving two slices of the cube rather than just one),
E,Sor rotations (x,y,z).It only works on iOS for now because it was a Sunday-evening sofa hack while rewatching Voyager on Netflix.
-
Toast Guide
Ever needed a handy chart to guide you through the complexities of toast?
Thought so.
-
One product, many owners
or: "What you are is not what you do"
Imagine you're on a bank heist. You're literally right in the middle of the job. Your expert team consists of some very talented criminals. There's The Hacker, The Driver, The Money Man, The Explosives Expert, You.

While The Hacker is rewriting the safe door control circuit's firmware to speed up the clock and release the time-lock, you find the computer controlling the security cameras. Do you make a note on a ToDo list?
- Remind the Hacker to delete the security footage [ ]
Or do you grab the mouse and select
File > Delete Security Footage?(Yes, it is that easy, you specifically chose this bank to hit because it has terrible security)
Once you leave the building, there's a bit of confusion and The Explosives Expert ends up in the driving seat. The Driver is in the back! The police are one block away. Do you all get out, rearrange, let the driver get in the front? Or do you just start driving? The Explosives Expert may not know the exact route but, remember, The Driver is right there, able to give directions.
And that is literally exactly what developing a software product is like.
Product
The role of the Product Owner is fairly well known, well defined and ubiquitous across agile teams. But we know that everybody in the team is responsible for the product. The PO might be an expert in certain areas of understanding the customers' mindset or prioritisation but everyone is responsible for the product. Everyone owns the product but, in this instance, there is one person with the title Product Owner.
Quality
In the same way, everyone working on a product is responsible for the quality. If you're working on the database and you find that the drop-down menu occasionally disappears, there are multiple ways you could deal with it.
- You could just ignore it. It's not the databases's fault, after all.
- You could file a ticket in the system for someone else to pick up.
- You could figure out a reproducible test-case.
- You could pop open the web inspector and check the console, poke around a bit.
- You could check out the code and fix it.
There are a lot of ways you could do this, depending on your abilities and your available time but whatever you do – as long as it's not just ignoring the problem – you are taking a step to improve the quality of the product.
The QA might be an expert in writing test cases or have the kind of brain that would think of using a base64-encoded png as a username but that doesn't mean quality begins and ends with them. They are the Quality Owner. Everyone is responsible for quality, but it's the Quality Owner's priority.
Architecture
And so we come to the Architecture Owner. Even now, a couple of decades after the Agile Manifesto with repeated swings for and against it, Agile and Architecture have an uneasy relationship or, at least, a poorly-defined one.
The image of The Architect as the keeper of the book, the writer of the specification still triggers rebellion in the minds of those who zealously misunderstand agile practices. Of course, there can't be a predestined development plan when the destination is unknown. But that doesn't mean you blindly run headlong into every problem. You look around, you keep aware of your surroundings, of other projects. If nothing else, you stay aware of your situation to know if you're doing something you've done before. If you are, you can look at how you solved this in the past and do the same or better this time round. This is everyone's responsibility but it's also Architecture.

"The last time I did a job in this town, the bank had a silent alarm system. You might want to cut the wires on this one before it's triggered this time."
Agile architecture is about looking a little bit forward and a little bit back. How will this work next year? How did we solve it last year? Is another team working on the same thing? Did they? Will they? Any prototyping done to figure out the next step of the journey is architecture.
Just as development, quality, product, design, business are all essential parts of any project, so is architecture. The Architecture Owner doesn't only do architecture and isn't the only person to do architecture tasks. It is merely their priority. They may have additional expertise or experience, they may be faster at building prototypes or drawing boxes-and-arrows but they are as integral a part of the product development team as anyone else.
To be effectively agile, everyone should care ultimately about creating the product.
Practicality
This is all good in theory. What does this actually mean? Is 'Architecture Owner' a full-time job? Does an architect architect all day long?
Well, is Product Owner a full-time job? QA? Explosives Expert? For a lot of teams, it is. But not all. A particularly small team might have an Engineer who acts as part-time PO. A larger team will have a dedicated person for each role. What you are is not what you do. The whole point of this is that being the owner of a domain doesn't make you solely and exclusively responsible.
In many cases, the person who assumes the AO role will be a strong engineer who can jump on any part of the codebase and be effective quickly (because in addition to being experienced engineers, they understand the architecture and the motivations behind the architecture) and who coaches others to think more architecturally and be effective quickly.
Notes
In the decade or so since I first wrote this, the role of architecture in agile has come and gone and come back a couple of times. I find myself directing people to the same articles repeatedly so I figured it was time to update and publish this.
There are many other articles on agile architecture, most of which are written much more seriously than this.
-
Microbots
Another April, another album.
-
Art Auction

I rarely sell my original paintings, preferring instead to make prints. This does mean I have shelves full of artwork I'll have to do something with one day.
I did, however, donate the original of this painting here to a fundraising auction.
If you'd like to find out more about the auction (and possibly bid), check out:
-
Painting a children's book
Here's a quick time-lapse of me painting a page from a children's book.
-
Probably Not A Robot
I made another album…
This is for all those people who have wondered at some point whether they are actually robots. If you were, would you know? What if your programmer wrote your software so that you wouldn't figure it out?
As with all my albums, it's free to download so you have no reason not to.
-
The Great British Web App
I think I've figured out the next break-out TV competition show: The Great British Web App
Round 1: The Microsite
Each team is presented with a PSD and a Word doc. You've got 1 hour to slice up the images, mark up the content and deploy a microsite advertising an event. The judges are harsh on anyone demoing on localhost.
Round 2: The Magazine
Using the tools, frameworks and languages of your choice, design, develop and deploy a magazine-style web site with full CMS and social media share buttons.
Teams are judged on semantic markup, SEO friendliness and accessibility audit score.
Round 3: The Masterpiece
Your chance to show off. You have 4 hours to build the shiniest, scrollbar-misusing, WebGL-heavy, experimental web masterpiece possible to match the client brief "Anything, as long as it pops!".
You only get points if it's mobile-friendly and works on IE 6.
Prize
The Winners of the Grand Finale get a copy of Dreamweaver 4 and enrolled in a Coursera course on how to retrain as a baker...
Bonus Technical challenge for the celebrity edition
Rebuild a classic HTML element using the latest web technologies - implement
<marquee>using Web Components or<blink>using Web Sockets. -
Web Components vs Vue Components
I've been doing a lot of work in Vue recently so when I was asked to evaluate using Web Components on an upcoming project, I approached it with a Vue-ish mindset.
I've not really kept my eye on Web Components for the last couple of years beyond seeing original proposals being superceded and import specs being replaced. Just seeing those things on the periphery were enough to make me think "Meh... I'll have a look later when it's all died down".
Now, I know that Web Components !== Vue. But, I was interested in what knowledge could be migrated from one technology to the other. If I were building an actual web app, I'd definitely use Vue. Building a boxful of reusable, shareable UI elements, though... let's find out.
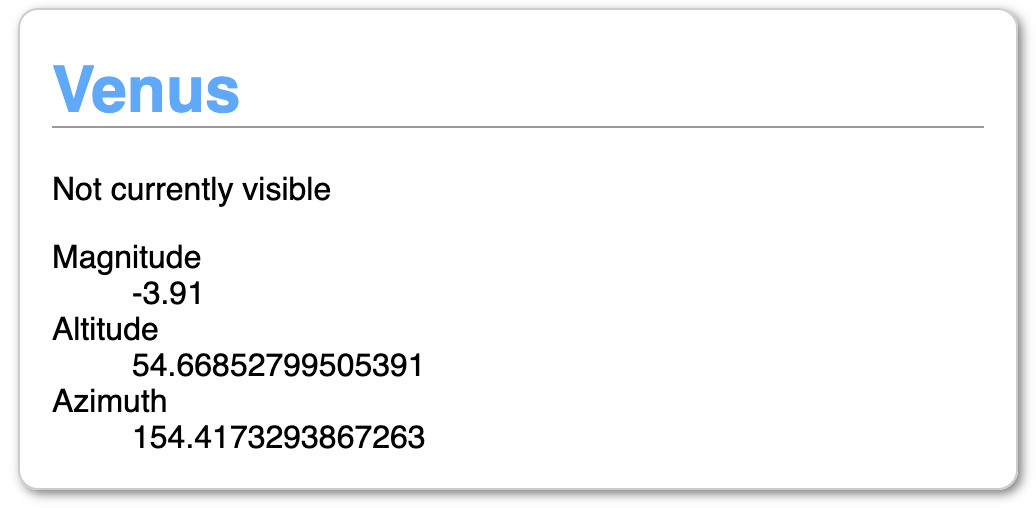
I'm not going to build anything too complex to start with. How about an "Planet Summary" panel? A simple panel that renders summary information about a planet given a JSON object.
I have an API that returns JSON information about where in the sky to find planets when given your latitude and longitude. For example, if you're standing slightly south of the centre of Berlin and want to know where Venus is, you'd make this request:
https://planets-api.awsm.st/venus/52.5/13.4
And the response would be:
{
  "name": "Venus",
  "number": 1,
  "colour": 1,
  "colleft": 24,
  "colright": 25,
  "alt": 13.043427032890424,
  "az": 290.3495756869397,
  "dec": 22.661411404345362,
  "ra": 110.21545618074397,
  "H": 98.18491228623316,
  "eclon": 108.59563862950628,
  "eclat": 0.5200939814134588,
  "illum": 0.9918628383385676,
  "r": 0.7192422869900328,
  "dist": 1.7155717469739922,
  "mag": -3.909377586961354,
  "elong": 0,
  "pa": 0,
  "p": 1,
  "description": {
    "altitude": "Barely above the horizon",
    "azimuth": "West"
  },
  "visible": false
}
In this case, it determines Venus isn't visible because, even though it's above the horizon, it's not bright enough given the time of day (about 6pm).
We want to make a little UI card that displays this information.
Mapping Vue features to Web Components
Vue Web Component Notes name class name data instance properties props attributes these are not reactive by default. Attributes have to be specifically observed (see watch).watch attributeChangedCallback first, register your watched attributes with `observedAttributes` then process them in attributeChangedCallback computed getters methods class methods mounted connectedCallback called async so the component may not be fully ready or may have been detached. Use Node.isConnected to protect against calling a dead node componentWillUnmount disconnectedCallback style block style block inside template styles are scoped by default template block literal template JS literal templates (backtick strings) are nowhere near as powerful for templating as an actual template library. Vue template features such as `v-for` can be replicated with vanilla JS but a single-purpose template library (such as `lit-html`) is a good idea. NOTE: I am deliberately not using Webpack. I realise that actual applications would be using additional tooling but I want to see what we can do without it.
The first thing that clicked with me was when I realised that computed properties and getters are identical. Nice.
Here's Vue code to return the planet name or a default string:
computed: {
  name() {
    return this.planet.name || '';
  },
}
And Web Component:
get name() {
  return this.planet.name || '';
}
Well, that was easy (and trivial).
The same goes for defining the custom element for use in the DOM
Vue:
components: {
  "planet-summary": PlanetSummary
}
Web Components:
customElements.define("planet-summary", PlanetSummary);The only real difference at this level is the data binding. In Vue, props passed from a parent element to a child are automatically updated. If you change the data passed in, the child updates by default. With Web Components, you need to explicitly say you want to be notified of changes.
This is basically the same as setting a
watchin Vue. Data that changes in a slightly less tightly-bound fashion can be watched and the changes trigger updates further down.Watches
Watches in Vue:
watch: {
  altitude(newValue, oldValue) {
    ...
  }
}
With Web Components, registering a watch and reacting to changes are separate:
static get observedAttributes() {
  return ['altitude'];
}

attributeChangedCallback(name, oldValue, newValue) {
  if(name === 'altitude') {
    ...
  }
}
Templating
Vue contains full templating support – for loops, conditional rendering, seamless passing around of data. Natively, you have literal templates and that's about it.
To create a list of planets, you'd use the
v-fordirective and loop over your planets array.Vue:
<ul>
  <li v-for="planet in planets">
    <planet-summary :planet="planet"></planet-summary>
  </li>
</ul>
Web Component
<ul>
  ${this.planets.map(planet => `
  <li>
    <planet-summary planet='${JSON.stringify(planet)}'></planet-summary>
  </li>
  `).join('')}
</ul>
The
joinis there because we're creating an HTML string out of an array of list items. You could also accomplish this with a reduce.Boilerplate
With Web Components, your component lives in the Shadow DOM so you are responsible for updating it yourself. Vue handles DOM updates for you.
Here is a basic render setup:
  constructor() {
    super();
    this._shadowRoot = this.attachShadow({ mode: "open" });
    this.render();
  }
  render() {
    this._shadowRoot.innerHTML = '';
    this._shadowRoot.appendChild(this.template().content.cloneNode(true));
  }
This needs to be explicitly included in every component as they are standalone whereas Vue automatically handles DOM updates.
CSS
Due to the fact that Web Components live in a separate document fragment, There are complications around sharing styles between the host page and the component which are nicely explained on CSS Tricks. The biggest benefit, on the other hand, is that all styles are scoped by default.
Vue without Webpack (or other tooling) also has its own complications around styles (specifically scoping styles) but if you're building a Vue application, it is much more straightforward to specify which styles are global and which are scoped.
Summary
Here is the Vue Planet Summary and the source of planet-summary-vue.js.
Here is the Web Component Planet Summary and the source of planet-summary.js.
Bonus: here's a Planet List Web Component which includes the Planet Summary component. And the source of planet-list.js
All in all, pretty much everything between basic Vue Components and Web Components can be mapped one-to-one. The differences are all the stuff around the basic construction of the components.
I'd say that if you're looking to build completely standalone, framework-free reusable components, you'll be able to accomplish it with the Web Components standard. You just might have a bit of extra lifting and boilerplate to deal with.
On the other hand, if you're already planning on building a full web application with data management and reactive components, use the tools available to you.
-
Sponsored Events on the Blockchain
Sponsored Event
In my day job, I’m responsible (among other things) for our efforts to integrate block chain and supply chain. Most of this relies on Smart Contracts. In order to learn more about them, I did a project last year that let me get in-depth.
The idea came about while my wonderful other half was organising a sponsored walk – Museum Marathon Edinburgh. It should be possible to create a sponsored event then manage funds and pledges through a smart contract. Unfortunately, I didn't get the project completed in time but I did manage to build Sponsored Event (possibly my most uninspired project name ever).
This can be used to manage, collect and distribute donations for any kind of charity event – sponsored walk, climb, run, pogo-stick marathon, etc.
No more chasing people for money after the event. No need to worry about how or whether the money makes it to the charity.
This contract also allows cancellation and withdrawal from the event. In that case, the participant's initial sign-up fee is transferred to the receiving charity but any pledges are returned to the sponsor.
Additional information about the event (description, title, images) should be stored off-chain in another database.
I built it almost 12 months ago but just updated it to use the latest version of Solidity. Due to the fast-paced nature of these things, it may or may not still work. Who knows?
Web App Structure
The web app uses
web3.jsto interact with the smart contractSponsoredEvent.sol. It can also interact with a separate content database to keep as much non-critical data off the blockchain as possible.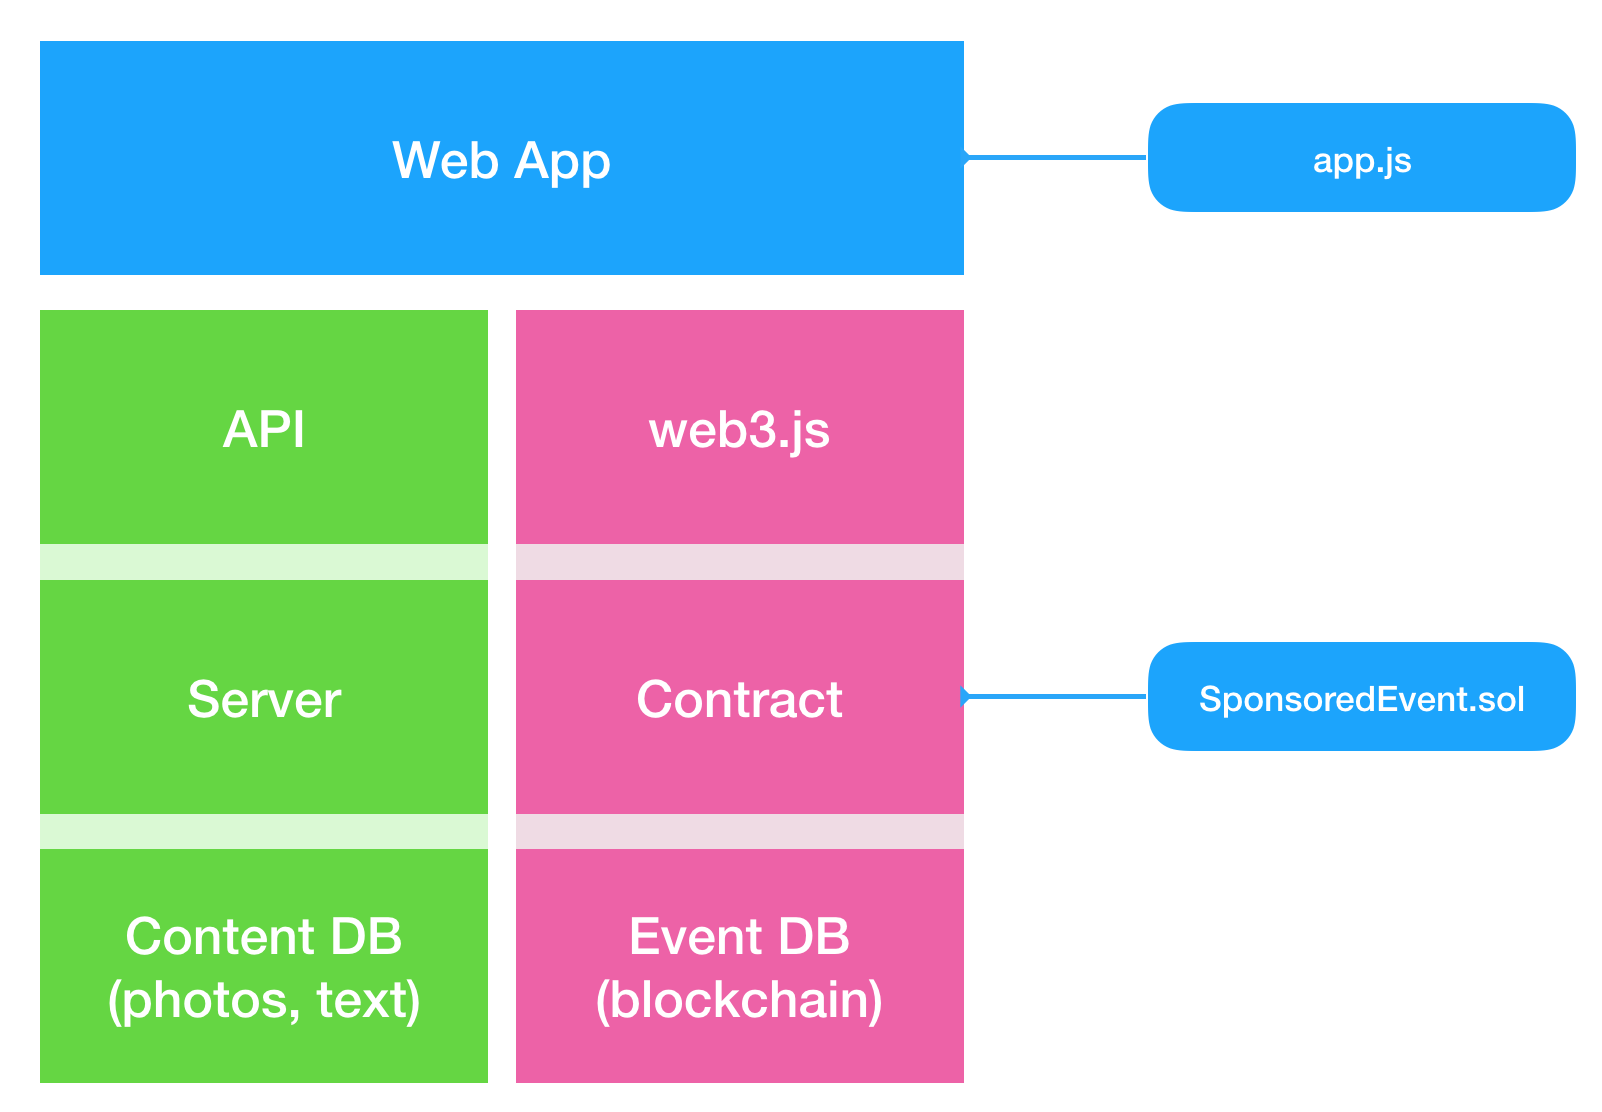
Key Concepts
The Event
An event for charity where someone must complete all or part of something. In exchange someone else pledges to give money to a recipient.
The Recipient
The charity or body receiving the funds at the end. They don't need to do anything except have an account capable of receiving the funds.
The Organiser
The person creating the event specifying the name, date, description and designating the account of The Recipient. This account is the owner of The Event.
The Participant
The person actually taking part in The Event. This person signs up for the event and commits to taking part. They are given a unique URL which The Sponsor can use to pledge money. Participants are charged a sign-up fee.
The Sponsor
The source of the funds. This party has promised to donate money to The Recipient if The Participant takes part in The Event. They can include a message along with their pledge.
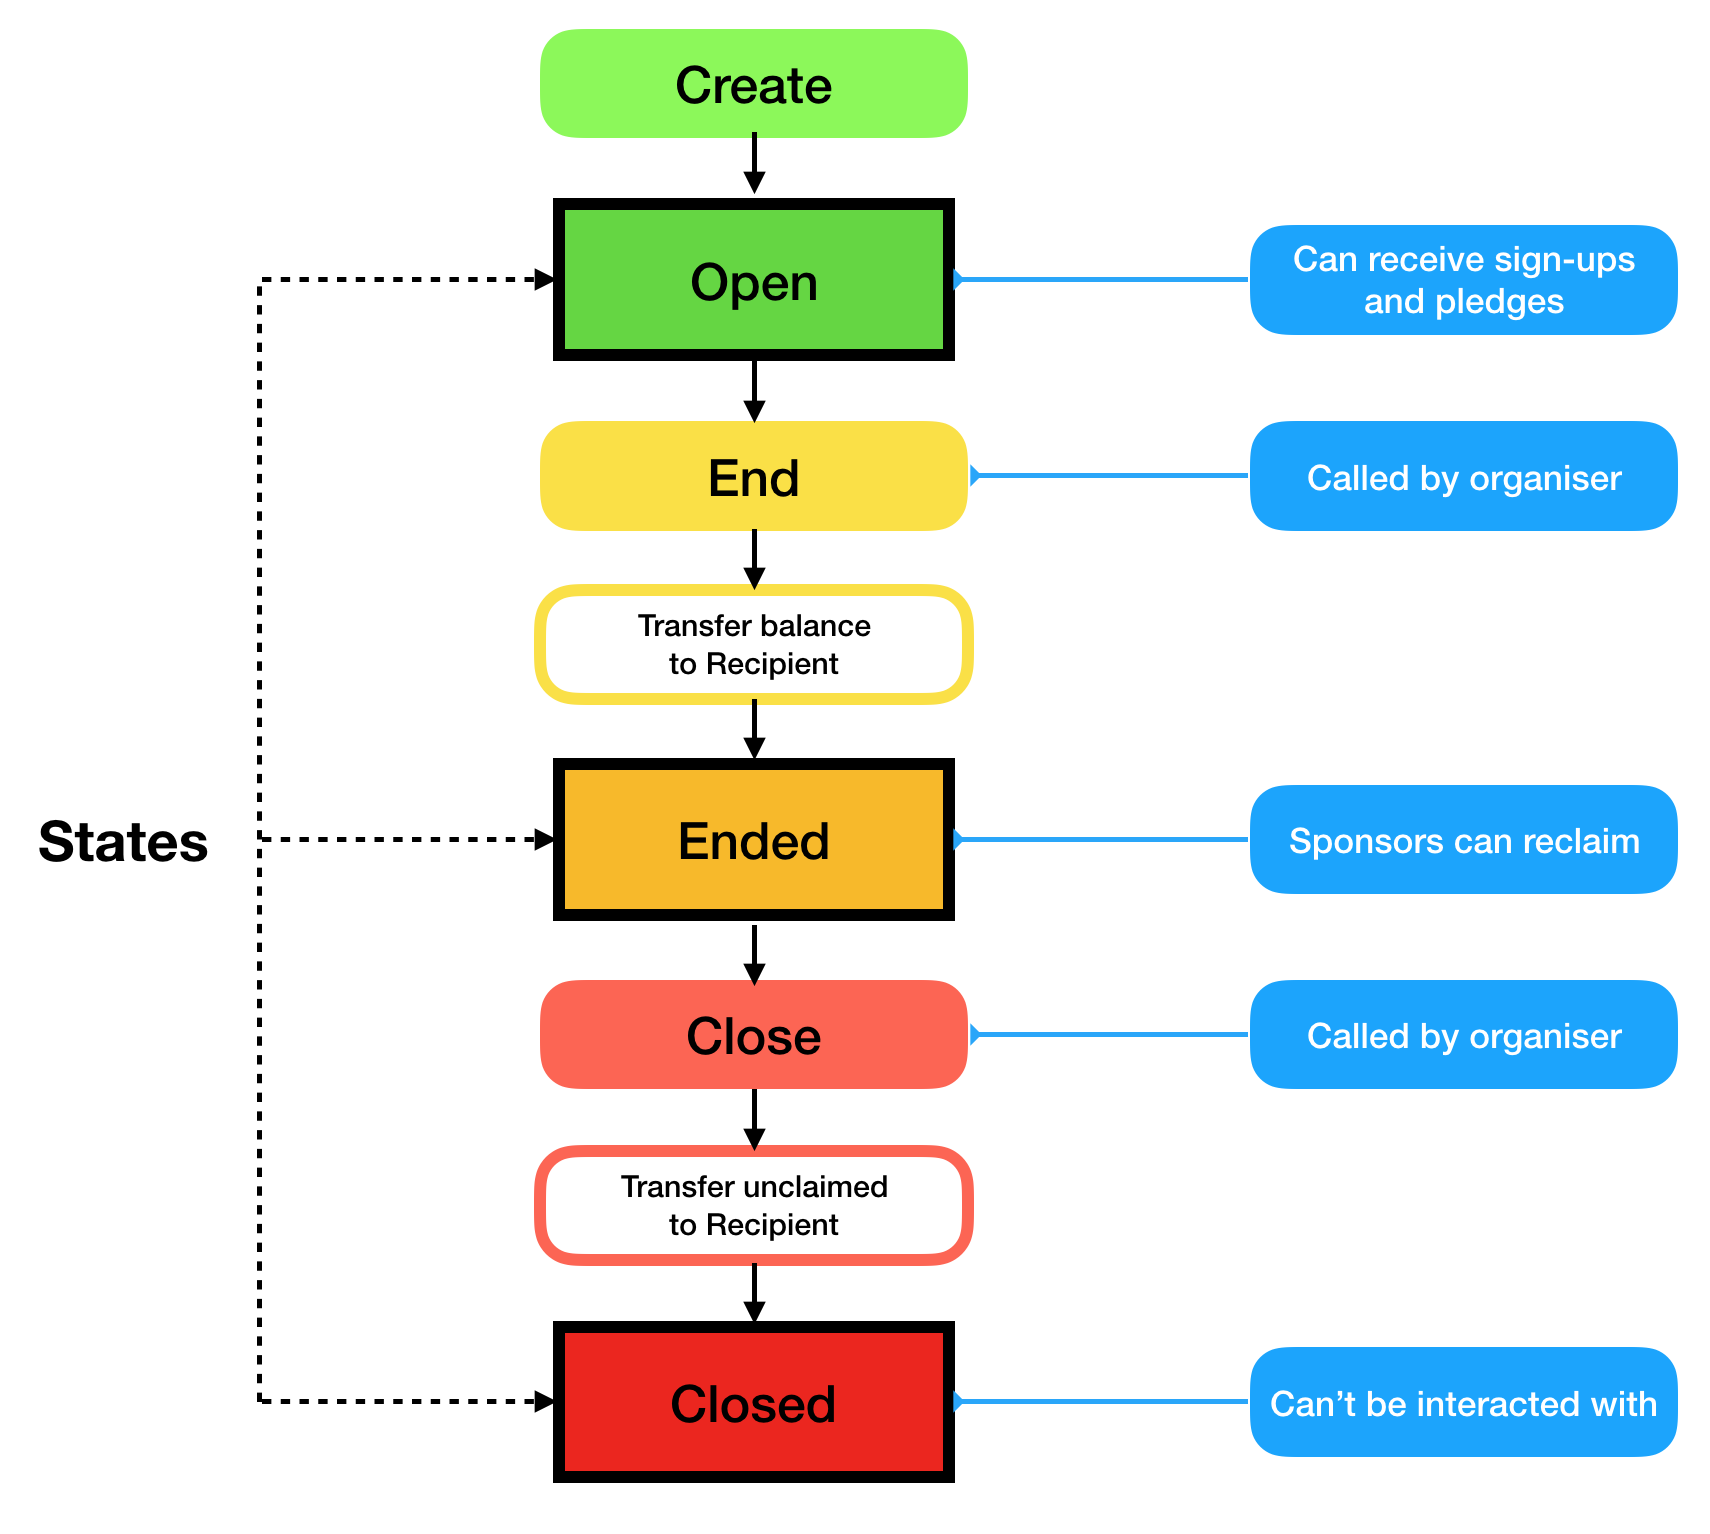
Cancellation
If the event is cancelled, all pledged money is automatically returned to The Sponsor. Sign-up fees are returned to The Participant.
Withdrawal from the event
If The Participant withdraws, all money pledged to them is automatically available for The Sponsor to reclaim. The participant's sign-up fee is not returned.
Ending the event
The Organiser can mark an event as Ended. This will transfer completed pledges and sign-up fees to The Recipient.
Retrieval of funds
Once the event has ended, The Sponsor is able to reclaim any funds donated to Participants who did not complete the event. The funds are not automatically returned as The Event may not have enough to cover the transaction fees.
Closing the contract
After a period of time following the end of an event, The Organiser will close the event. This will transfer any remaining balance to The Recipient.
Contract Lifecycle
Each Sponsored Event contract starts when The Organiser creates it and deploys it on the blockchain. From that point, The Participants can sign up and The Sponsors can make pledges.
Source
You can get the source on github and deploy it against a test network or run Ganache locally. Whatever you do, don't throw actual money against it. That would be a terrible idea.
-
It's Art, I tell you!
After many years of meaning to do it and not actually doing it, I decided to open an Etsy store. It's not my first online print store. In fact, one of the key reasons I ever learned HTML, CSS and PHP was to build an online store for my artwork back in... 2002? Seriously? Seventeen years ago...?
Anyways... I've put in a few prints so far, mostly from the Octoplural series of paintings although my current favourite is the My Day Flowchart.
I really like how I could tie Etsy together with Printful so the prints are generated on demand rather than me holding a lot of stock which is how we did it back in the olden days...
-
I made a thing. Now what?
Anyone who knows me knows I'm all about solving problems. That's my thing. There's a problem, here are the facts, here's the solution. It's almost always a technical solution.
So when I was presented with the problem of making it easier to make background music for YouTube videos, I built Harmonious Studio.
Technically, its a good solution – it lets you mix individual loopable instruments into a single track. Behind the scenes, it uses a the Web Audio API to manage the individual tracks in the browser and ffmpeg to prepare the final high-quality download.
The question is: what now?
The original plan was to allow others to upload their tracks and create a marketplace for music – basically positioning Harmonious Studio as "Shutterstock for Music". There are several options for this – monthly subscription for unlimited downloads, fee per premium track, fee per download.
There are a few problems with this, however.
1. Free is better
There is a huge amount of free music available online. Every week there's a post on /r/gamedev where a composer gives away thousands of tracks for free. The majority of responses I got from the feedback form I asked for on Harmonious fell into the segment "Yes, I use background music. No, I'd never pay for it".
2. Good enough is good enough
The idea was that content creators would be able to make music to fit their content exactly. However, getting something instantly for free that almost fits is preferable to making something custom that costs time and money. Kind of obvious when you think about it.
3. If it works, keep it
The other piece of feedback I got from YouTubers was that, once they've found a piece of music that works, they're more likely to copy-paste it into the next video than get a new one. Once they've got 3 or 4 'go-to' tracks, they've got everything they need for most kinds of videos.
So... what now?
It's a good technical solution to a problem without a good market. This is usually the point where the insightful entrepreneur pivots and relaunches using the tech in a completely new way. Anyone have any suggestions about how to do that?
-
Harmonious Studio

Some of you might know that my wonderful other half reviews a lot of books on Youtube and that I occasionally make music. So I, naturally, help her on the videos by providing background music for her videos.
After a couple of months of re-recording or remixing existing tracks, I realised the key was that – as a content creator – she wanted to have more control over the music in her videos than just picking one of my existing instrumentals. It occurred to me that not everyone that makes videos, games or podcasts has access to a musician with recording equipment but might want the same kind of control over their music.
There are plenty of royalty-free music sites around but a lot of them suffer from the problem that there are 20,000+ tracks to choose from and you might need to go through a few thousand of them to find the right track.
To solve this, I built my latest project: Harmonious Studio.
A 'set' is a collection of individual tracks built around a single basic loop. To create your individual mix, you pick a set, switch tracks on or off and download a loopable piece of music that can be dragged into whatever you use to create your videos or podcasts. All the tracks in a set work together but different combinations can change a piece from light and happy to dramatic and angry to wistful and relaxed.
Here are a few examples of mixes built from the same set:
For Game Makers
I'm also hoping this is useful for game developers. Fundamentally, it's a way to create lots of variations of music that go well together – some dramatic, some calm, some exciting – these variations can be tied to metrics and areas in a game and smoothly and transparently change with the game's mood and atmosphere.
For musicians
The next phase is to open up the platform to other musicians to enable them to add tracks to an existing set or create an entirely new set.
For now, all tracks are licensed for free under CC-by 4.0 but, if it turns out to be useful, musicians will be able to offer their tracks for sale. Those buying the track will pay a single fee for the mix and the fee will be split between the artists who created the tracks in the mix.
If you're a content creator, know a content creator, have ever thought about being a content creator or even have simply read this far in this post, please check it out and give me some feedback.
-
HERE Tracking
You'll have noticed I haven't updated much recently. Even when I did, if was with distinctly non-tech stuff. The reason being I've been busy. Not "I've got a big to-do list" busy or "I've had a couple of browser tabs open for a few weeks that I'll get round to eventually" busy, either. I've got a text-file to-do list that's been open, unsaved in the background since January 2017 and there are a couple of background tabs I've been meaning to get round to reading since late 2014. Really.
What's been keeping me busy?
Easy answer: HERE Tracking.
A couple of years back, a few of us got interested in how IoT devices could work with location. What's the smallest, simplest device we can connect to the cloud and pin point on a map? Within a few weeks, we had a basic cloud and at CES in January this year, we launched a fully-fledged product. In that time, I've moved from 'prototyper who built version 0.1 on his laptop during the Christmas holidays' to something roughly equivalent to CTO of a medium-sized tech company. Not bad.
What's it do?
In essence, a small IoT device with some combination of GSM, WiFi and Bluetooth does a scan to find out what wireless networks, Bluetooth beacons and cell towers are visible and how strong they appear. They send their scan to HERE Tracking where it gets resolved into a latitude/longitude and then saved. The best bit is that it works indoors and outdoors.
Look, we've even got our own shiny video with cheesy voiceover!
And another that shows what it actually does!
There are a bunch of other features as well such as geofences, notifications, filtering, etc. but the main focus is this large-scale ingestion and storage of data.
At this point, our original Tracking team has grown to include HERE Positioning (the clever people who actually figure out where the devices are) and HERE Venues (we recently acquired Micello). By combining, the Tracking, Positioning and Venues bits together, we can follow one of these devices from one factory, across the country on a truck or train, overseas, into another country, into another factory, out into a shop... and so on.
-
HTTP Status Codes: The Album
-
The Same Side of Two Different Coins
-
Real life is busy
For reasons that this margin is too narrow to contain, I don't have the time to maintain a lot of my open source projects now.
I don't like to abandon them, however. I should have probably done this a few months ago but better late than never.
I'm looking for someone to take over
Hardyandcsste.st.Hardy
https://github.com/thingsinjars/Hardy
Automated CSS testing framework. Back when I used to do CSS for a living, I got interested in the concept of visual regression testing. Not finding the right tool for what I had in mind, I built Hardy. It was quite popular for a while but has been quite neglected for about a year for various reasons. The main reason being that I don't actually write CSS any more. Well, not for a living. The tool worked for me while I needed it and when I didn't, I stopped updating it.
If anybody would like to take over the project and keep it going, get in touch.
csste.st
https://github.com/thingsinjars/csstest
This was supposed to be a community-driven collection of information about CSS testing - tools, techniques, tutorials, etc. I'd love it if it could continue like that but I had a difficult time keeping up my enthusiasm after the umpteenth demand from some "CSS testing as a service" start-up founder demanding a favourable write-up. Quite a few of these founders also wanted some kind of guarantee that I would continue to maintain Hardy for free so they could build a business model around selling it.
Again, if anyone has ideas for how to take the project forward, let me know.
I'm going to renew the domains hardy.io and csste.st for another year to see if I can find maintainers but after that, I'll retire them if I haven't found any.
-
PrologCSS
Seeing as both Prolog and CSS are declarative languages, I found myself wondering if it would be possible to create a mapping from one to the other. It was an interesting thought experiment that quickly found itself being turned into code.
Way back when, Prolog was actually one of the first languages I learned to program in. It had been a while since I'd last used it for anything (a chess endgame solver in high school, I think) so I looked up an online tutorial. The following example is derived from section 1.1. of Learn Prolog Now
Simple rules
If you think of Prolog facts as denoting true/false attributes of elements, you can consider every known item in a KnowledgeBase (KB) as a DOM Element. For example:
mia.Is equivalent to:
<div id="mia"></div>While
woman(mia).Equates to:
<div id="mia" class="woman"></div>You can make multiple statements about an item in the KB:
woman(jody).
playsAirGuitar(jody).
Which is mapped to:
<div id="jody" class="woman playsAirGuitar"></div>You can then represent these facts using visual attributes:
.woman {
  background: yellow;
}
.playsAirGuitar {
  border: 1px solid black;
}
The only real issue is that CSS values can’t be aggregated. If they could be, you could always use the same attribute (e.g. box-shadow) and combine them:
.woman {
  box-shadow: 1px 1px 0 red;
}
.playsAirGuitar {
  box-shadow: 2px 2px 0 red;
}
You'd want this to render two box-shadows, one with a 1px offset and one with a 2px offset.
Instead, you have to use a unique CSS attribute for each class of facts. However, for the simplest examples, It’s not too complicated...
If you want to query the KnowledgeBase, you need to map a standard Prolog query such as:
?- woman(mia).Into the a different output mechanism: HTML.
The response is visualised in HTML and CSS using the following rules:
- There is an element with id "mia"
- There is a class "woman"
- The element with ID "mia" has the class "woman"
In the demo below, you can read this by verifying that the #mia div has a yellow background. Done.
Here's the complete KnowledgeBase for the first section of "Learn Prolog Now".
<!-- woman(mia). -->
<div id="mia" class="woman"></div>

<!-- woman(jody). -->
<!-- playsAirGuitar(jody). -->
<div id="jody" class="woman playsAirGuitar"></div>

<!-- woman(yolanda). -->
<div id="yolanda" class="woman"></div>

<div id="party"></div>
And here are the queries that could be answered by looking at the visual output:
?- woman(mia). Yes (the element with id="mia" has a yellow background) ?- playsAirGuitar(jody). Yes (the element with id="jody" has a solid black border) ?- playsAirGuitar(mia). No (the element with id="mia" does not have a solid black border) ?- playsAirGuitar(vincent). No (there is no element with id="vincent") ?- tattooed(jody). No (there is no CSS style for a class '.tattooed') ?- party. Yes (the element with id="party" exists) ?- rockConcert. No (the element with id="rockConcert" does not exist)More complex rules
It starts to get tricky when you have rules depending on other values such as
?- happy(jody):- playsAirGuitar(jody)
(“If jody plays air guitar, jody is happy”)
But I think some clever element nesting could handle that.
First, change the structure so that the classes/properties are on parent elements
<div class="woman">
    <div class="playsAirGuitar">
        <span id="jody"></span>
    </div>
</div>
Make properties into divs and entities into spans
Then update the structure of the rules:
.woman span {
    background: yellow;
}
.playsAirGuitar span {
    border: 1px solid black;
}
Now you can make rules dependent using the cascade. First, add the property:
<!-- happy(jody):- playsAirGuitar(jody) -->

<div class="woman">
    <div class="playsAirGuitar">
        <div class="happy">
            <span id="jody"></span>
        </div>
    </div>
</div>
Then create the rule:
.playsAirGuitar .happy span {
    box-shadow: 1px 1px 0 red;
}
The rule for
happy(jody)will only be true (show box-shadow) if the rule forplaysAirGuitar(jody)is also true.Conclusion
Sure, it's all a bit silly but it was quite a fun little experiment. There are probably a few big aspects of Prolog that are unmappable but I like to think it might just be possible to create a chess endgame solver using nothing but a few thousand lines of CSS.
-
The Greatest Sea Captain the World Has Ever Seen
(I'm still taking a break from tech writing. There will be more in the future, don't worry. If you really need a web dev reading fix, I recommend Val Head's book on CSS animations and not only because I was the technical editor on it.)
Okay, How To Catch a Cold is still in the same state it was before (finished but unpublished) but the second of the three books I started is now finished, too!
This one is a children's novel about The Greatest Sea Captain the World Has Ever Seen. Gasp as he navigates his ship through the Floating Flames, be amazed at spectacle of a sea covered in Pink Cloudweed, hold your breath as he confronts The Dreaded Pirate Captain Montigus d'Ark!
I'll need to do a few rounds of edits before sharing any samples but this one was a lot of fun to write.
-
How to catch a cold
When I decided to take a break to write, I really should have been stricter with myself and only started one book. Instead, I started three. While multitasking and context-switching may be a good thing in the fast-paced, high tech world of the Internets (and I'm not convinced it is), there's a chance it's really unhelpful when you're trying to write a book.
That said, I have at least finished one of the books:
How to Catch a Cold

It's a pencil and watercolour illustrated story about a boy's attempts to avoid school by catching a cold.
Now to move onto the second stage of book writing: wallpapering my bedroom with rejection letters.
-
Don't Panic
Really, it looks worse than it is.
For reasons of top-secret international security, I can't go into details but I'm back in hospital. pic.twitter.com/wWgaU100vJ
— Simon Madine (@thingsinjars) April 27, 2014I'm actually just getting my tonsils out but seeing as it's only really teenagers that get their tonsils out, I'm trying my best to pretend there's a parasitic fungus attacking the planet rendering everyone helpless and my blood is the only cure.
Yes I'm bored.
-
Shhh, I'm writing!
Things will be quiet here for the next few months. I'm taking a break from tech writing for a while to see if I can write something else.
You might remember the last time I did this when I wrote Explanating and tried the (admittedly, not very successful) read-then-buy experiment.
I'll update again when I've got something to show for myself.
-
Hardy v1.1 - Cartwright
Thanks to some great work by Daniel Wabyick and his team, Hardy has had a bunch of improvements over the last few weeks.
The biggest change in this version is that, if you have GraphicsMagick installed on your machine, Hardy will use it for native image diffs but fall back to the built-in method if you don't. The current image diff technique involves creating an HTML page with a canvas, opening that with PhantomJS, loading the image into the canvas and using imagediff.js to calculate the diffs. It works everywhere PhantomJS works but it's slow. Daniel benchmarked the difference and it's a huge performance gain if you rely on image diff tests.
There's also some minor improvement around logging and the cucumber report format but I'll write about them later once I've had a chance to update the Hardy website.
-
High-definition CSS Testing!
Well, kinda. Before giving my Automated CSS Testing talk at CSS Summit in July, I recorded a video of it as a backup. If everything fell apart during my presentation, Ari could seamlessly switch over the One I Made Earlier. Fortunately, the Internet did what it does best and just worked fine.
That means I have an Automated CSS Testing video all ready and waiting that nobody's seen!
Yes, it does get progressively darker as you watch. That's not your eyes playing tricks on you, that's me sitting on my balcony recording as the sun went down.
-
CSSConf EU Notes
Due to what are probably very good evolutionary reasons, doodling helps some people concentrate. I'm one of those people.
On Friday I went to CSS Conf EU and, true to form, doodled my notes. I find it also helps if I draw a little cartoon of the speaker. Although they may be of no help to anyone, here are my notes from the conference. I don't claim they are complete or accurate but I can say I had quite good fun drawing them.
-
Hardy, meet Travis
While developing the website for Hardy, it seemed obvious that I should be writing Hardy-based tests for it. What better way to figure out how to simplify testing than see what bits of the process were the hardest?
The site is hosted on GitHub using the
gh-pagesbranch of the hardy.io project. I've played with various toolchains in GitHub pages in the past - csste.st uses Wintersmith, for example - but wanted to follow my own best practice suggestions and automate the process of getting an idea from inside my head, through the text editor, through a bunch of tests and out onto production as much as possible. The main Hardy project uses Travis CI to run unit and acceptance tests on every commit so it seemed obvious to use it for this. What I've ended up with is what I think is a nice, simple process. This is designed for sites hosted on GitHub Pages but is applicable to other sites run through Travis,The manual steps of the process are:
- Make change in your website
masterbranch - Preview changes locally
- Commit changes and push to GitHub
After this, the automation takes over:
- Travis pulls latest commit
- Builds website project to
distfolder inmasterbranch - Launch web server on Travis
- Run Hardy tests against local web server
- On successful test run, push (via git) to
gh-pagesbranch
The full process is used to build hardy.io. Have a look at the
.travis.yml,package.jsonandpost_build.shfiles mostly. - Make change in your website
-
Hardy - Rigorous Testing
When GhostStory first came out, it grabbed a fair bit of interest. Unfortunately, despite the number of downloads, I got the impression actual usage was low. There were quite a few stars on the project, a couple of forks and no issues. That's not a good sign. If your project has no issues, it doesn't mean your codes are perfect, it means nobody's using them.
After asking on Twitter and generally 'around', it emerged that, although people liked the idea,
- initial setup was too tricky
- test maintenance was a hassle
- it’s not WebKit that needs tested most
Number 3 might seem odd but it has become a fact that, due to the excellent tooling, most web developers use a WebKit variant (chrome, chromium, safari, etc) as their main browser when building. This means they do generally see the problems there where they might miss the ones in IE. This isn't to say WebKit shouldn't also be tested, but GhostStory was built on PhantomJS - a WebKit variant - and therefore only picked up problems that occurred there.
I've been working evenings and weekends for the last
couple ofseveral months to improve the CSS testing setup on here.com and I think we've gotten somewhere. For a start, the name has changed...Hardy
A.K.A. GhostStory 2 - The Ghostening
This is the bulk of the original GhostStory project but instead of running through PhantomJS, it now uses Selenium via the Webdriver protocol. This means you can run your same CSS tests - still written in Cucumber - against any Webdriver-capable browser. This means Chrome and Firefox and Opera and PhantomJS and Internet Explorer and Mobile Safari on iOS and the Android Browser and and and…. you get the idea.
Installation
It’s a simple npm-based install:
npm install -g hardyYou can then call it by passing a folder of
.featurefiles and step definitions.hardy testfolder/Any relevant files it finds will be automatically parsed.
Okay, that's most of the difficulty out of the way. A simple install, simple test run and, hopefully, a simple integration into your build system. The only thing left to solve is how to make it easier to make the Cucumber files in the first place.
Hardy Chrome Extension
It’s now as simple to make your initial test cases as opening Chrome DevTools and clicking around a bit. Well, almost. Still under development, the Chrome extension helps you make feature files by navigating around the site you want to test and capturing the styles you want to test for. A Hardy-compatible Cucumber file and the accompanying element selector map is generated ready to be dropped into your features folder.
What's missing?
Is there anything missing from this flow that you'd like added? A Grunt task to set it up? Prefer something else over Cucumber? Want a Maven Plugin instead of a grunt one? Just let me know. I'm not promising I'll do it, just that I'd like to know.
Let me know by filing an issue on GitHub.
Credits and notes
The image diff code is heavily borrowed from PhantomCSS. In fact, if PhantomCSS could be run through Selenium, I'd switch over to it straight away.
Project structure and the automatic way Cucumber files, steps and suchlike all play nicely together mostly comes from WebDriverJS and CucumberJS.
Note: It’s just Hardy, not Hardy.JS. The idea here is just to show how to setup basic CSS tests and provide one (JS) solution to the problem. It’d be nice if Hardy could include common JBehave steps for CSS testing, too. And whatever it is Ruby people use.
-
Chrome Devtools Extension Starter Kit
I've been working on a new little side project recently (more info soon) which involves a Chrome Devtools extension. These are Chrome extensions that aren't targeted at changing your usual browsing experience like a normal extension but are actually aimed at modifying or providing extra behaviour for the Chrome Devtools panel. It's a little bit meta.
The theory behind them isn't that tricky and if you have any experience with standard Chrome extensions, you'd probably 'get' devtools extensions quite easily. Unfortunately, I was coming in with no prior knowledge at all and got quite lost for a few days. The docs are very helpful and the Google Group is handy but it still took me a while.
The main area I had difficulty with was the message passing. Sending info from my panel in the devtools window to the page being inspected and vice versa proved to be... complicated. I've used message events before but it still took me a while to figure out what was going where. It seems there are three individual execution contexts:
- The Panel
- The Background
- The Page
They each have access to different bits of the Chrome Extension API and the inspected page. I won't go into details of that here as others have explained it better. What I will do, though, is share this project - Devtools Extension Starter Kit. This does nothing more than create a panel containing three buttons. The first executes a snippet of JS in the context of the inspected page, the second attaches a complete JS file to the inspected page (allowing execution) and the third replaces the entire inspected page with a button. When you click on this button, it will send data back from the inspected page to the devtools panel.
Essentially, it's all the communication channels I found I needed for my extension and should be a useful starting point for anyone wanting to do something similar.
I also heard today about a new Yeoman generator that makes building Chrome Extensions easier. It would probably have made the first bit of my investigations a lot easier if I'd known about that beforehand.
-
My other hobby
Regular readers will have noticed there hasn't been anything much to read regularly here for a while. That's because I occasionally like to remind myself I'm not actually a geek, I just play one on TV. The rest of the time, I have totally different hobbies, one of which is drawing. The last time I seriously sat down and devoted several hours to drawing anything besides cartoons and application diagrams was in 2011 when I drew Oskar. Seeing as he grows pretty fast, it was about time for another.
Here are some shots of the progress:
And the finished drawing:
Of course, this isn't drawn from a live posing session. There is no way Oskar would sit still for even 2 minutes, never mind the 10 hours it took to draw this. Jenni took an amazing photo of Oskar in the Westberlin coffee shop which provided the perfect reference.
-
.net Magazine
Continuing my attempts to convince the world that CSS testing is a good thing, I wrote an article for .net Magazine. Issue 240, to be precise. Page 88 to be exact.
It's one of the few things I've done recently that I can actually point my Mum at and say "That. That there, that's what I do for a living". Which is nice.
I recognise that fella...
With Andre Jay Meissner who's also in the same issue
-
Unheroes
While tidying up my dropbox, I found a few old 'Unhero' sketches:
Also, a master uncriminal:
And the original Angry Robot Zombie:
-
HEREHacks
On Saturday 19th January, we hosted our first HERE Maps API hackathon here in Berlin. The weather (several degrees below freezing) meant a few no-shows but those came had a fun and productive day.
Hacks developed on the day included:
Cutting edge technologies
In between running around helping everybody else with their hacks, Max found the time to integrate the just-landed-in-webkit Web Speech API with a map. This means you can now speak to your computer and ask it to "Find me a restaurant". Also: "Find me monkeys. Lots of Monkeys". I kinda used that a lot while testing it out. In fact, I didn't use anything else while testing it, just that.
The source is available on GitHub
Where is the news?
There were two projects that involved analysing the content of tweets and RSS from various news sources to determine areas around the world where the news is happening.
Here's NewsMap.
Lunchtime
I squeezed in a short hack to help people find somewhere that they can walk to, eat in and walk back from in a lunch break:
http://thingsinjars.com/lab/map/lunchtime.html
Windows Phone
The majority of projects used the Web APIs but there was one team who developed a Windows Phone application. Using the concept of the 'Fog of War' from the classic Age of Empires, they brought together map exploration and POI discovery into a gamified location experience. This project was so thoroughly developed with consideration to future marketing potential that it was the overall winner for the day.
We might aim for another hackathon in the Summer so if you're anywhere near Berlin and fancy spending a day hacking on Geo API stuff, drop me a line.
-
Angler Fish

Quick sketch of an Angler Fish I drew last year.
-
GhostStory
During all the research I did for my CSS testing talk, I couldn't help but spot another gap where a testing tool could be useful.
Cucumber
Cucumber is a technology used widely in automated testing setups, mostly for acceptance testing - ensuring that the thing everybody agreed on at the beginning was the thing delivered at the end.
This is accomplished by having a set of plain text files containing descriptions of different scenarios or aspects of the application, usually with a description of the actions performed by an imaginary user. You describe the situation (known as a 'Given' step), describe the user's action ('When') and describe the expected outcome ('Then').
The language (properly known as gherkin) used in these files is deliberately simple and jargon-free so that all the key stakeholders in the project - designers, developers, product owners - can understand but the files are also written in a predictable and structured style so that they can, behind the scenes, be turned into testable code.
What occurred to me when looking into this area was that there wasn't an agreed terminology for specifying the layout/colour/look and feel of a project in plain text. Surely this would be the perfect place to drop in some cucumber salad.
What we've got now is a project based on SpookyJS - a way of controlling CasperJS (and, therefore PhantomJS) from NodeJS - which contains the GhostStory testing steps and their corresponding 'behind the scenes' test code. There are only two steps at the moment but they are the most fundamental which can be used to build up future steps.
Implemented Steps
Here, "Element descriptor" is a non-dev-readable description of the element you want to test - "Main title", "Left-hand navigation", "Hero area call-to-action". In the project, you keep a mapping file,
selectors.json, which translates between these descriptions and the CSS selector used to identify the element in tests.Then the "Element descriptor" should have "property" of "value"This is using the computed styles on an element and checking to see if they are what you expect them to be. I talked about something similar to this before in an earlier post. This is related to the 'Frozen DOM' approach that my first attempt at a CSS testing tool, cssert, uses but this way does not actually involve a DOM snapshot.
Then the "Element descriptor" should look the same as beforeThis uses the 'Image Diff' approach. You specify an element and render the browser output of that element to an image. The next time you run the test, you do the same and check to see if the two images differ. As mentioned many times before, this technique is 'content-fragile' but can be useful for a specific subset of tests or when you have mocked content. It can also be particularly useful if you have a 'living styleguide' as described by Nico Hagenburger. I've got some ideas about CSS testing on living styleguides that I'll need to write up in a later post.
Future Steps
Off the top of my head, there are a couple of other generic steps that I think would be useful in this project.
Then the "Element descriptor" should have a "property" of "value1", "value2", ..., or "valueN"This variation on the computed style measurement allows an arbitrary-length list of values. As long as the element being tested matches at least one of the rules, the step counts as a pass. This could be used to ensure that all text on a site is one of a certain number of font-sizes or that all links are from the predefined colour palette.
Then the "Element descriptor" should look the same across different browsers.This would build on the existing image diff step but include multiple browser runners. Just now, the image diffs are performed using PhantomCSS which is built on top of PhantomJS which is Webkit-based. This would ideally integrate a Gecko renderer or a Trident renderer process so that the images generated from one could be checked against another. I still feel that image diff testing is extremely fragile and doesn't cover the majority of what CSS testing needs to do but it can be a useful additional check.
The aim
I'm hoping this can sit alongside the other testing tools gathering on csste.st where it can help people get a head-start on their CSS testing practices. What I'm particularly keen on with the GhostStory project is that it can pull in other tools and abstract them into testing steps. That way, we can take advantage of the best tools out there and stuff it into easily digested Cucumber sandwiches.
Try it
The GhostStory project is, naturally, available on GitHub. More usefully, however, I've been working on a fork of SpookyJS that integrates GhostStory into an immediately usable tool.
Please check out this project and let me know what you think. I might rename it to distinguish it from the original SpookyJS if I can figure out exactly how to do that and maintain upstream relationships on GitHub.
-
Things I learnt at CSS Dev Conf
Jank
This is the word Paul Irish (@paul_irish) used to describe that jittering, stuttering effect that happens when you aren't syncing your animations with the monitor using requestAnimationFrame. Find out more about Jank at jankfree.com or requestAnimationFrame at CreativeJS.
SuperToonists
Rachel Nabors (@CrowChick) and Kyle Weems (@cssquirrel) are just as cool in real life as they are on the Twitter. Probably moreso, in fact, as there's more than 140 characters of them at a time.
Scoped Revelation
Tab Atkins (@tabatkins) explained over the buffet table the reason why the spec went for
<style scoped></style>rather than
<scopedstyle></scopedstyle>It had been bugging me that using the former meant that this wasn't backwards compatible but it turns out I was totally wrong on this one. By using the attribute rather than a new tag, the styles were backwards compatible. They would still be interpreted by older browsers (although they would still spread out to affect the whole page). If they had been included in a new tag, older browsers wouldn't have read them. The affect of the styles on the page can be avoided by introducing an ID inside the block to be scoped (and all styles within the scoped block). That way, older browsers can continue to work fine while newer browsers that interpret the attribute correctly will benefit from the improved performance of having styles only affecting a small chunk of the page.
This is why I don't write specs.
Choose your elements wisely
The examples for improving selector performance for GitHub's diff pages presented in Jon Rohan's talk made me wonder "Do I really need all these divs?". Read more yourself. Also, I love the word 'Design-gineer'.
A Porter?
Pam Selle (@pamasaur) couldn't believe I had never heard of a porter beer. Is this actually a thing? Wikipedia seems to think so but then, Wikipedia can be convinced that Julianne Moore is Dudley Moore's daughter so I'll need more proof than that. Ale, stout, bitter, lager, all words I'm familiar with but 'porter'? Nope.
More than you'd think
I thought I had a fairly comprehensive list of all the CSS testing tools out there. Really. I've spent over a year researching and testing as many as I could get my hands on. There are even more. Phil Walton (@philwalton) made some excellent points around mocking content for tests that I'm going to have to follow up on.
Skyscraper
Christopher Schmitt (@teleject) is tall. Really tall. No, taller than that.
-
CSS Dev Conf
Last week I was at CSS Dev Conf in Hawaii - the first of an annual series of conferences. Not only was I there, I actually gave a talk!
I gave an overview of the tools and techniques available for automated CSS testing. I didn't mention it much here or on twitter because, well, I was kinda nervous and didn't want to jinx it. In my daily job, I organise Tech Talks and give pointers to people on how to make their presentations exciting and full of awsm but I tend to avoid actually standing up at the front of the room myself. Beyond introducing the speakers, that is. This is probably why I used to help organise gigs more than play them.
I won't repeat the content of the talk here. For that, you should start out by checking out the slides. The main point I finished on, however, is that the web dev community has fantastic tools for testing every aspect of web development except CSS and that it appears that every developer interested in the subject has started from scratch and built a tool that does what they need it to do. I'm hoping that I can turn http://csste.st/ into a community-driven site where people can share best-practices, techniques, tools and terminology around CSS testing. That way, we can create some sturdy processes around testing our CSS and not reinvent the wheel every few months.
The conference
Firstly, the trip to Hawaii: it was fantastic. I spent the weekend before the conference staying in a backpackers hostel on Waikiki beach. If you ever need somewhere to stay for a fraction of the price of a hotel on Waikiki, I totally recommend the 'Waikiki Backpackers Hostel'. Backpackers' hostels are the same everywhere - there are the people who hang around reception that may or may not work there, you can't quite tell; there's the Australian guy who comes down drunk for breakfast, smokes half-a-dozen cigarettes quickly then goes back to bed until the afternoon; there's the guy in his mid 70s who looks like a cross between everybody's favourite grandad and a stereotypical acid-casualty.
I swam with turtles in Hanauma Bay, climbed up Diamonhead Ridge, took a bus to the far side of downtown then spent 4 hours walking back via Iolani Palace. Like I say, it was a fantastic trip, even for someone who doesn't like the sun that much.
On the Tuesday, I moved into the Outrigger Reef on the Beach hotel for the conference. Ooh, posh. I could practically step out of my room into the elevator then step out of the elevator onto the beach. I then got to spend my remaining time in Hawaii hanging out with a huge bunch of cool, clever people (Rachel Nabors put together a Twitter list of the speakers), all of whom know an awful lot about web development.
With any multi-track conference there are always going to be a few sessions you have to miss but with CSS Dev Conf being four-track and having such a high level of quality, I kinda worry that I missed out on about three-quarters of what I wanted to see. Fortunately, everybody's been sharing their slides so I can at least get the gist of what they were talking about.
The journey
All in all, I'd totally recommend keeping an eye open for the announcement of next year's CSS Dev Conf. It might not be held in Honolulu again but, from my point of view, that's a good thing. It really is a fantastic place to spend time (seriously: turtles!) but getting there from Berlin is not the easiest thing. In fact, if you use the 'Earth Sandwich' lab on here.com, you can see how close Hawaii is to being the Exact Opposite Side of the World from Berlin. On the way out there, it didn't seem too bad as I left on Friday morning (Berlin time) and landed on Friday evening (Hawaii time) but on the way back, I left on Thursday and landed on Saturday. That was quite a journey.
-
jHERE playground
Every couple of months, we have a Research Week. It's kind of like the well-known Google 20% time but instead of doing it one day a week, we gather up our time and do a week of maps-based hacking. It's totally cross-discipline so we usually gather a couple of developers, a couple of UX and visual designers, a QA and build something cool. In past Research Weeks, I've built or helped build the Alien Easter Egg, Maps Labs and CoverMap.Me. I also built a maps-based JSBin fork called JotApp.
When my partner-in-crime Max started working on the latest version of his jQuery plugin (formerly called jOvi, now called jHERE), I wanted to build a new playground where people could play and build their own maps mashups and hacks really easily. My first thought was to rework the fork of JSBin again and maybe add in a slightly nicer default theme. I wanted users to be able to save to Gists so, seeing as there is already an SQLite and a MySQL adapter, I wrote a Gist adapter which appeared to the application as if it were a database but actually saved to anonymous Gists. The problem was that it was a bit too… heavy.
Don't get me wrong, JSBin is a fantastic project. It just does a lot more than I needed. I didn't need the MySQL adapter, the alternate themes, the localstorage or the user registration. Also, it's a bit too weighty for my phone. When someone tweets a link to a JSBin or a JSFiddle, I usually check it out on my phone and it's not the best experience. Seeing as HERE maps work on mobile, I wanted my playground to work, too. Rather than spend a couple of hours cutting out all the bits I didn't want from JSBin, I decided to spend a couple of hours building my own version from scratch. So, this past Sunday afternoon, that's exactly what I did:
It's written in NodeJS on top of express and works nicely on desktop, iPad and mobile.
The project is open-sourced on GitHub (naturally) and can be modified to be a general JS-playground for anything. If you fancy a simple, self-hosted JS hackspace, just change the default HTML, CSS and JS and it's ready to go.
-
Open Source Snacks
In my opinion, seed snacks are pretty much the perfect web dev snack: they're tasty, they're low-fat, they're vegan-friendly, they're gluten-free. I've always got a tub of some next to my monitor so, when I'm chewing over a tricky layout, I can grab a handful and chew them, too.
This repository collects some of my favourite seed recipes and I'm hoping that other web devs can clone the project, roast their own, suggest improvements and submit a pull request. If you have any other easy to make snacks (such as nut snack recipes), feel free to submit them, too.
Eating tips
From observation, seed eaters tend to fall into one of these categories:
Pour-and-snarf

Pour a few into your hand, tip them into your mouth in a oner. Good when you're in a hurry. Can lead to stray seeds falling into the keyboard.
Considerate Ant-eater

Pour a few into your hand, stick your tongue into the pile of seeds, retract.
Solo Ant-eater

Stick your tongue directly into the tub of seeds. Clean, efficient, not good for sharing.
Ice-cream scoop

Use a spoon. Good for sharing and minimises mess. Prevents multi-tasking. Feels kind of like using your mouse to go Edit > Copy when ctrl-C is right there.
Rousing call-to-arms
The stereotypical image of the geek - bottle of cola on one side, jumbo bag of chips on the other, little desire to do anything beyond the computer - has never really been true for the majority. We're all kinds of different people - mountain climbers, cyclists, needlepoint workers, knitters. The people that played on the football team and the ones who didn't get picked. We deserve more than just nachos.
Also nachos.

-
Some App.net recipes
This is a collection of code snippets for various common tasks you might need to accomplish with the App.net API. Most of these are focused on creating or reading geo-tagged posts. They require a developer account on app.net and at least one of an App ID, App Code, App Access Token or User Access Token. The calls here are implemented using jQuery but that's just to make it easier to copy-paste into the console to test them out (so long as you fill in the blanks).
An important thing to bear in mind is the possibility for confusion between a 'stream' and 'streams'. By default, a 'stream' is a discrete chunk of the 20 latest posts served at a number of endpoints. This is the open, public, global stream:
https://alpha-api.app.net/stream/0/posts/stream/globalOn the other hand, 'streams' are long-poll connections that serve up any matching posts as soon as they are created. The connection stays open while there is something there to receive the response. Streams are available under:
https://alpha-api.app.net/stream/0/streamsTotally not confusing. Not at all.
Creating a user access token
Required for any user-specific data retrieval. The only tricky thing you'll need to think about here is the
scopeyou require.scope=stream email write_post follow messages exportshould cover most requirements.
Requires
client_id
Visit this URL:
https://alpha.app.net/oauth/authenticate
    ?client_id=[your client ID]
    &response_type=token
    &redirect_uri=http://localhost/
    &scope=stream email write_post follow messages export
Using a user access token to create a post (with annotations)
Requires
User Access Token- text to post
The text is essential if you don't mark a post as '
machine_only'. The annotations here are optional. Annotations don't appear in the global stream unless the requesting client asks for them.$.ajax({ contentType: 'application/json', data: JSON.stringify({ "annotations": [{ "type": "net.app.core.geolocation", "value": { "latitude": 52.5, "longitude": 13.3, "altitude": 0, "horizontal_accuracy": 100, "vertical_accuracy": 100 } }], "text": "Don't mind me, just checking something out." }), dataType: 'json', success: function(data) { console.log("Text+annotation message posted"); }, error: function() { console.log("Text+annotation message failed"); }, processData: false, type: 'POST', url: 'https://alpha-api.app.net/stream/0/posts?access_token={USER_ACCESS_TOKEN}' });
Using a user access token to post a machine_only post (with annotations)
Requires
User Access Token
In this example, we're creating a post that won't show up in user's timelines and adding the 'well-known annotation' for geolocation.
$.ajax({
  contentType: 'application/json',
  data: JSON.stringify({
    "annotations": [{
      "type": "net.app.core.geolocation",
      "value": {
        "latitude": 52.5,
        "longitude": 13.3,
        "altitude": 0,
        "horizontal_accuracy": 100,
        "vertical_accuracy": 100
      }
    }],
    machine_only: true
  }),
  dataType: 'json',
  success: function(data) {
    console.log("Non-text message posted");
  },
  error: function() {
    console.log("Non-text message failed");
  },
  processData: false,
  type: 'POST',
  url: 'https://alpha-api.app.net/stream/0/posts?access_token={USER_ACCESS_TOKEN}'
});
Retrieve the global stream, including geo-annotated posts if there are any
Requires
User Access Token
This is a very basic call to retrieve the global stream but it also instructs the endpoint to return us all annotations and include machine-only posts.
var data = {
  "include_machine": 1,
  "include_annotations": 1,
  "access_token": "{USER_ACCESS_TOKEN}"
};

$.ajax({
    contentType: 'application/json',
    dataType: 'json',
    success: function(data) {
      console.log(data);
    },
    error: function(error, data) {
      console.log(error, data);
    },
    type: 'GET',
    url: 'https://alpha-api.app.net/stream/0/posts/stream/global',
    data: data
});
Creating an App Access Token
This is necessary for many of the
streamsoperations. It is not used for individual user actions, only for application-wide actions.Requires
client_idclient_secret
client_credentialsis one of the four types ofgrant_typespecified in the OAuth 2.0 specification. I had difficulty getting this to work when using a data object:var data = { "client_id": "{CLIENT_ID}", "client_secret":"{CLIENT_SECRET}", "grant_type": "client_credentials" };The
client_credentialskept throwing an error. Instead, sending this as a string worked fine:$.ajax({ contentType: 'application/json', data: 'client_id={CLIENT_ID}&client_secret={CLIENT_SECRET}&grant_type=client_credentials', dataType: 'json', success: function(data) { console.log(data); }, error: function(error, data) { console.log(error, data); }, processData: false, type: 'POST', url: 'https://alpha.app.net/oauth/access_token' });One other thing to note is that this bit should be done server-side. This will throw a bunch of "…not allowed by Access-Control-Allow-Origin…" errors if you do it via jQuery.
Returns
{
    "access_token": "{APP_ACCESS_TOKEN}"
    }
Creating a
streamsformatNow you have your app access token, you can use it to tell the service what kind of data you want back. The streams offered in the API have two quite powerful aspects. Firstly, filters allow you to run many kinds of queries on the data before it is streamed to you so you don't need to recieve and process it all. Secondly, the decoupling of filters from streams means you can specify the data structure and requirements you want once then just access that custom endpoint to get the data you want back any time.
Requires
App access token
This first example just creates an unfiltered stream endpoint
$.ajax({
  contentType: 'application/json',
  data: JSON.stringify({"object_types": ["post"], "type": "long_poll", "id": "1"}),
  dataType: 'json',
  success: function(data) {
    console.log(data);
  },
  error: function(error, responseText, response) {
    console.log(error, responseText, response);
  },
  processData: false,
  type: 'POST',
  url: 'https://alpha-api.app.net/stream/0/streams?access_token={APP_ACCESS_TOKEN}'
});
Returns
{
    "data": {
        "endpoint": "https://stream-channel.app.net/channel/1/{LONG_RANDOM_ENDPOINT_URL}",
        "id": "77",
        "object_types": [
            "post"
        ],
        "type": "long_poll"
    },
    "meta": {
        "code": 200
    }
}
Using Filters to create a stream of geotagged posts
We'll specify some requirements for our filter now so that it only returns back a subset of posts. The rules we're specfying here are:
At least one item in the "/data/annotations/*/type" field
must "match"
the value "net.app.core.geolocation"
Requires
User access token
The
fieldis specified in 'JSON Pointer' format. Within the response, there is a 'data' object and a 'meta' object. The data contains an 'annotations' object which contains an array of annotations, each of which has a type. This is represented as/data/annotations/*/type.$.ajax({ contentType: 'application/json', data: JSON.stringify({"match_policy": "include_any", "clauses": [{"object_type": "post", "operator": "matches", "value": "net.app.core.geolocation", "field": "/data/annotations/*/type"}], "name": "Geotagged posts"}), dataType: 'json', success: function(data) { console.log(data); }, error: function(error, responseText, response) { console.log(error, responseText, response); }, processData: false, type: 'POST', url: 'https://alpha-api.app.net/stream/0/filters?access_token={USER_ACCESS_TOKEN}' });Returns
The filter rules you just specified, the
idof the filter (remember that for later) and the details of the application used to make the request.{ "clauses": [ { "field": "/data/annotations/*/type", "object_type": "post", "operator": "matches", "value": "net.app.core.geolocation" } ], "id": "527", "match_policy": "include_any", "name": "Geotagged posts", "owner": { "avatar_image": { "height": 200, "url": "https://d2rfichhc2fb9n.cloudfront.net/image/4/Pr63PjEwJ1fr5Q4KeL3392BMgSnIAYlHxv8OkWwzx75V8quNfpaFp4VPpKnDRxdXtYYPtIutrDVdU9NbJn7hKApQL84T5sfB1D9bWTgtizMWInignv0WyPPfM2DpqSThQgvkB68vbPzjZ8VeKM02M2GySZ4", "width": 200 }, "canonical_url": "https://alpha.app.net/thingsinjars", "counts": { "followers": 30, "following": 65, "posts": 96, "stars": 0 }, "cover_image": { "height": 230, "url": "https://d2rfichhc2fb9n.cloudfront.net/image/4/UWZ6k9xD8_8LzEVUi_Uz6C-Vn-I8uPGEBtKb9jSVoFNijTwyEm1mJYpWq6JvnA6Jd4gzW76vFnbSWvM3jadhc1QxUl9qS4NTKiv3gJmr1zY_UpFWvX3qhOIyKrBPZckf2MrinqWay3H0h9rfqY0Gp9-liEg", "width": 960 }, "created_at": "2012-08-12T17:23:44Z", "description": { "entities": { "hashtags": [], "links": [], "mentions": [] }, "html": "<span itemscope="https://app.net/schemas/Post">Nokia Maps Technologies Evangelist; CreativeJS team member; the tech side of museum140; builder of The Elementals; misuser of semi-colons;rn</span>", "text": "Nokia Maps Technologies Evangelist; CreativeJS team member; the tech side of museum140; builder of The Elementals; misuser of semi-colons;rn" }, "id": "3191", "locale": "en_GB", "name": "Simon Madine", "timezone": "Europe/Berlin", "type": "human", "username": "thingsinjars" } }
Listening to the geotagged post stream
This wil return a link to a long-lasting connection to the app.net stream that will only return posts with the geolocation annotation.
Requires
filter_idfrom the previous call
Note: the
filter_idwas returned asidin the previous response.$.ajax({ contentType: 'application/json', data: JSON.stringify({"object_types": ["post"], "type": "long_poll", "filter_id": "527"}), dataType: 'json', success: function(data) { console.log(data); }, error: function(error, responseText, response) { console.log(error, responseText, response); }, processData: false, type: 'POST', url: 'https://alpha-api.app.net/stream/0/streams?access_token={APP_ACCESS_TOKEN}' });Returns
The same kind of response as the 'Creating a
streamsformat' example except the data coming down on the stream is filtered.https://stream-channel.app.net/channel/1/{LONG_RANDOM_ENDPOINT_URL}Open that URL up in your browser (seeing as we're testing) and, in a different tab, create a geo-tagged machine-only post (see above). Your post will appear almost instantly after you've submitted it.
-
Explanating Experiment Follow-up
A year ago, I started a little experiment (and not one of my usual web experiments).
I decided to give away my book, Explanating, for free. The website has links to download the book without charge and also links through to Amazon and Lulu. I asked people to download the free one then, if they enjoyed it, they could come back and buy it.
Twelve months later, I now have the answer.
- Free: 315
- Amazon: 2
- Lulu: 0
Erm. Yeah. Not quite as successful as I would have liked. Still, the point was to measure the 'conversion rate'. Admittedly, it's a small sample size but it would appear to be about 0.6%. At this rate, I only need another 97,465,886 people to download the free one and I'll have made £1,000,000! Sweet!
-
Location-based time
Inspired by the simplicity of implementing a proximity search using MongoDB, I found myself keen to try out another technology.
It just so happened that I was presented with a fun little problem the other day. Given a latitude and longitude, how do I quickly determine what the time is? Continuing the recent trend, I wanted to solve this problem with Node.JS.
Unsurprisingly, there's a lot of information out there about timezones. Whenever I've worked with timezones in the past, I've always gotten a little bit lost so this time, I decided to actually read a bit and find out what was supposed to happen. In essence, if you're doing this sort of task. you do not want to have to figure out the actual time yourself. Nope. It's quite similar to one of my top web dev rules:
Never host your own video.
(Really, never deal with video yourself. Pay someone else to host it, transcode it and serve it up. It'll will always work out cheaper.)
What you want to do when working with timezones is tie into someone else's database. There are just too many rules around international boundaries, summer time, leap years, leap seconds, countries that have jumped over the international date line (more than once!), islands whose timezone is 30 minutes off the adjacent ones...
To solve this problem, it needs to be split into two: the first part is to determine which timezone the coordinate is in, the second is the harder problem of figuring out what time it is in that timezone. Fortunately, there are other people who are already doing this. Buried near the back of the bottom drawer in very operating system is some version of the
tz database. You can spend hours reading up about it, its controversies and history on Wikipedia if you like. More relevantly, however, is what it can do for us in this case. Given an IANA timezone name – "America/New_York", "Asia/Tokyo" – you can retrieve the current time from the system'stz database. I don't know how it works. I don't need to know. It works.Node
Even better for reaching a solution to this problem, there's a node module that will abstract the problem of loading and querying the database. If you use the
zoneinfomodule, you can create a new timezone-aware Date object, pass the timezone name to it and it will do the hard work. awsm. The module wasn't perfect, however. It loaded the system database synchronously usingfs.readFileSyncwhich is I/O blocking and therefore a Bad Thing. Boo.10 minutes later and Max had wrangled it into using the asynchronous, non-blocking
fs.ReadFile. Hooray!Now all I needed to do was figure out how to do the first half of the problem: map a coordinate to a timezone name.
Nearest-Neighbour vs Point-in-Polygon
There are probably more ways to solve this problem but these were the two routes that jumped to mind. The tricky thing is that the latitude and longitude provided could be arbitrarily accurate. A simple lookup table just wouldn't work. Of course, the core of the problem was that we needed to figure out the answer fast.
Nearest Neighbour
- Create a data file containing a spread of points across the globe, determine (using any slow solution) the timezone at that point.
- Load the data into an easily searchable in-memory data-structure (such as a k-d tree)
- Given a coordinate, find the nearest existing data point and return its value.
Point in Polygon
- Create a data file specifying the geometry of all timezones.
- Given a coordinate, loop over each polygon and determine whether this coordinate is positioned inside or outside the polygon.
- Return the first containing polygon
This second algorithm could be improved by using a coarse binary search to quickly reduce the number of possible polygons that contain this point before step 2.
Despite some kind of qualification in mathematic-y computer-y stuff, algorithm analysis isn't my strong point. To be fair, I spent the first three years of my degree trying to get a record deal and the fourth trying to be a stand-up comedian so we may have covered complexity analysis at some point and I just didn't notice. What I do know, however, is that k-d trees are fast for searching. Super fast. They can be a bit slower to create initially but the point to bear in mind is that you only load it once while you search for data lots. On the other hand, while it's a quick task to load the geometry of a small number of polygons into memory, determining which polygon a given point is in can be slow, particularly if the polygons are complex.
Given this vague intuition, I settled on the first option.
If I wanted to create a spread of coordinates and their known timezones from scratch, it might have been an annoyingly slow process but, the Internet being what it is, someone already did the hard work. This gist contains the latitude and longitude for every city in the world and what IANA timezone it is in. Score! A quick regex later and it looks like this:
module.exports = [ {"latitude": 42.50729, "longitude": 1.53414, "timezone": "Europe/Andorra"}, {"latitude": 42.50779, "longitude": 1.52109, "timezone": "Europe/Andorra"}, {"latitude": 25.56473, "longitude": 55.55517, "timezone": "Asia/Dubai"}, {"latitude": 25.78953, "longitude": 55.9432, "timezone": "Asia/Dubai"}, {"latitude": 25.33132, "longitude": 56.34199, "timezone": "Asia/Dubai"}, etc…All that's left is to load that into a k-d tree and we've got a fully-searchable, fast nearest neighbour lookup.
Source
The source for this node module is, of course, available on GitHub and the module itself is available for install via npm using:
npm install coordinate-tzWhen combined with the
zoneinfomodule (or, even better, this async fork of the module), you can get a fast, accurate current time lookup for any latitude and longitude.Not a bad little challenge for a Monday evening.
-
Building a Proximity Search
This is the detailed post to go with yesterday's quick discussion about proximity search. All the code is available on GitHub.
This assumes a bit of NodeJS knowledge, a working copy of homebrew or something similar.
Install
- MongoDB -
brew install mongodb - NodeJS
- NPM (included in NodeJS installer these days)
These are included in the
package.jsonbut it can't hurt to mention them here:npm install twitter(node twitter streaming API library)npm install mongodb(native mongodb driver for node)npm install express(for convenience with API later)
Start
mongodin the background. We don't quite need it yet but it needs done at some point, may as well do it now.Create a Twitter App
Fill out the form Then press the button to get the single-user access token and key. I love that Twitter does this now, rather than having to create a full authentication flow for single-user applications.
ingest.js
(open the ingest.js file and read along with this bit)
Using the basic native MongoDB driver, everything must be done in the
database.opencallback. This might lead to a bit of Nested Callback Fury but if it bothers you or becomes a bit too furious for your particular implementation, there are a couple of alternative Node-MongoDB modules that abstract this out a bit.// Open the proximity database db.open(function() { // Open the post collection db.collection('posts', function(err, collection) { // Start listening to the global stream twit.stream('statuses/sample', function(stream) { // For each post stream.on('data', function(data) { if ( !! data.geo) { collection.insert(data); } }); }); }); });Index the data
The hard work has all been done for us: Geospatial Indexing in MongoDB. That's a good thing.
Ensure the system has a Geospatial index on the tweets.
db.posts.ensureIndex({"geo.coordinates" : "2d"})Standard Geospatial search query:
db.posts.find({"geo.coordinates": {$near: [50, 13]}}).pretty()
(find the closest points to (50,13) and return them sorted by distance)
By this point, we've got a database full of geo-searchable posts and a way to do a proximity search on them. To be fair, it's more down to mongodb than anything we've done.
Next, we extend the search on those posts to allow filtering by query
db.posts.find({"geo.coordinates": {$near: [50, 13]}, text: /.*searchterm.*/}).pretty()API
Super simple API, we only have two main query types:
/proximity?latitude=55&longitude=13/proximity?latitude=55&longitude=13&q=searchterm
Each of these can take an optional
'callback'parameter to enablejsonp. We're using express so the callback parameter and content type for returning JSON are both handled automatically.api.js(open the api.js file and read along with this bit)
This next chunk of code contains everything so don't panic.
db.open(function() {
  db.collection('posts', function(err, collection) {
    app.get('/proximity', function(req, res) {
      var latitude, longitude, q;
      latitude = parseFloat(req.query["latitude"]);
      longitude = parseFloat(req.query["longitude"]);
      q = req.query["q"];

      if (/^(-?d+(.d+)?)$/.test(latitude) && /^(-?d+(.d+)?)$/.test(longitude)) {
        if (typeof q === 'undefined') {
          collection.find({
            "geo.coordinates": {
              $near: [latitude, longitude]
            }
          }, function(err, cursor) {
            cursor.toArray(function(err, items) {
              writeResponse(items, res);
            });
          });
        } else {
          var regexQuery = new RegExp(".*" + q + ".*");
          collection.find({
            "geo.coordinates": {
              $near: [latitude, longitude]
            },
            'text': regexQuery
          }, function(err, cursor) {
            cursor.toArray(function(err, items) {
              writeResponse(items, res);
            });
          });
        }
      } else {
        res.send('malformed lat/lng');
      }

    });
  });
});
If you've already implemented the
ingest.jsbit, the majority of thisapi.jswill be fairly obvious. The biggest change is that instead of loading the data stream then acting upon each individual post that comes in, we're acting on URL requests.app.get('/proximity', function(req, res) {For every request on this path, we try and parse the query string to pull out a latitude, longitude and optional query parameter.
if (/^(-?d+(.d+)?)$/.test(latitude) && /^(-?d+(.d+)?)$/.test(longitude)) {If we do have valid coordinates, pass through to Mongo to do that actual search:
collection.find({
  "geo.coordinates": {
    $near: [latitude, longitude]
  }
}, function(err, cursor) {
  cursor.toArray(function(err, items) {
    writeResponse(items, res);
  });
});
To add a text search into this, we just need to add one more parameter to the
collection.findcall:var regexQuery = new RegExp(".*" + q + ".*"); collection.find({ "geo.coordinates": { $near: [latitude, longitude] }, 'text': regexQuery }This makes it so simple, making it it kind of feels like cheating. Somebody else did all the hard work first.
App.net Proximity
This works quite well on the App.net Global Timeline but it'll really become useful once the streaming API is switched on.
Of course, the code is all there. If you want to have a go yourself, feel free.
- MongoDB -
-
Proximity Search
Now that geolocated posts are beginning to show up around app.net, I found myself wondering about proximity search. Twitter provides one themselves for geotagged tweets. What a proximity search does, essentially, is provide results from a data set ordered by increasing distance from a given location. This can be further enhanced by combining it with a text search either before or after the distance sorting. This would give you a way to search for a certain query within a certain area.
When I first started thinking about the tech required for a proximity search, I remembered Lukas Nowacki back in our old Whitespace days implementing the Haversine formula in MySQL (Alexander Rubin has a good overview of how to do this). As much as I love my trigonometry and logarithms, I must admit, I was looking around for a simpler solution. Actually, I was looking around for a copy-paste solution, to be honest. I may even have spent some time going down that route if Max hadn't pointed me in the direction of MongoDB.
I'd been putting off digging into NoSQL databases for a while because, well, I had no real reason to. Recently, I've either been focused on front-end dev or hacking away at Java and never really had any good reason to investigate any of these new-fangled technologies get off my lawn you kids.
MongoDB
After 10 minutes of messing around with Mongo, I pretty much just found myself saying “No... way. There's no way that's actually working” I'm sure those of you experience with document-oriented databases are rolling your eyes right now but for those few of us left with an entirely relational concept of databases, let me just explain it like this: you know those things you want to do with a database that are just a hassle of multiple joins and confusing references? Document databases do some of those things really really well.
The biggest selling point for me, however was the native geospatial indexing. That pretty much made the majority of my proximity search complete. All I needed to do was wrap it in a nice interface and call it a day...
I'll follow up tomorrow with a more detailed 'How-to' guide.
-
How App.net became useful
After Twitter started announcing changes to its API usage and people started to get worried about the future of the developer eco-system, App.net appeared. It provides a streaming data-platform in much the same way Amazon provides a web hosting platform. The reason for the Twitter comparison is that one of the things you can make with it is a Twitter-like public short message system. This was, in fact, the first thing the App.net developers made to showcase the platform: Alpha although that example seems to have convinced many people that the whole point was to build a Twitter-clone instead of a service whose purpose is to stream small, discrete blocks of meta-tagged data. The community-developed API spec is an important aspect of App.net as well although feature discussions can devolve into musings on Computer Science theory a bit too easily.
For the first couple of weeks, it was fun to just hack around with the APIs, post a bit, build a little test app (disabled now that more App.net clients have push notifications). It all became much more interesting, however, when two new features were added to the platform – Machine-only posts and Well-known Annotations.
Machine-only posts
Pretty much exactly what they sound like. These are posts that are not intended to be viewed in any human-read conversation stream. They still get pushed around the network exactly the same as all other posts but to see them, you must explicitly say 'include machine-only posts' in your API calls. For developers who have been building silly toys on Twitter for a couple of years, this is fantastic. You don't need to create a separate account purely for data transfer. This can be part of your main account's data stream. I have quite a few Twitter accounts that I just use for outputs from various applications. I have one, in fact, that does nothing but list the tracks I listen to that I created for this side-project.
By classifying these as
'machine-only', they can stay associated with the user and subject to whatever privacy controls they have set in general. This makes it far easier for the user to keep control of their data and easier for the service to track accurate usage. For devs, it also means you can hack away at stuff, even if it is to be public eventually, without worrying too much about polluting the global stream with nonsense.Well-known Annotations
Annotations were part of the spec from the beginning but only implemented at the end of August. Annotation is just another word for per-post meta-data – each post has a small object attached which provides extra information. That's it.
The annotations can be up to 8192 bytes of valid JSON which is quite a lot of meta-data. Even with this, however, the usefulness is limited to per application use-cases until some standards start to appear. There's nothing to stop a popular application being the one to set the standard but for the more general cases, it is most fitting to continue with the community-led development model. This is where Well-known Annotations come in.
Well-known annotations are those attributes which are defined within the API spec. This means that the community can define a standard for 'geolocation', for example, and everyone who wants to use geolocation can use the standard to make their application's posts compatible with everybody else's.
Obviously, I'm quite into my geolocated data. I love a bit of map-based visualisation, I do. Here's a sample of jQuery that will create a post with a standard geolocation annotation:
$.ajax({
  contentType: 'application/json',
  data: JSON.stringify({
    "annotations": [{
      "type": "net.app.core.geolocation",
      "value": {
        "latitude": 52.5,
        "longitude": 13.3,
        "altitude": 0,
        "horizontal_accuracy": 100,
        "vertical_accuracy": 100
      }
    }],
    machine_only: true
  }),
  dataType: 'json',
  success: function(data) {
    console.log("Non-text message posted");
  },
  error: function() {
    console.log("Non-text message failed");
  },
  processData: false,
  type: 'POST',
  url: 'https://alpha-api.app.net/stream/0/posts?access_token=USERS_OAUTH_TOKEN'
});
In the same way as the machine-only posts, these annotations aren't provided on a default API request, you have to specifically ask for them to be included in the returned data. This is to make sure that the majority of use cases (public streaming, human-readable conversation) don't have to download up to 8KB of unnecessary data.
Retrieving both
This is an API call to retrieve posts marked machine-only and with annotations
Potential use cases
You might have noticed, the API call above had the machine-only attribute as well as the well-known geo annotation. If I wanted to create an app that would run on my phone and track my routes throughout the day, all I would need to do would be to run that
$.ajaxcall periodically with my current geolocation. The data would be saved, distributed, streamed and could be rendered onto a map or into a KML at the end of the day. I could record hiking trails or museum tours, or share my location with someone I'm supposed to be meeting so they can find out where I'm coming from and why I'm late. That's just a couple of the single-user cases. Having a shared standard means that the potential for geo-tagged posts opens up to at least equal that of Twitter's. Heatmap-density diagrams showing areas of the most activity; global and local trends; location-based gaming. Add a'news'annotation to geotagged posts and suddenly you've got a real-time local-news feed. Add'traffic'and you've got community-created traffic reports.There are so many clever things you can do with location-tagged data. I hope others are just as enthused about the possibilities as I am.
-
CoverMap - Nokia Maps on Facebook
I'm almost managing to keep to my intended schedule of one map-based web experiment per week. Unfortunately, I've mostly been working on internal Nokia Maps projects over the weekends recently so I've not had much to post here.
I can share my latest toy, though: CoverMap.me
Using just the public APIs over a couple of hours last Sunday afternoon, I made this to allow you to set a Nokia Map as your Facebook Timeline cover. The whole process is really straightforward so I thought I'd go over the main parts.
The exact aim of CoverMap.me is to allow the user to position a map exactly, choose from any of the available map styles and set the image as their cover image.
Make a Facebook App
Go to developers.facebook.com/apps/ and click 'Create New App', fill in the basic details – name of the app, URL it will be hosted on, etc – and you're done.
Facebook login
I've used the Facebook JS SDK extensively over the summer for various projects but I wanted to try out the PHP one for this. Super, super simple. Really. Include the library (available here), set your
appIdandsecretand request the$login_url.$facebook->getLoginUrl(array('redirect_uri' => "http://example.com/index.php"));That will give you a link which will take care of logging the user in and giving you basic access permissions and details about them.
Nokia Maps JS API
When I'm hacking together something quick and simple with the Nokia Maps API, I usually use the properly awsm jQuery plugin jOVI written by the equally awsm Max. This makes 90% of the things you would want to do with a map extremely easy and if you're doing stuff advanced enough to want the extra 10%, you're probably not the type who'd want to use a jQuery plugin, anyway. Either way, you need to register on the Nokia developer site to get your Nokia
app_idandsecret.To create a map using jOVI, simply include the plugin in your page then run
.jOVIon the object you want to contain the map along with starting parameters:$(window).on('load', function() { $('#mapContainer').jOVI({ center: [38.895111, -77.036667], // Washington D.C. zoom: 12, // zoom level behavior: true, // map interaction zoomBar: true, // zoom bar scaleBar: false, // scale bar at the bottom overview: false, // minimap (bottom-right) typeSelector: false,// normal, satellite, terrain positioning: true // geolocation }, "APP_ID", "APP_SECRET"); });This gives us a complete embedded map.
As I mentioned above, part of the idea for CoverMap.me was to allow the to choose from any of the available map styles. This was an interesting oddity because the public JS API gives you the choice of 'Normal', 'Satellite', 'Satellite Plain' (a.k.a. no text), 'Smart' (a.k.a. grey), 'Smart Public Transport', 'Terrain' and 'Traffic' while the RESTful Maps API (the API that provides static, non-interactive map images) supports all of these plus options to choose each of them with big or small text plus a 'Night Time' mode. Because of this, I decided to go for a two-step approach where users were shown the JS-powered map to let them choose their location then they went through to the RESTful static map to allow them to choose from the larger array of static tiles.
RESTful Maps
The RESTful Maps API is relatively new but does provide a nice, quick map solution when you don't need any interactivity. Just set an
img srcwith the query parameters you need and get back an image.(this should be all on one line) http://m.nok.it/ ?app_id=APP_ID &token=APP_TOKEN &nord // Don't redirect to maps.nokia.com &w=640 // Width &h=480 // Height &nodot // Don't put a green dot in the centre &c=38.895111, -77.036667 // Where to centre &z=12 // Zoom level &t=0 // Tile StyleThat URL produces this image:
Upload to Facebook
Given the above, we've now got an image showing a map positioned exactly where the user wants it in the tile style the user likes. We just need to make the Facebook API call to set it as Timeline Cover Image and we're done.
You'd think.
Facebook doesn't provide an API endpoint to update a user's profile image or timeline cover. It's probably a privacy thing or a security thing or something. Either way, it doesn't exist. Never fear! There's a solution!
With the default permissions given by a Facebook login/OAUTH token exchange/etc... (that thing we did earlier), we are allowed to upload a photo to an album.
The easiest way to do this is to download the map tile using cURL then repost it to Facebook. The clever way to do it would be to pipe the incoming input stream directly back out to Facebook without writing to the local file system but it would be slightly more hassle to set that up and wouldn't really make much of a difference to how it works.
// Download from RESTful Maps
$tileUrl = "http://m.nok.it/?app_id=APP_ID&token=APP_TOKEN&nord&w=640&h=480&nodot&c=38.895111,%20-77.036667&z=12&t=0";
$ch = curl_init( $tileUrl );
$fp = fopen( $filename, 'wb' );
curl_setopt( $ch, CURLOPT_FILE, $fp );
curl_setopt( $ch, CURLOPT_HEADER, 0 );
curl_exec( $ch );
curl_close( $ch );
fclose( $fp );

//Upload to Facebook
$full_image_path = realpath($filename);
$args = array('message' => 'Uploaded by CoverMap.me');
$args['image'] = '@' . $full_image_path;
$data = $facebook->api("/{$album_id}/photos", 'post', $args);
The closest thing we can do then is to construct a Facebook link which suggests the user should set the uploaded image as their Timeline Cover:
// $data['id'] is the image's Facebook ID
$fb_image_link = "http://www.facebook.com/" . $username . "?preview_cover=" . $data['id'];
Done
There we go. Minimal development required to create a web app with very little demand on the user that gives them a Nokia Map on their Facebook profile. Not too bad for a Sunday afternoon.
Go try it out and let me know what you think.
-
Web Audio
I'm getting a bit obsessed with the Web Audio API just now. That's not a bad thing, of course, I just wish the browsers would all catch up.
Ages ago, I mentioned the SoundScape maps mashup Max and I made at the 5apps hackathon. Finally, here's the video of the two of us presenting it at a Nokia Berlin Tech Talk.
Creative tutorials
This goes along with the series of Web Audio API introductory tutorials I'm writing over at CreativeJS.
-
Using CSS :target to control state
There can be a fair amount of discussion provoked by the phrase "CSS only" or "Built entirely in HTML and CSS" when it comes to tech demos. The discussion generally revolves around the fact that what the phrase actually means 99% of the time is "Using CSS for the graphical bits but tracking the mouse using JS" or "Using CSS transforms for most of it but using JS to calculate the values" or any number of variations on that theme.
Now, I'm not saying that's a bad thing at all, I quite happily called my interpretation of Super Mario Kart CSS-only even though without JS, Yoshi wouldn't make it to the first bend. What these demos are doing, essentially, is using CSS as the rendering layer where previously, JS would have been used. By doing so, you even get some nice hardware acceleration thrown in. Not too bad.
Why fall back?
The reason we fall back to JS for a lot of things is because CSS is a declarative language (see my post on CSS testing to learn more). However you say things should be is how they are. In CSS, you can't set a variable to one value, do something with it then set it to a different value and do something else. For a start, you don't have variables. Even if you did, the style sheet is read top-to-bottom before anything is done with it. The variable would always have the final value assigned to it, even the first time you used it. I'm simplifying a bit but not much. If you want to do anything clever, you generally need to resort to JS, an interpreted language.
Really CSS only
If you want to make something properly interactive but entirely CSS, you have to find a way to modify the state of the DOM so that different sets of styles can be applied to the same sets of elements. We actually do this all the time when we change the colour of a link on :hover. The user interacts with the page, the state of the page is changed slightly, a different style applies. There's a lot you can do now that you have a way to modify the page based on user interaction. Hooray for pseudo-classes!
An extremely important addition to the set of pseudo-classes available in CSS3 is the :target class. This becomes set on an element when the element is the target of a clicked link. Think of in-page jump links. When you click on one and the URL changes to 'blah.html#the-thing-you-clicked', the element with
id="the-thing-you-clicked"gets the :target pseudo-class. Now you can affect it and its children with new styles. Now it becomes interesting, you can click on something on one bit of the page and it cause something to happen on another bit of the page.Multiple-nested states
By nesting several elements around the thing you're intending to modify, you can now create a set of states entirely controlled by CSS. For example, with this HTML:
And this CSS:<div id="red"> <div id="blue"> <div id="green"> <div id="yellow"> <p>Hello.</p> </div> </div> </div> </div> <ul> <li><a href="#red">Red</a></li> <li><a href="#blue">Blue</a></li> <li><a href="#green">Green</a></li> <li><a href="#yellow">Yellow</a></li> <li><a href="#default">Default</a></li> </ul>p { color:black; } #red:target p { color:red; } #blue:target p { color:blue; } #green:target p { color:green; } #yellow:target p { color:yellow; }You can change the colour of the text by clicking on the link. Without any JS.
Shiny demos
This still isn't perfect. There are still going to be many things that JS is best for, calculations being one, keyboard input being another. To try and find the best way to show this off, I tried to update CSS Mario Kart to be entirely CSS and I almost got there but wasn't 100% successful.
I then started to build a zoetrope in CSS, found someone else had already done it and decided to modify it.
Maybe soon, the phrase "CSS only" will really mean "CSS only. And a bit of HTML."
-
Web Audio API Part 1
I'm enjoying the chance to write for another site that I get with creativejs.com but it does leave me less time to create new posts for here.
Having said that, there's nothing wrong with the occasional cross-post. Here's the first part of the introduction to Web Audio that I promised a couple of weeks ago:
-
CSSSquircle
After a light-hearted challenge in work, I started trying to replicate a Squircle in CSS. This is a bit tricky as it can't be created using simple border-radius.
Fortunately, somebody else already did the hard work. There's a project on GitHub by Robert Dougan which contains a fairly accurate squircle (good enough for screen, anyway). I decided to reproduce it reducing the number of elements used.
Here it is using pseudo-elements on a paragraph and a link tag.
Now to convince the designers at work to use it.
-
A collection of bookmarklets
Bookmarklets are the handiest little things. In case you don't know (which I'm sure you do), they're small chunks of JS that you store in your browser's Bookmarks or Favourites section which you can launch while looking at any web page. I write bookmarklets for all kinds of different tasks – navigating quickly around the build monitor at work, filling in tricky forms that my browser autocomplete doesn't handle, etc.
Here are a few of bookmarklets I find extremely useful for web development. To add them to your browser, simply drag the link on the title into your bookmark bar, hold shift down and drag or right-click and 'Add to Favourites', depending on what browser you're in.
Add JS to the page by URL
This will allow you to add any script you like to the current page. This can be particularly useful if you want to add a certain library or plugin to a page to investigate it further.
javascript:(function(){document.body.appendChild(document.createElement('script')).src=prompt('Script to add');})();Add the latest CDN jQuery to the page
A variation on the above bookmarklet, this simply adds the latest version of jQuery. If you want to be able to play with a page and are familiar with jQuery, this will ensure that it is loaded and attached.
javascript:(function(){document.body.appendChild(document.createElement('script')).src='http://code.jquery.com/jquery-latest.min.js'})();Add CSS to the page by URL
Add any stylesheet to the current page with a particular URL. This is handy if you want to demo variations to clients, I find. particularly if you predefine the CSS URL.
javascript:(function(d){if(d.createStyleSheet)%20{d.createStyleSheet(%20u%20);}%20else%20{var%20css=d.createElement(%27style%27),u=prompt(%27CSS%20to%20add%27);css.setAttribute(%22type%22,%22text/css%22);css.appendChild(document.createTextNode(%22@import%20url(%22+u+%22)%22));d.getElementsByTagName(%22head%22)[0].appendChild(css);}}(document))Submit this page to the webdev subreddit
This isn't so much a web dev helper, more a general helper. I use this (or a variation thereof) to submit posts to specific reddits with fields prefilled. This bookmarklet defaults to the webdev subreddit.
javascript:window.location=%22http://www.reddit.com/r/webdev/submit?url=%22+encodeURIComponent(window.location)+'&title='+encodeURIComponent(document.title);void(0);Add a CSS rule to the page
I can't remember whether I wrote this one or if I found it somewhere. The 'x<style>' is something from the middle of jQuery, though. Anyhow.
This allows you to add a style block directly into the page. This is useful for small CSS injections where the browser's web inspector is unavailable or incapable. Even though it's a single prompt that pops up, there's no reason why you can't past an entire stylesheet in there. I sometimes find myself doing that when I'm previewing designs on a production server.
javascript:(function(){var div = document.createElement('div'); div.innerHTML ='x<style>' +prompt('Style to add')+ '</style>';document.body.appendChild(div.lastChild);})(); -
Sounds like a Hackathon
A couple of weeks ago, I started digging into the Web Audio API. Initially, I was just looking to find out what it was and see if any ideas for toys presented themselves but, kinda predictably, I ended up getting elbow-deep in a bucketful of audio routing graphs, gain nodes and impulse responses.
I'll write up a more detailed post about the API shortly but Max and I used it quite heavily in the 5apps hackathon we attended last week and I wanted to share the outcome of our hacking.
SoundScape
“A Nokia Map mashed together with a bunch of APIs and positional audio to create an immersive map experience.”
For a better explanation of how SoundScape works, check out Max's slides:
In essence, we use a Nokia Map as the base, add on a Flying Hamster, make a call to Freesound.org for geotagged audio samples, male a call to LastFM for upcoming concerts, make a call to Deezer for the most popular track by the artist playing the event reported by LastFM and put them all together in the browser using 3D positional audio. Basically.
The source is available on GitHub
The Actual Demo
-
Web Page Screensavers
I don't find myself using screensavers that much these days. Sure, they made sense when you needed to avoid burning a ghost of the windows start bar into your CRT monitor but with TFTs, LEDs, projectors, OLEDs and whatever else, it's rare you'll find hardware that actually needs protecting like that any more. On top of that, in my case, I'm either at my desk coding or at the coffee machine refilling. There aren't that many opportunities for me to appreciate a warp-speed starfield or some infinite pipes.
What I'm saying is: I miss screensavers.
Since I started writing for CreativeJS, I've seen a lot more examples of clever, cool, pretty and downright creative demos and toys written in JS than I ever had before. You can probably figure out where I'm heading with this: these would make cool screensavers.
A quick bit of googling later and I found a couple of applications that let you set a web-page fullscreen as your screensaver. Of course, you can't just set any old demo as your screensaver, many of them rely on user interaction which kinda defeats the purpose.
Downloads
OS X
Unfortunately, this uses plain-old standard WebKit so no WebGL demos. Maybe someone can fork Chromium to make it do this.
Windows
This one seems to be based on IE so it probably won't work with the canvas-based demos below. If you can point me to a WebKit-based one, I'll include that instead.
Old-school screensavers
Flying Windows
http://dl.dropbox.com/u/16145652/flying/flying.html
Starfield by Chiptune
http://www.chiptune.com/starfield/starfield.html
Non-canvas
Insta-Art by me
http://thelab.thingsinjars.com/insta-art.html
Newsola by Nick Nicholaou
Canvas
Falling blocks by Lionel Tardy
http://experiments.lionel.me/blocs
MMOSteroids by Seb Lee-Delisle
http://seb.ly/demos/MMOsteroids.html
Origami by Hakim El Hattab
http://hakim.se/experiments/html5/origami/
The Single Lane Superhighway by Aaron Koblin and Mr.doob
http://www.thesinglelanesuperhighway.com/
Ablaze by Patrick Gunderson
http://theorigin.net/ablazejs/
Visual Random by Dimitrii Pokrovskii
Circle Worm by Ilari
http://style.purkki.ilric.org/projects/js_wave/
Boids by Jason Sundram
http://viz.runningwithdata.com/boids/
3D Globe by Peter Nederlof
http://peterned.home.xs4all.nl/demooo/
Moonlander by Seb Lee-Delisle
http://moonlander.seb.ly/viewer/
WebGL Needed
Just in case someone in the comments finds a WebGL-capable screensaver, here are the demos I liked that require WebGL.
Clouds by Mr.doob
http://mrdoob.com/lab/javascript/webgl/clouds/
WaterStretch by Edouard Coulon
http://waterstretch.ecoulon.com/
Further Development
The ideal screensaver would allow you to enter several different URLs to allow you to easily save them. There should also be a checkbox to mark demos as 'works offline'. That way, when the screensaver starts, it checks for connectivity then displays a screensaver that doesn't require a connection.
Add your suggestions below.
-
Nokia Web Dev Blog
Exciting news! The Nokia Web Dev Blog is finally live!
You might remember it was one of my 2012 ToDos and I can now move the To-Do to Done.
So far, I've put two posts up, one on using
background-size: coverand one on quick prototyping using python SimpleHTTPServer.I'm not convinced a URL with '.../Blogs/blog/...' is necessarily the most memorable so maybe the next task would be to get something catchier. Any suggestions?
-
Superhero Libraries
I'm currently writing an introduction course to JS libraries and have decided jQuery is like Batman – Objects are wrapped in a utility belt that does everything but are essentially unchanged underneath – while Prototype is more like Wolverine – Objects are injected with stuff to make them better, stronger, more deadly.
Anyone got any ideas about MooTools?
-
Writing, writing and writing
In case anybody's wondering where I've been for the last few weeks (and I know you all have), I've recently joined the CreativeJS team writing about the coolest, shiniest things on the world-wide interwebs. My first post went up last week.
I'm also about to launch the Nokia Web Dev blog (link to come soon) where I get to write tutorials about the coolest, shiniest things we do in Nokia Maps
Don't worry, there won't be fewer articles going up here than before, I just had to spend a couple of weeks figuring out which articles were best suited to where. To make up for a quiet few weeks, here's a picture of some Kohlrabi, a really tasty vegetable barely known outside Germany.
-
JS Minification is seriously addictive.
Having gotten hooked on it during the first js1k, written about extreme JS minification and submitted a bunch of stuff to 140bytes, I think it's fairly safe to say I'm an addict. Because of that, there was really no chance that I could let this year's js1k go by without entering.
The theme this year is ‘Love’. Seeing as I never actually submitted my maze1k demo, I decided I'd spruce it up, restyle a bit and submit it covered top to bottom in hearts.
There's not a lot I can say about minification techniques that hasn't already been covered either on this site, on Marijn Haverbeke's site, on Ben Alman's or on the 140bytes wiki page on byte-saving techniques. The only things I will add are a couple of techniques which are new to me. I have thoroughly commented the code below, however. If you want to play along, have a look.
Left-first Evaluation
It's a feature of most programming languages that when you have a logical operator such as
&&or||, the value of the left side of the operator determines whether the right side will be evaluated at all. If the left side of an AND is false, we're going to get a false for the whole thing. It doesn't matter what the right side is so we don't even need to look at it. Similarly, if the left side of an OR is true, the eventual return value will be true so we don't need to look at the right. For example, here are two statements:coffee&&morning wine||workIn the first example (
&& – AND), we will only checkmorningifcoffeeis true. We first have a look atcoffeeand if it is false, we don't care whether morning is true or not, we just skip it (and, presumably, go back to bed). Ifcoffeeistrue, we'll then have a look to see if morning is true. It doesn't matter if morning is a function or a variable assignment or whatever, it will only happen ifcoffeeis true.In the second example (
|| – OR), we will only evaluateworkifwineis false. We start by looking at and evaluatingwine. If that is true, the JS interpreter saves us from even consideringworkand skips it. The right-side of the operator,work, is only considered if wine is false.You can probably see how, in a few simple situations, this can help avoid an
if(), thereby saving at least one byte. Usually.‘A’ font
If you want to set the font-size on a canvas 2D context, you have to use the font property. Makes sense, right? Unfortunately for obsessive minifiers, you can't just set the fontSize, you also have to set the fontFamily at the same time:
canvas.getContext('2d').font="20px Arial"Failure to set the font family means that the whole value is invalid and the font size isn't applied.
My thought process: “But 'Arial'? The word's so… big (5 bytes). There must be some way to make this smaller. If only there were a font called ‘A’ (1 byte)…”
Well, it turns out, if you set a font that doesn't exist on the user's system, the canvas will fall back on the system sans-serif by default. On windows that is... Arial. On OS X, it's Helvetica. I'm glad about that because otherwise, Helvetica wouldn't get a look-in, being 9 whole bytes.
There is always the chance that someone will have a font called ‘A’ but I'm willing to take that risk. This possibility could be avoided by using an unlikely character like ♥ for the font name.
The code
These are hosted on GitHub rather than in my usual code blocks to make it easier for you to fork them, pull them apart and get elbow-deep in them.
The almost-impossible-to-read minified submission:
The full, unminified code with thorough commenting:
The submission
My entry is up on the js1k site now. It's already getting quite busy up there after only a few days and I have to say I'm impressed by the fantastic job @kuvos has done in building it up over the last couple of years and providing me with fuel for my addiction.
-
SSH Access Limiting
Adding the following rules to the iptables will limit SSH access to 5 connections within a 60 second period. This should be more than enough for normal usage but is far too limiting to allow a brute-force dictionary attack. This must be installed as root.
iptables -A INPUT -i eth0 -p tcp –dport 22 -m state –state NEW -m recent –set –name SSH
iptables -A INPUT -i eth0 -p tcp –dport 22 -m state –state NEW -m recent –update –seconds 60 –hitcount 5 –rttl –name SSH -j DROP
Important
If you're experimenting with iptables, you should add this to the crontab first:
*/10 * * * * /sbin/iptables -FThis will reset all rules every 10 minutes just in case you add something dumb and lock yourself out.
-
ImpressJS Tools
While putting together last week's promo video for Museum140 (a vote'd be awsm, btw), I knocked up a few tools to make my life easier. As I always say, if you find something you like, make a plugin for it. Seriously, I always say that. That might even be how I proposed to my wife, I'll have to check.
Anyway.
Play
This is a simple timing helper. It just provides a little array you can push slide durations into and at the end, you call 'play'. I can't see many uses for this other than in creating videos.
ImpressJS.play(3000);  //Set the first slide duration for 3 seconds
ImpressJS.play(1000);  //Set the second slide duration for 1 second
ImpressJS.play(); //Play from the start
Edit
This is much more useful.
If this script is included in the page (after the impress.js script), you can drag your slides around, rotate and scale them into exactly the position you want. Once you're happy, you can get the current HTML output onto the console for pasting back into your original slideshow file. I could have snuck in a drag-n-drop file handler but that would make it Chrome only.
Disclaimer
These tools rely on ImpressJS having a public API which it currently doesn't have. It's obviously high on the author's priority list (given the amount of discussion it's raised) but, as too many pull requests spoil the broth, I've made a little fork of my own, added the public functions the tools require and I'll update them once the main repository's settled down a bit.
Download
These are available in the tools folder of this fork of impress.js. Each one contains an example. Hopefully, these will be updated to use the public API as soon as it's available.
-
Museum140 Shorty
As regular readers are probably aware, one of my side projects is helping out Museum140 with tech and design support (building websites, designing stickers, etc). Jenni's the main driving force behind some of the coolest “Museums and Social Media” projects of the past year.
The Museum140 project is in the running for a Shorty Award so I thought I'd help out by making a promo video. Of course, it's always best to play to your strengths so I built the video as a web page…
ImpressJS
HTML5 slideshows are all pretty cool (I even used one myself a few months back) but most of them deliberately emulate traditional slide presentations. When I saw ImpressJS for the first time last week, I was astounded. Its style is based on prezi.com but built using CSS3 rather than Flash. As well as being an inventive way of giving presentations, it also gave me an idea.
A couple of hours coding later and we've got a simple but stylish video with every word and phrase positioned perfectly. I wrote a little helper function to assist in creating a consistent timeline and recorded it in Screenflow. After that, I spent 10 minutes with the other kind of keyboard and came out with a nice little piece of background music, too.
The Video
There you go, ImpressJS is not only good for slideshow but also promo videos. Not bad.
Vote?
It would also be remiss of me if I didn't ask those of you with a twitter account to at least consider voting.
-
Umpteen ways to test for a function
After wrestling with another 140bytes challenge, I found myself wondering how many different ways you can test an object in JS to see if it’s a function. I wrote out a few of them then threw it out to my colleagues who came up with a few more. I’d love to hear from anyone who can suggest more to add to the list. Ideally, you want to find a test that will return true for all functions and only for functions. It’d be great if it’s a universal test that can be slightly modified to test for other types but that’s not essential.
Bear in mind, most of these shouldn’t be used in the real world, this is just for fun.
There are a couple of main categories and several variations within.
Duck Typing
When I see a bird that walks like a duck and swims like a duck and quacks like a duck, I call that bird a duck.
In other words, if an object has the methods of a function and the properties of a function, it’s probably a duck. No, that doesn’t sound right.
This simply detects whether the object we’re testing contains the methods or properties we’d normally associate with a function. The most common test is checking whether
a.callexists. In most cases, this will only be defined on a function and it will be defined on all functions. It is, therefore, a good test to use.The downside is that it can be fooled by setting a property of call on the object to be truthy. This will pass the test but still not be a function. Also, if the object is null or undefined, this will throw a TypeError (as pointed out by subzey on git).
a.call                   // Hey, this has a call property. Quack?
a.call && a.call.call    // The call also has a call so is probably also a function. Quack.
a.apply                  // As before but with apply this time
a.apply && a.apply.apply // ditto and ditto
String comparisons on typeof
This area of inspection is probably the richest for coming up with silly ideas to test. The
typeofoperator simply returns a string containing the type of the object. That’s it. Anything you can think of to compare a string against another string, be it RegEx, charAt, equals or threequals (===) can be manipulated to become a check for type.typeof a>'f'&&typeof a<'g' // Long-winded and quite silly. Performs a numerical comparison on the strings (typeof a).charAt(0)=='f' // Sturdy but not very useful. typeof a==typeof eval // May as well use eval for something, it’s a global function typeof a==typeof dir // Shorter but might not exist everywhere typeof a=='function' // The usual way to test. Everything above here is purely academic /^f/.test(typeof a) // Matching the string against a unique RegEx. See the table below typeof a==typeof b // Requires access to another variable which is a known function (typeof a)[0]=='f' // Small and robust but doesn’t work in IE6 or 7Table of RegEx Patterns to match object types:
As little aside here, we’ve got a table of simple RegEx tests that do the same as the one mentioned above. They return true if the type is what you expect, false for all other types. They work by assuming things like ‘object’ being the only type to contain a ‘j’ or ‘boolean’ being the only one with an ‘a’.
Type         RegEx                 Note
boolean      /a/.test(typeof a)    // Shorter than typeof a==‘boolean’
function     /^f/.test(typeof a)   // Shorter than typeof a==‘function’
undefined    /d/.test(typeof a)    // Shorter than typeof a==‘undefined’
number       /m/.test(typeof a)    // Same length as typeof a==‘number’
object       /j/.test(typeof a)    // Same length as typeof a==‘object’
string       /s/.test(typeof a)    // Same length as typeof a==‘string’
null         /ll/.test(typeof a)   // Longer than typeof a==‘null’
Pick & Mix
This not only makes the assumption that an object is probably a function if it contains a ‘call’ but also that if that call has the same type as the object, they’re both probably functions.
typeof a==typeof a.call // A mixture of typeof string comparison and duck typinginstanceof
In some circumstances,
instanceofis going to be better than typeof as it compares types rather than strings.a instanceof Function // This will throw a ReferenceError if a is undefined.The [[Class]] of the object
This comes from the JavaScript Garden where you’ll find they have a strong opinion on
typeofandinstanceof. This usescallto execute thetoStringmethod on theprototypeof the basicObjectconstructor. Phew. At that point, you'd have a string ‘[Object Function]’. You can then chop off the beginning and the end using slice (treating the string as if it were an array) to get just the type. All together, it looks like this:Object.prototype.toString.call(a).slice(8, -1);Testing the string representation of the object
This is fairly nasty but still quite effective. Convert the object itself to a string (not its type but the actual object) and see if that begins with ‘function’. This is nowhere nearly as robust as some of the other tests as this will also pass true for any strings that begin "function..." but it’s quite cunning. Credit goes to Max for this one.
/^function/.test(a.toString())   //Test if the output of .toString() begins with ‘function’
/^function/.test(a+"")           //As above but using a shortcut to coerce the function to a string.
Running it
This isn’t so much checking whether it looks and sounds like a duck, this is more like serving it à l’orange and seeing if it tastes like a duck. The idea here is to actually try and execute it. If it throws an error, it’s not executable, if it doesn’t, it is. Or something like that. Here, we’re testing that the error is an
instanceofTypeError as an undefined object would also end up in the catch.The obvious downfall to this technique is that you don’t necessarily want the function executed when you’re testing it. In fact, you almost never want to do that. I might go as far as to say you never want that.
try {
  a();
  true;
} catch (e) {
  !(e instanceof TypeError);
}
The other big weakness in the above technique is that, even if the object is a function, the call itself might throw a TypeError. In Chrome, there's a bit more transparency as the error thrown has a type property. In that case you want to check that the type is
'called_non_callable'but that might still be a consequence of the function. In Safari, there's a similar property on the error (e.message) but the error object itself is no longer a TypeError, it is just an Error.More…
I’m certain there are more. Many, many more. There are also several dozen that are trivial variations on those mentioned above – you could do the same string comparison tests on the
[[Class]]property, for instance – but I missed these out. There’s probably a huge section missed out here (I'd forgotteninstanceofexisted until after the first draft of this post, for instance). If you can think of any more, let me know here or on The Twitter.I'll also reiterate my point from earlier: most of these are deliberately useless or inefficient. The point here isn't to find better ways to do things, it's to practice doing what you do every day. The more you play while being a web developer, the less you need to work.
-
Dun-dun-Duuuuun
Or, to put it another way: Done.
After chatting with my co-conspirator in Museum140, I was finally convinced to do a list of stuff I started and finished in 2011. I'm usually a bit reluctant to write these kinds of things down because it borders on trumpet-blowing but at least this way, I'll have something to prompt me when I start going senile and remaking old ideas.
Personal
Before getting to the lists, I have to mention that this time last year I was living in Edinburgh, working at National Museums Scotland and being sleep-deprived by my newborn son. This year, I'm living in Berlin, working at Nokia Maps and being sleep-deprived by my teething one-year-old son.
My job at Nokia is seriously kick-ass. Aside from spending most days figuring out how to do cool stuff in clever ways, I've been getting actively involved in organising our weekly Tech Talks.
Websites
These are sites I built or helped build with Jenni or with the rest of my awesome team at Nokia.
Tools
Things I built to make my life easier which I hope others might find useful.
Book
Although I first published the book last year, this year, I did try out the ‘Read now, Pay Later’ experiment this year. I'll let you know how that's going later.
Video
Having missed out on presenting it at a conference, I gathered together a bunch of stuff I learnt while working at NMS.Digital Toys
These are the most fun bits. The silly, experimental games, gadgets and fun ways to waste time.
Still to do...
Get the Nokia Web Dev blog off the ground. Don't currently have the slightest idea how to go about it but we've got some world-class webdevs here and we should share some of those smarts.
Write articles for other people. I write a lot and, often, my only editor is myself. I have no idea if any of this is any good to anyone. The best way to find out is to try writing for another editor some time.
Present a lot more. As someone who, at one point, used to make his living standing in front of a theatre full of people being funny at them, I kinda miss that in my day-to-day.
Not move country. Seems like a simple plan but I've failed at it 3 out of the last 5 years.
-
CSS Verification Testing
It's difficult to test CSS. In Nokia Maps, we use lots of different kinds of automated tests to ensure the build is doing what it's supposed to do – Jasmine for JS unit tests, jBehave for Java acceptance tests, a whole load of integration tests and systems to make sure all along the process that we know as soon a something goes wrong.
CSS has typically been left out of this process – not just in our team but generally throughout the industry – because it's a difficult thing to test. CSS is a declarative language meaning that the CSS of a page doesn't describe how the page is to accomplish the task of turning text red, for example, it simply says 'the text should be red' and the implementation details are left up to the browser. This doesn't fit well into typical testing strategies as there is no sensible way to pass information in to check the outputs are as expected. With a declarative language, there is very little logic around which you can wrap a test. In essence, the bit you would normally test is the bit handled by the browser. About the closest CSS gets to having continuous-deployment style tests is to run your files against the in-house style guide using CSSLint.
That's not to say people haven't tried testing CSS. There are lots of opinions on how or why it should be done but with no concrete answers. There has also been a lot of thinking and quite a lot of work done in the past to try and solve this requirement. This article from 2008 and this article from 2006 both propose a potential route to investigate for testing strategies.
In summary, the two main approaches used are:
- Generate images from the rendered HTML and compare differences (c.f. css-test by Gareth Rushgrove)
- Specify expected values and compare actual values (cssUnit, CSSUnit)
There must be something about the desire to test CSS and the name Simon as both Simon Perdrisat and Simon Kenyon Shepard created (separate) unit-testing frameworks called 'CSSUnit'. And there's me, obviously.
Another important related note: there's no point in developing a CSS testing framework for Test-Driven Development. Again, this is an aspect of being a declarative language but, by the time you've written your test, you've written your code. There's no Red-Green pattern here. It either does what you intended it to or it doesn't.
In essence, the only way to test CSS is by verification testing – the kind of thing you do before and after refactoring your styles. This, essentially, involves working within your normal process until the job is done then creating 'snapshots' of the DOM and capturing the current cascaded styles. You can then refactor, rework and reorganise your CSS as much as you like and, as long as the combination of snapshot DOM plus CSS produces the same results as before, you can be confident that your entire system still appears the same way.
Get to the point...
Why the long ramble about CSS testing strategies? Well, unsurprisingly, I've had a go at it myself. My approach falls into the second category mentioned above – measure styles once finished and create secure test-beds of DOM structure which can have CSS applied to them. The test system is currently being run through its paces in Nokia Maps City Pages (my bit of maps) and, if it passes muster, I'll put it out into the big, wide world.
-
Latest 140byt.es offerings
Long-term readers (a.k.a. my Mum) might remember my JS1K efforts last year and the subsequent discussion of Extreme JS Minification. The same kind of mindset that inspired qfox to create that competition also inspired Jed to create 140 Bytes. As with JS1K, the clue is in the name, you have the length of a tweet – 140 characters – to create something cool or clever in JS.
I won't go into any more detail here, if you're interested, you've either already heard about it or would do better clicking around the 140bytes site or reading the comments on the master gist.
My entries
Following last week's draggable file script, I started messing about with making it small enough to qualify and, predictably, got hooked. Here are four I made last weekend.
Create a draggable file on-the-fly
The code from last week shrunk down.
Detect Doctype
There's no simple way to access the current document's doctype as a string. There is already a
document.doctypeobject so you might expect (or, at least I'd expect) you could do a.toString()or.asDoctypeStringor something like that. Nope. Nothing. You have to manually recreate it as a concatenation of properties. A quick discussion with kirbysayshi and mmarcon came up with a few alternative methods (Max's is quite devious, actually) before eventually culminating in this.Chainify and Propertize
This began as a very minimal implementation of Lea Verou's Chainvas. The idea is to enhance various constructors (Element, Node, etc.) so that each method returns the original object. This means that you can then chain (jQuery-style) any built-in function. Each constructor is also enhanced with a .prop function which allows property setting in a similarly chainable manner. For a better description, read through the Chainvas site.
-
Homemade Lanyard
I'm currently looking for new earphones as my Klipsch ones finally gave out on me last week. Until I get some (Christmas is coming, after all), I decided to rummage around in my 'retired headphones' box (everyone's got one, no?) and found this:
Back when I was using my second generation iPod nano, I needed something that combined the usefulness of the lanyard attachment but with good quality headphones. As I couldn't find anything, I got a pair of Sennheiser CX300s, an old USB connector cable and a metre of red ribbon and made my own. Once the USB end was cut off, I looped it round and glued it ends together then wrapped the join in plumbers' PTFE tape to seal it. The headphones were wired round, fastened with cable ties and then sewn together with the ribbon to make the neck bit comfortable. The iPod connector has two little clips in it which was plenty to hold the lightweight iPod Nano in place under my t-shirt and on that model, the headphone jack was on the bottom so the whole thing clipped together nicely.
The sound quality was as good as you'd expect from Sennheisers and I actually surprised myself with the build quality when I had to, yesterday, dismantle them after almost 4 years. Unfortunately, the iPhone 4 is a little bit too chunky to wear under a t-shirt. I got some odd looks when I tried.
-
jQuery Detach Scrollbars Plugin
A design I recently worked on called for a scrollbar which only took up half the height of the area it was scrolling. Now, I'm not going to get into a discussion about scroll behaviour, accepted standards or user expectations - fascinating though that would be - instead, Here's a jquery plugin.
The existing jQuery plugins I found that dealt with scrollbars created their own custom, themable bars. jScrollpane, for instance, gives you complete control over pretty much every aspect of the look and feel of the scrollbar. I figured this was too much for my needs, all I wanted was to be able to anchor the scrollbar to a given corner and change its height. The resulting plugin does just that. It even handles OS X Lion's disappearing scrollbars natively, too.
Usage
Note: This currently only works on vertical scrolling and doesn't have a good jQuery setup and teardown. If I needed it more than once on a page, I'd have written it a bit more robustly so it could be used more than once. Maybe I'll leave that task as an exercise for the enthusiastic reader.
If you call the plugin on an element with a scrollbar (i.e. the element has height and contains content that overflows), it will duplicate the scrollbar using the standard browser scrollbar and get rid of the original one. In fact, in its default configuration, there's pretty much no difference between using the plugin and not using it.
$(element).detachScrollbar();It becomes more useful, however, when you pass in a couple of options. This example will move the scrollbar to the left of the content area:
$(element).detachScrollbar({anchor : 'topleft'});You could leave the scrollbar on the right but shrink it downwards:
$(element).detachScrollbar({anchor : 'bottomright', height : '50%'});The only behaviour of a standard scrollable area that isn't replicated by default is being able to use the mouse wheel to scroll while over the content area. If you want this behaviour (and you probably do), all you need to do is include the jQuery Mousewheel plugin in your page. This script will recognise if it's available and enable the functionality.
How it works
The script creates a container div around the original scrollable content and sets that to
overflow:hiddenwhile setting the original area toheight:auto. This means that the original scrollbar disappears. It then creates another invisible div the same height as the original content and wraps that in a div withoverflow-y:scroll, this creates a scrollbar that looks exactly like the original one. Add in some clever event trickery to tie the scroll position of one to the scroll position of the other and we're done. We've replicated the original functionality but can now control the styles applied to the scrollbar completely separately from the original content. This means we can position it to the left or above, maybe add a 90° CSS transform and have it look like a horizontal scrollbar, anything you like.The plugin also incorporates “Cowboy” Ben Alman's scrollbar width plugin to make sure we're matching dimensions on whatever platform this is used on.
The options that can be passed in are:
internal: true / false (default: true)
autoposition: true / false (default: true)
anchor: 'topleft' / 'topright' / 'bottomleft' / 'bottomright' (default: 'topright')
height: Any CSS length (default '100%')
Advanced usage
The
autopositionoption allows you to decide whether to let the plugin handle the layout (which you probably do for most cases) or whether you want to specify everything yourself using the provided classes as styling hooks.The other option,
internal, determines the DOM structure. Specifically, it says whether everything is contained within the one element or whether the scrollbar is separate. Specifyinginternal: falsewould allow you to put the scrollbar anywhere on your page. You could have all scrollbars set asposition: fixedalong the top of the page if you wanted. Not sure why you would but you could.Example and Download
-
Create a draggable file on-the-fly with JS
Here's a useful little code snippet if you're building a web application. It's a simple way of making the boundary between web-browser and platform a bit smaller. It allows you to create a file (text, html, whatever) in in your page which the user can drag onto their desktop (if their browser supports the dragstart event and dataTransfer methods).
document.getElementById('downloadElement').addEventListener("dragstart", function (e) {
  e.dataTransfer.setData("DownloadURL", "text/html:filename.html:data:image/png;base64," + btoa(fileContent));
});
A description of the code:
- attach an event listener to the draggable element you specify (
downloadElement) - when you start to drag it (
dragstart), - it creates a dataTransfer object (with the type
DownloadURL) - and sets the content of that to be whatever you pass it (
fileContent) - It uses
btoa()to encode the string data as a base64-encoded string. - When you combine this with the MIME-type (
text/html), - you can create a file with the specified name (
filename.html) when the user releases the drag in their local file system. - The fake MIME-type (
image/png) is there as part of the object data to convince the browser this is a binary file (which it is, even though it's not an image).
Credit goes to Paul Kinlan for using this in Appmator which is where I first saw this done this way. He actually uses it alongside some extremely clever JS zip-file creation stuff, too, it's definitely worth digging through the source there.
You can find out more about the drag events on the MDN.
- attach an event listener to the draggable element you specify (
-
Simple and clever beats clever
When messing about with another little game idea, I found myself retyping (for the umpteenth time) the same little bit of value bounding code I use a lot:
Which basically translates to:var x = Math.max(0, Math.min(y, 1))"Set x to be the value of y as long as it's between 0 and 1. If not, set it to 0 if it's smaller or 1 if it's larger."Of course, 0 and 1 don't need to be the boundaries, I'm just using them for convenience.
Instead of continuing with the game, I decided to take a little tangent and see if there was any way I could rewrite this so that the syntax was a bit more obvious. I'd like to be able to use syntax like:
x = [0 < y < 1]to mean the same. Written exactly as above, JS will try and evaluate left-to-right, changing the comparisons to booleans. The statement would become
y = 0.5

x = [0 < y < 1]
x = [0 < 0.5 < 1]
x = [true < 1]
x = [false]
Similarly:
y = -0.5

x = [0 < y < 1]
x = [0 < -0.5 < 1]
x = [false < 1]
x = [true]
My first thought was to be clever about it, I wanted to try and figure out how to partially evaluate the expression and take the different outcomes to figure out the logic required. If '0 < y' was false, then y is less than zero therefore outside our bounds, the return value should then be 0. If the first part is true and the second is false then we know the value is higher than our bounds....etc and so on.
This proved to be a logical dead-end as there was no good way to partially evaluate the statements. Not without preparsing the JS, anyway. Which leads me onto the second attempt...
Preparsing the JS
The next attack on the problem was the idea of reading the JS as a string, shuffling it around quickly and silently (not like a ninja, more like a speedy librarian in slippers) and put it back where it was.
So I began to look at ways to recreate that. I remembered from many, many years ago (two, actually) Alex Sexton creating the genius abomination that is goto.js and how that used some kind of preparsing. A quick skim through the code later and I ended up on James Padolsey's site looking at parseScripts.js.
In the end, all I needed to do was include parseScripts (which is a generalised form of the code I ended up using for the whitehat SEO question from last month) and provide a new parser function and script type.
parseScripts(/:bound/, function(unparsed) {
 return unparsed.replace(/\[(\d)\s*<\s*(\w)\s*<\s*(\d)\]/g, "Math.max($1, Math.min($2, $3))");
})
I'm not saying parseScript isn't clever because it most definitely is but I am saying it's simple. There's not always a need to branch off into deep technical investigations of partial evaluation when a simple search-and-replace does the job better and faster.
For someone always going on about bringing simplicity and pragmatism into development, you'd think I'd have gotten there faster...
Bounded Range
The final bounded range syntax code is available here (hint: view the console). It's silly but it was a fun half-hour.
Improvements?
Do you know of any better way to do this? Is there a clever parsing trick we can use instead? Is there, indeed, any language which has this syntax?
-
cssert – Like ‘assert’ but with CSS at the front
cssert – pronounced however you feel like it – is my attempt at bringing some kind of style verification into an automated build process. If you've read the previous article, you'll know that this falls into the second group of CSS test frameworks, style measurement and comparison. The system works exactly as I described above – your test files have a basic HTML structure created by traversing the DOM from the element being tested upwards. You could also include your entire HTML in the test file if you liked, it would just be unnecessary in most cases.
I've created a couple of (for me, at least) helpful utilities which allow these test cases to be generated from a page via a bookmarklet and then run in the browser or on the command-line. Running the tests in the browser is useful for quick human verification while the command-line interface can be integrated into an automated build system if you like that kind of thing. The test file structure is quite simple (all samples here taken from the Twitter Bootstrap project:
First, we have the test file opening structure:
<!doctype html><html><head><title>cssert test page</title><link rel="stylesheet" href="../lib/cssert.css"></head><body><h1>cssert Test cases</h1><p>click to expand test</p><script type="text/html">/*==Then we have the name of the test:
Intro ParagraphThen we have the skeleton DOM:
<!doctype html><html><head><meta charset="utf-8"><base href="http://twitter.github.com/bootstrap/examples/hero.html"><link href="../1.3.0/bootstrap.css" rel="stylesheet"><style type="text/css">
      body {
        padding-top: 60px;
      }
    </style><style>#cssert-style-modal {display:none;position: fixed;top: 10%;left: 50%;margin-left: -350px;width: 700px;background: #39c;color: white;padding: 10px;color: #fff;text-shadow: 0 1px 0 rgba(0,0,0,.3);background-image: -webkit-linear-gradient(-45deg, rgba(255,255,255,0), rgba(255,255,255,.1) 60%, rgba(255,255,255,0) 60%);border-radius: 5px;border: 1px solid #17a;box-shadow: inset 0 0 0 1px rgba(255,255,255,.3);}#cssert-style-modal ul,#cssert-style-modal li {margin:0;padding:0;font-size:11px;list-style:none;}#cssert-style-modal>ul>li {float:left;width:140px;font-size:13px;}#cssert-style-modal ul {margin-bottom:10px;}#cssert-pre {position:fixed;top:10px;right:10px;background:white;border:1px solid gray;width:200px;height:200px;overflow:auto;}#cssert-drag {position:fixed;top:210px;right:10px;background:white;border:1px solid gray;width:200px;height:20px;overflow:auto;}</style></head><body><div class="container"><div class="hero-unit"><p>Vestibulum id ligula porta felis euismod semper. Integer posuere erat a ante venenatis dapibus posuere velit aliquet. Duis mollis, est non commodo luctus, nisi erat porttitor ligula, eget lacinia odio sem nec elit.</p></div></div></body></html>
The CSS selector identifying the element to verify:
html body div div pAnd the styles we wish to verify:
{"font-family":"'Helvetica Neue', Helvetica, Arial, sans-serif","font-weight":"200","font-style":"normal","color":"rgb(64, 64, 64)","text-transform":"none","text-decoration":"none","letter-spacing":"normal","word-spacing":"0px","line-height":"27px","text-align":"-webkit-auto","vertical-align":"baseline","direction":"ltr"}A test file can contain as many test units as you like. At the very end is the close of the test file structure
*/</script><script src="../lib/cssert.js"></script></body></html>You'll probably notice the crucial bit in the test structure is the
baseelement. The CSS available from the location specified here is the thing we are actually testing. In typical test lingo, the structure we have in our test file is the mock and our tests work by asserting the values ‘output’ from applying the CSS to this structure are as expected.Running the tests
Running the tests in-browser
Open the test page in a browser. That's it. If it's green and says 'passed', the test passed. If it's red and says 'failed', the test failed. You can see the output by clicking on the title of the test.
This works by loading the test file, creating an iframe and injecting the test case into the iframe as source. It then looks into the iframe and measures the styles. If they match those specified in the test file, it passes, otherwise, it fails. Clicking on the test title simply removes the
position:absolutewhich is hiding the iframe.Running the tests on command-line
The exact same test page can also be used with the command-line interface. cssert uses PhantomJS to run the tests in a headless webkit instance. You'll need to install PhantomJS into your path after downloading it. Place your test case in the tests folder and run:
$ ./cssert testcase.htmlTo run all tests in the tests folder at once, simply run with no arguments:
$ ./cssertThis works by, again, loading the HTML from the test files. In this case, the structure is injected into a new headless browser window. The styles are measured and the output is redirected to stdout. Each browser window test is also rendered as a PNG so you can see what failed if any did.
Limitations
I'm not saying this is the ultimate solution to CSS testing. Declarative languages don't sit well with testing. This is as close as I can get for the moment. I'm also not going to be able to head off or counter all possible complaints or criticisms but I will cover a couple.
Firstly, most of the limitations you'll run into are caused by using the automatically generated tests. They're good for creating a starting point but at the moment, they need to be tweaked for many cases.
Sibling selectors
Because the test generates the DOM via following parents up the structure, sibling elements are ignored. These styles are still testable, though. Simply add the sibling element into your HTML test block.
Styles modified by JS
The styles are measured on the element as it is when the case is generated. The test compares this against the styles provided by the CSS. If the element contains JS-only styles not added by CSS, they will not be correctly matched. Modify your test case to allow for this.
Why not use Selenium?
This, essentially does the same as Selenium would do if you took the time to set up your test cases. This makes it much easier to set up test cases, though.
@font-face!
If your @font-face declaration contains a suggested 'local' source (as recommended in Paul Irish's bulletproof syntax), a bug in QTWebkit will prevent the test case from running correctly.
Installation
Just clone the git project from
git@github.com:thingsinjars/cssert.gitand you're good to go.The tests directory comes with some sample tests generated using Twitter's Bootstrap project. Put your tests in that same place.
-
Whiteboard Laptop Lid
I use whiteboards a lot. Whether I'm coding, explaining some concept or other, sharing the results of a meeting, wherever. If there's a whiteboard nearby, I'm quite likely to jump up and start drawing big diagrams with lots of arrows and wavy lines. When there's not a whiteboard, I still jump up but I tend to lean more towards big handy gestures drawing diagrams in the air (I recently watched a video of myself presenting with the sound turned down and I looked like an overenthusiastic mime artist dancing to 'Vogue').
To make sure I always have a whiteboard to hand, I roped in Jenni to help with a little home craft-making.
D.I.Y. Laptop-lid Whiteboard
Blue Peter style list of things:
You'll need scissors and/or a craft-knife, double-sided sticky tape, a measuring tape, a bit of sturdy white cardboard or a thing sheet of opaque PVC and some sticky-backed clear plastic. You'll also need a laptop and an grown-up to help you with the cutting.
First, measure the top of your laptop and figure out how big your whiteboard can be and draw that on your cardboard or plastic (from now on referred to as 'white board').
Next, cut your cardboard or plastic to the right size. Remember to measure twice and cut three times or something like that. I can't remember exactly but there some ratio of measuring to cutting. Do that.
If you're using a piece of shiny PVC or something like that, you can miss this next bit. If you're using cardboard or something else, you'll need to cover it with the transparent sticky-backed plastic.
The final preparation stage is to put the double-sided sticky tape on the back and position it on your laptop lid.
Try not to take any photos one-handed while doing this step or this may happen:
There you go. A portable, take-anywhere whiteboard in 10 minutes. Apart from needing a pen, of course, and a cloth to wipe it so you don't end up with smudges all over your laptop bag, we're done.
I can now take my whiteboard with me everywhere I go for a meeting. Long may the diagramming continue.
-
Poor man's touch interface
Here's a little code snippet for today.
While I was making the 3D CSS Mario Kart, I needed a simple, drop-in bit of code to handle touch interfaces. I looked through some old experiments and found a rough version of the code below. It was based on this KeyboardController by Stack Overflow user Bob Ince.
It doesn't do anything clever. All it does is provide a simple way to attach functionality to touch events in different areas of the screen – top-left, top-center, top-right, middle-left, middle-center, middle-right, bottom-left, bottom-center, bottom-right. My apologies to any Brits for the spelling of centre as 'center'. It's the Internet, we have to.
How to use
Include this code:
function TouchController(areas, repeat) {
  var touchtimer;
  document.onmousedown = document.ontouchstart = document.ontouchmove = function(e) {
    var position;
    e.preventDefault();
    e.touches = [{'clientX':e.pageX,'clientY':e.pageY}];
    switch(true) {
    case (e.touches[0].clientY<window.innerHeight/3) :
        position = 'top';
        break;
    case (e.touches[0].clientY>(2*window.innerHeight)/3) :
        position = 'bottom';
        break;
    default :
        position = 'middle';
        break;
    }
    position+='-';
    switch(true) {
    case (e.touches[0].clientX<window.innerWidth/3) :
        position += 'left';
        break;
    case (e.touches[0].clientX>(2*window.innerWidth)/3) :
        position += 'right';
        break;
    default :
        position += 'center';
        break;
    }

    if (!(position in areas)) {
      return true;
    }

    areas[position]();
    if (repeat!==0) {
      clearInterval(touchtimer);
      touchtimer= setInterval(areas[position], repeat);
    }
    return false;
  };
  // Cancel timeout
  document.onmouseup = document.ontouchend= function(e) {
  clearInterval(touchtimer);
  };
};
Now, all you need to do to attach a function to a touch event in the top-left area of the screen is:
TouchController({
  'top-left': function() { topLeftFunction();}
}, 20);
I use this for direction control in the Mario Kart experiment which maps exactly onto the cursor keys used for the normal control.
TouchController({
  'top-left': function() {  // UP + LEFT
				drawMap.move({y: 2});
				drawMap.move({z: drawMap.z + 2});
				drawMap.sprite(-1)
			  },
  'top-center': function() {  // UP
				drawMap.move({y: 2});
			  },
  'top-right': function() {  // UP + RIGHT
				drawMap.move({y: 2});
				drawMap.move({z: drawMap.z - 2});
				drawMap.sprite(1)
			  },

  'middle-left': function() {  // LEFT
				drawMap.move({z: drawMap.z + 2});
				drawMap.sprite(-1)
			  },
  'middle-right': function() {  // RIGHT
				drawMap.move({z: drawMap.z - 2});
				drawMap.sprite(1)
			  },

  'bottom-left': function() {  // DOWN + LEFT
				drawMap.move({y:  - 2});
				drawMap.move({z: drawMap.z + 2});
				drawMap.sprite(-1)
			  },
  'bottom-center': function() {
				drawMap.move({y:  - 2});
			  },
  'bottom-right': function() {  // DOWN + RIGHT
				drawMap.move({y:  - 2});
				drawMap.move({z: drawMap.z - 2});
				drawMap.sprite(1)
			  },
}, 20);
If you need anything clever or you need two or more touches, you should use something else. This is just a simple drop-in for when you're copy-paste coding and want to include touch-screen support.
-
Super Mario Kart CSS
Silly CSS Fun for a Sunday Afternoon
Yesterday, I decided to mess around with 3D CSS transforms. I've used them here and there for various things (the flip animations in Shelvi.st, for example) but nothing silly.
My mind wandered back to an early HTML5 canvas demo I saw ages ago where Jacob Seidelin had written Super Mario Kart in JS and I wondered if it would be possible to do the pixel-pushing part of that demo in CSS.
An hour later and we have this:
Yes, it's silly. Yes, it's nothing like playing Mario Kart and, no, there isn't any acceleration. That wasn't the point, however. View the source to see the description of the rotations and transforms.
-
Silly CSS Gradient
Okay, here's a bit of silliness. I did a little presentation yesterday with some slides which I built using Hakim El Hattab's 3D CSS Slideshow. I decided to have some fun with the last slide.
The Looney Tunes “That's all Folks” end title using radial gradients.
-
That Version-y Control-y Stuff
Just in case you don’t know, a Version Control System (VCS) is pretty much the most important thing ever in the history of anything ever. Just think about it conceptually: the ability to stand back and look at everything you’ve ever done, choose the good bits, drop the bad bits, mop up the mistakes… it gives you the freedom to “Play with it ‘til it breaks” with the safety net that you can always go back and fix it again.
You Get To Play With Time Itself!
There are many, many debates about the different methodologies you can use with version control and which technologies are best suited to which methodologies and which interfaces are best suited to which technologies and so on ad nauseam. The main concepts of working with any VCS are essentially the same, however.
- It must be almost invisible.
- It must be completely reliable
- You mustn’t rely on it
It must be almost invisible
If you have never used a VCS before, it must fit perfectly into your workflow otherwise you won’t do it. It isn’t until you’ve been saved from potential disaster by a system that you will truly appreciate it and see the value in working it into your process. If you have or are currently using a VCS, think about when and how you use it. Does it require launching a new application or does it run in the background? Do you have to manually check things in or is it seamless versioning? The more effort required to mark a version, the less often you’ll do it as it breaks the flow of development
On the other hand, if the process is completely invisible, you might forget it’s there. It’s exactly the same as assuming your changes are going live on the server – the moment you assume it happens, it doesn’t. You still need some level of manual checking.
It must be completely reliable
This is fairly obvious, hopefully. You need the security that your version system is working otherwise you might again be tempted to miss it out – why take the extra step required to version a file if it’s not going to be there when I need it?
If you’re hosting your own repositories internally to your organisation, don’t put it on a server older than you are. The safest route to go down is contracted external hosting. That way, it’s someone’s job to make sure your datums are secure.
You mustn’t rely on it
Always have a backup. Always have a copy. Always have an escape route. Or something. You should have picked up the theme by now. Version Control Systems are great but as soon as it is the only thing standing between you and a complete failure to deliver a project, it will fail. Or not. It’s funny like that.
-
Copy-paste coding
This weekend, I had a spare couple of hours on Saturday night (as often happens when you have a kid) so I decided to pass the time with a bit of copy-paste coding.
I grabbed a bit of example code for a top-down racing game built using Box2d and GameJs. I then grabbed a Google Maps demo and a Nokia Maps demo and smooshed them together. I've seen a few racing games before so I know there's nothing innovative here, it's just a bit of silliness.
The results
Copy-Paste: Not a bad thing
There are many developers who will tell you that blindly copy-pasting is a terrible way to code. They make the valid points that you don't understand something if you don't read it properly and that you'll end up stuck down an algorithmic cul-de-sac with no way to three-point-turn your way out (although they may phrase it differently). These are valid points but...
If I'd sat down on Saturday night and thought "I want to build something in Box2D" then gone to the site, downloaded the library, read the docs and loaded the examples, by the time I had understood what I was doing, Sunday morning would have come round and I'd still have GameJS to read up on. There's absolutely no harm in blindly catapulting yourself a long way down the development track then looking round to see where you are. Sure, you'll end up somewhere unfamiliar and you may end up with absolutely no clue what the code around you does but at least you have something to look at while you figure it out. At least a few times, you'll find something almost works and a quick search of the docs later, you've figured it out and know what it's doing.
Basically, copy-pasting together a simple little demo and making it work is a lot more interesting than taking baby-steps through example code and beginner tutorials. Don't be too careful about trying to build something complicated.
-
Workflow. The flow. Of work.
How to actually work
Don’t tell anyone (particularly not your clients and especially not my clients) but making websites is really very easy. Don't make it harder by deliberately hindering yourself. You should always try to travel the shortest distance between “amends needs done” and “amend is done”. Again, I hear a “Pah!” in the distance, “Well, that’s obvious.”, but is it? Are you sure you’re ‘Being all you can be’?
The shortest distance
Okay, picture the scene: you've run out of socks. You need to put on a load of washing. The washing is in a pile in the corner of the room. You hunch over, pick up all the socks, pants, t-shirts and walk, waddle and totter to the washing machine. As you walk, you drop a sock and bend down to pick it up, dropping another. You recover that one and another falls. Eventually, you make it to the washing machine after a few minutes, put everything in, throw in some powder and set it going. As you head back to your bedroom, you spot three more socks that you missed. Darn.
Okay, picture the scene: you've run out of socks. You need to put on a load of washing. Fortunately, every time you took your socks off, you put them straight in the washing machine. You wander to the kitchen, put in the powder and switch it on. Done.
Any time you try to do anything, the more steps involved between intention and completion, the more likely it is to go wrong. Whether the intention is 'wear clean socks' or 'update this website', if you can do it in a handful of steps, you'll make fewer mistakes than if you have to do it in a hunched-over armful.
Workflow. The flow. Of Work.
The next time you're making an amend somewhere, watch yourself. Watch which applications you jump between. Don't just make your changes, pay attention to how you do them. Are you jumping between text editor and FTP client? Text editor and web browser? FTP and Subversion? Just take a few minutes to think about which steps you might be able to miss out. For instance, if you use Textmate and Transmit, you can set up DockSend so that pressing ctrl-shift-f then 2 will upload the file you currently have open to the same place on the server. You can now change the editor↔FTP↔browser cycle to editor↔browser.
However...
Seamless does not imply flawless. Don't be tempted to simplify to the stage where you don't need any interaction between making a change and the change being live. If you rely on the fact that your changes 'just happen', you might be tempted not to check. That's the point at which they don't 'just happen'.
-
Sine
Another game concept prototype – Sine
Honestly, I have no idea what I was going for with this one. It started off last weekend with a vague idea about matching patterns of numbers and old-school graphics and I don't know what and ended up with this.
The idea is to make the bottom row match the top row, basically. There are several front-ends to this game so you can choose the style of play you prefer - numbers and letters, waves, colours or a generated sound wave (if you have a shiny new-fangled browser). It uses the nifty little Riffwave library to generate PCM data and push it into an audio element.
Further development
If I were to develop this further, I'd try and build it in a modular fashion so that front-ends could be generated really easily and open it to other people to see how many different ways this game could be played. It'd be an interesting social experiment to be able to play what is fundamentally the same game in a dozen different ways. You could find out if visual thinkers processed the information faster than numerical or audio-focused people. Leaderboards could allow different styles of player to compete on the same playing field but with a different ball (hmm, weak sports analogy). The rhythms of the game lend themselves well to generated drum tracks so there's probably something in that area for exploring as well.
At the moment, the code is written as the programming equivalent of stream-of-consciousness – global variables everywhere, some camel-case, some underscored, vague comments sprinkled around. There's some commented-out code for the wave mode that moves the waves closer together so that there's a time-limit set but I felt it didn't suit the game.
-
Explanating
I never really marketed it much but I wrote a book called ‘Explanating’ a couple of years ago. I even decided to self-publish1 and organised ISBNs and everything.
The book is an "illustrated collection of completely plausible but entirely untrue explanations of everyday phenomena". Basically, it's lots of the kinds of things you might make up to explain something to a kid if you really have no idea. Hence the name ‘Explanating’ – it's kinda like explaining but not quite right. It also has a rather nice cheesecake recipe in the appendix. I put it on Lulu and Amazon and didn't really do anything else with it. I did try to get it in the iBookstore but that seems to be a horribly complicated process if you aren't based in the US.
Now available for the low, low price of...
Rather than have the book sit around for another few years not doing anything useful, I've decided to try something new. You can now download the book for free from explanating.com in your ebook format of choice (PDF, ePub, Mobi). You don't have to pay anything.
Unless you want to.
If you read it and decide you like it, you can come back to the site any time and buy it from Lulu or Amazon for £1.71 (or the equivalent in USD or EUR or wherever you happen to be). Or not, you could like it and keep it and not pay anything. It's entirely up to you. And your conscience :D.
Download, read, buy
I have no idea if anyone will actually take me up on this offer but I hope some people do, at least, enjoy the book. If nothing else, make the cheesecake, it's delicious.
And that URL once more
-
HighlightBlock.vim
Okay, this'll be my last vim post for a while. I just couldn't leave it alone, though.
My Cobalt theme was good but it wasn't quite enough. You'll see from the screenshots that the entire HTML page had the same background colour in Vim while the TextMate version changed the background colour inside
<style>and<script>blocks. I was surprised how much that bugged me so I figured there must be a way to highlight an entire line. It turns out this isn't a trivial thing to do. Syntax matches will only match to the final character in the line ($), not the width of the screen. No amount of tweaking a colorscheme would allow highlighting all the way across.After a lot of digging around, I found out about signs. This is a built-in feature which allows you to add a marker to a line for whatever purpose you want. It can point out debugging information or provide visual checkpoints to mark out things in your document. It's probably very handy but as I've only just started using vim, I don't really know what it's best for. However, as a side-effect, it can also apply a style to the entire screen-width of a line.
Some googling, hacking and probable violation of Vim plugin best-practice, I knocked together this plugin:
When this is installed, it will highlight any embedded CSS or JS blocks in a HTML, PHP, Velocity templates or Ruby files. Well, it will apply the syntax class 'HighlightedBlock' to the line. If your theme has a style for that, it will highlight it. Incidentally, I updated the Cobalt port to include that style.
It runs on initial load then refreshes every time you exit insert mode.
I might update it later to highlight PHP blocks in HTML or some other things like that but for my current purposes, it's finished.
Warning
- It pays no attention to existing signs. If you use them, you probably shouldn't use this. If you know of a simple way to group signs together to stop me messing with them, let me know.
- When signs are added to a file, an extra two-character column appears to the left of the line numbers. This plugin shrinks the line-numbers column by two characters if signs exist and increases it again when they are removed. This stops everything from jumping around but if you're working on a 10,000 line file, you might see some confusion down the bottom.
Installation
As with the Cobalt theme, if you're using Janus, add this to
~/.janus.rake, I still have no idea if this works. It might. :vim_plugin_task "HighlightBlock.vim", "git://github.com/thingsinjars/HighlightBlock.vim.git" -
Cobalt.vim
What?!
Another port of the TextMate theme 'Cobalt' to Vim?
But there are already so many!
Yes. Yes there are. However, the other ones I found were all missing something. Some had the right colours but in the wrong places, some had most of the right things highlighted but in slightly wrong colours. None of them had coloured the line-numbers. I think this is the most complete port. The initial work was done automatically using Coloration and then manually tweaked and added to. I know I should probably have just picked one of the existing GitHub projects, cloned it and pushed to it but I feel it would be a tad presumptuous of me to just turn up in someone's repository one day saying "yeah, you did alright but mine's better". Besides, I've never tried making a theme for Vim before. I've probably done something wrong (see below). If it continues to work for a while without causing any major issues, I might look at pushing it to another repo.
This was done on top of a vanilla install of the excellent Janus configuration of MacVim so whatever plugins are installed by default may have an affect on this.
There are a few limitations in the syntax files enabled by default so this includes a couple of matches, regions and things that really shouldn't be in a colorscheme file but I've included them because I felt like it and it was the only way to really match some of the highlighting TextMate allows (this is the thing I was referring to above).
I haven't really touched the NerdTree colouring much as it's probably impossible to have different background colours in different panes. Can't guarantee that, though.
Installation
There are probably some conventions to do with how to organise a GitHub project so that it can be automatically installed but I've just gone with sticking it in a directory called 'colors' so it can be pulled in from the root of your
~/.vimdirectory.If you're using Janus, add this to
~/.janus.rake, I think it'll work:vim_plugin_task "Cobalt.vim", "git://github.com/thingsinjars/Cobalt.vim.git"If you're not using Janus, you probably know what you're doing anyway.
The GitHub project is here:
Screenshots
The first of each pair is Vim, the second is the TextMate original.
Editing CSS
Editing HTML
-
Text Editors
Many years ago during the text-editor holy wars, I sided neither with the Vi Ninjas nor the Emacs Samurai but instead went a third way – Pico (short for Pine Composer). It was the text editing part of the e-mail program I used (Pine). For many years, this served me well. Even today, Pico's successor - Nano – is installed pretty much everywhere. It isn't , however, quite powerful enough for fast-paced web development. Serious, full-time development needs shortcuts and macros, syntax highlighting and snippets. When you spend 10 or more hours every day pressing buttons to change flashing lights, you need to optimise the way the lights flash.
After Pico, I found Crimson Editor which served me well for almost 10 years. I eventually started working on a Mac and became a TextMate user for most of the last 5 years.
In my new job, I find myself jumping from computer to computer to desktop to server quite a lot. The only constant editor available is Vi. Or Vim (Vi Improved). I've been trying to pick it up as a way to ensure I can always jump into a friendly text editor no matter where I am. Besides, these days Vim is the old-new-cool thing that all the cool-old-kids use, particularly MacVim so I thought it was worth giving it a go to see what the fuss was about.
One of the biggest deciding factors in trying it out was actually fellow Edinburgh Web Dev/International Traveller Drew Neil (@nelstrom), creator and voice of the vimcasts.org series of screencasts who is actually writing a book on Vim this very second as I write this. Most people are evangelical about their choice of text editor to the point of rabid fundamentalist, frothing-at-the-mouth, intoning-keyboard-shortcuts craziness (hence my allusions to text-editor holy wars). When I mentioned to Drew that I used Pico instead, his response was long the lines of "Fair enough". This lack of confrontation actually inspired me to try it out. Well played, sir.
Anyway, I'll give it a go and see what happens. If you're interested, I recommend reading Yehuda Katz' post 'Everyone Who Tried to Convince Me to use Vim was Wrong'. Don't worry, I'm definitely not going to try and convince anyone to use one code editor over another. You should probably stop using FrontPage, though.
-
Whitehat Syndication
I recently ran into an interesting SEO problem on a project which has led to a question I just don't know the answer to:
How do you display syndicated content without triggering Google's duplicate content flag?
Hmm... intriguing.
Background
To explain the problem more fully (without giving out any project specifics), imagine you have a website. You probably already do so that shouldn't be hard. Now, imagine you fill that website full of original content. Again, that shouldn't be hard. For the sake of example, let's assume you run a news blog where you comment on the important stories of the day.
Next, you figure that your readers also want to read important related facts about the news story. Associated Press (AP) syndicates its content and through the API, you can pull in independently-checked related facts about whatever your original content deals with. So far, so good.
Unfortunately, a thousand other news blogs also pull in the same AP content alongside their original (and some not-so-original) content. Now, when the Googlebot crawls your site, it finds the same content there as it does in a thousand other places. Suddenly, you're marked with a 'duplicate content' black flag and all the lovely google juice you got from writing original articles has been taken away. Boo.
Your first thought might be to reach for the
rel="canonical"attribute but that really only applies to entire pages. We need something that only affects a portion of the page.Solution
What you need to do is find a way to include the content in your page when a visitor views it (providing extra value for readers) but prevent Google from reading it (hurting your search ranking). Fortunately, there are some methods for doing this. One involves having the content in an external JS file which is listed in your robots.txt to prevent Google from reading it. Another similar method involves having the content in an external HTML and including it as an iframe, again, preventing crawling via robots.txt. When the reader visits the page, the content is there, when Google visits, it isn't.
The Problem with the Solution
Both of the techniques mentioned here involve an extra HTTP request. You are including an external file so the visitor's browser has to go to your server, grab the file and include it. This isn't a huge problem for most sites but when you're dealing with high-traffic, highly-optimised websites, every file transferred counts. You go to all the trouble of turning all background images into sprites, why waste extra unnecessary connections on content?
Yahoo's Solution
Yahoo have a nice solution to this problem. If you include the attribute
class="robots-nocontent"on any element, the Yahoo spider (called 'slurp') will ignore the content. Perfect. This does, however, only work for Yahoo. Not perfect.My solution
My attempt at solving this problem which is a combination of SEO and high front-end performance was inspired by the technique GMail uses to deliver JS to mobile devices. In their article, Google delivers JS that they don't want run immediately in the initial payload. They figure that the cost of serving a single slightly larger HTTP request is less than the delay in retrieving data on demand.
I use HTML embedded in a JS comment in the original page which is then processed on DOMReady to strip out the comments and inject it into wherever it is supposed to be (identified by the
data-destinationattribute). I'm doing this on a page which already loads jQuery so this can all be accomplished with a simple bit of code.<script type="text/html" class="norobot" data-destination=".content-destination"> /*! <p>This content is hidden on load but displayed afterwards using javascript.</p> */ </script> <div class="content-destination"></div> <script src="http://ajax.googleapis.com/ajax/libs/jquery/1.5/jquery.min.js"></script> <script> $('.norobot').each(function() { _this = $(this); $(_this.data('destination')).html(_this.html().replace('/*!','').replace('*/','')); }); </script>Notes on the code
You may have noticed the
type="text/html"attribute on the script block. That's to get around the fact that jQuery parses and executes any script blocks it finds when moving elements around (in an appendTo() or an html(), for example. Adding this attribute tells jQuery to process this as template code.Also, the opening JS comment here begins
/*!. The exclamation mark in this is a directive to any minifiers you might use on the code to tell them not to remove this comment block.This is also available in a standalone page.
This is all a very long setup for my initial question. Does Google read this and, if so, does this affect duplicate content rankings?
Plus and Minus
- Minus: The duplicate content is definitely in the page.
- Plus: It's hidden in JavaScript
- Minus: we're using JavaScript to serve different content to users and to google.
- Plus: we're showing less to google than users. Spam techniques show more to increase keyword matches.
- Plus: faster response due to a single http request (Google likes fast pages)
Obviously, we could add an extra step of obfuscating the 'hidden' content by reversing it or encoding it. This would definitely hide it from google and it would be trivial to undo the process before showing it to the user but is this step necessary? Part of my reasoning for concluding that Google ignores JS comments is that thousands of sites include the same standard licences bundled with their JS library of choice and don't get penalised. This may, of course, be specific to licences, though.
I can find no definitive answer anywhere on this subject. If you have any good references, please let me know. Alternatively, if you happen to know Matt Cutts, ask him for me. If I get any conclusive answer, I'll update here.
-
Testing
The web is a visual medium. Well, mostly.
There's no better way to test a visual medium than by looking at it. Look at your site in as many browsers as you can. If you've already got as many browsers installed on your development computer as you can fit, get another computer and install some more. Either that or run a Virtual Machine.
If you can't do that easily, you could use one of the growing number of browser testing services. These are server rooms packed with computers running Virtual Machines and automated systems to which you supply a URL, wait a few moments and get shown an image (or several hundred images) showing your URL in different browsers on different platforms. Some of the more sophisticated services allow you to scroll down a long page or specify different actions, text entry or mouse events you want to see triggered. These services can be exceptionally useful when it comes to developing HTML e-mails as there are some rare and esoteric e-mail clients out in the wild. Litmus does an excellent job at virtualised testing for HTML e-mails. On that note, the Campaign Monitor library of free HTML e-mail templates is a great place to start, learn and possibly finish when working on an HTML e-mail.
There is also a place for automated testing for some things. Recently, there has been a bit of a movement away from validating code as the purpose of web development is not to make it 'check a box' on a merely technical level, it is to get the message across via the design however possible. However, validation is still the best and easiest way to check your syntax. Syntax errors are still the main cause for mistakes appearing in your web sites and are the easiest thing to fix. Don't assume IE is wrong. Again, if you're keen on HTML e-mails, here's a great post on the Litmus blog.
-
Don’t be seduced by the drag-and-drop side
You don’t have to be a survivor of the vi and Emacs holy wars to appreciate the beauty of fully hand-crafted code. There was a bit of attention a couple of weeks ago on the soon-to-be-launched Adobe Muse which lets you “Design and publish HTML websites without writing code”. If you want to be a kick-ass developer, you must realise that tools like this aren't designed for you. They're designed for people who want to do what you can do but either don't have the time or the inclination to learn how. Although drag 'n' drop application do lower the barrier to entry for creating a website, there is still a need for web developers to know exactly what's going on in their pages.
In much the same way as with JavaScript (See “You must be able to read before you get a library card”), building your HTML using that extra level of abstraction might work for almost every situation but will eventually leave you stuck somewhere you don’t want to be. By all means, pimp up your text editor with all manner of handy tools, shortcuts and code snippets but make sure you still know exactly what each bit of mark up means and does. If you structure your code well (more on that in a later post), your natural feel for the code will be as good a validator as anything automated (by which I mean prone to errors and worth double-checking).
Learn the keyboard shortcuts. If you learn nothing else from this, learn the importance of keyboard shortcuts. You might start off thinking you'll never need a key combination to simply swap two characters around but one day, you'll find yourself in the middle of a functino reaching for ctrl-T.
Also, there is no easy way to tell if a text editor is fit for you until you have tried it, looking at screenshots won’t work. You don't need to build an entire project to figure out whether or not you're going to get on with a new text editor, just put together a couple of web pages, maybe write a jQuery plugin. Do the key combinations stick in your head or are you constantly looking up the same ones again and again? Do you have to contort your hand into an unnatural and uncomfortable claw in order to duplicate a line?
The final thing to cover about text editors is that it's okay to pay for them. Sure, we all love free software. “Free as in pears and free as in peaches” (or whatever that motto is) but there are times when a good, well-written piece of software will cost money. And that's okay. You're a web developer. You are going to be spending the vast proportion of your day using this piece of software. If the people that made it would like you to spend $20 on it, don't instantly balk at the idea. Think back to the idea of web developers as artisan craftsmen. You're going to be using this chisel every day to carve out patterns in stone. Every now and then, you might need to buy your own chisel.
-
You must be able to read before you get a library card
I like JavaScript. JS. ECMAScript. Ol' Jay Scrizzle as nobody calls it.
I also like jQuery. jQ. jQuizzie. jamiroQuery. Whatever.
Ignoring the stoopid nicknames I just made up, did you notice how I referred to JavaScript and jQuery separately? I didn't say "I like JavaScript, there are some really great lightbox plugins for it" just the same as I didn't say "I wish there was a way to do indexOf in jQuery".
I'm regularly amazed at how many new (and some not-so-new) web developers either think they know JavaScript because they know jQuery or wish there was a way to do something in jQuery that they read about in an article about JavaScript. jQuery is a library written to make coding in JavaScript easier. It's made in JavaScript so you can say "jQuery is JavaScript" but only in the same way that "Simon is male". To confuse jQuery as all of JavaScript is the same as saying "Simon is all men" (don't worry, there's still only one of me).
For most web site or web app development, I do recommend using a library. Personally, I've used jQuery and Prototype extensively and decided I prefer jQuery. Libraries are designed to make coding faster and more intuitive and they can be a great productivity aid. You can get a lot more done quicker. There is a downside, however.
Downside
If you're doing what the library was intended to help with, great. Slide this panel up, pop open a modal window, scroll to the bottom of the page and highlight that header. Brilliant. The difficulties come when you're either trying to do something the library wasn't intended to do or something nobody's thought of before or you're just plain doing something wrong. If you are fluent in your library of choice but don't know the JavaScript underpinnings, your usual debugging tools can only help you so far. There will come a point where there's an impenetrable black-box where data goes in and something unexpected comes out. Okay, it's probably still data but it's unexpected data.
Don't let this point in the process be the discouragement. This is where the fun bit is.
Learning to read
Library authors are very clever groups of people. Often large groups. Reading through the unminified source of a library can be an awesomely educational experience as it's usually the culmination of many years best practice. If you want a nice introduction to some of the cool things in jQuery, for instance, check out these videos from Paul Irish:
- http://paulirish.com/2010/10-things-i-learned-from-the-jquery-source/
- http://paulirish.com/2011/11-more-things-i-learned-from-the-jquery-source/
I've dug around in jQuery many, many times to try and figure out why something does or doesn't do what it should or shouldn't. The most detailed investigation was probably Investigating IE's innerHTML during which nothing was solved but I found out some cool stuff.
Learning to write
The best way to get your head around libraries is to write your own. Yes, there are literally millions of them (not literally) out there already but you don't need to aim for world dominance, that's not the point of writing your own. Start simply, map the dollar symbol to
document.getElementById. Done. You've written a tiny library.function $(id){ return document.getElementById(id); }Now you can add some more stuff. Maybe you could check to see if the thing passed to the $ is already an element or if it's a string. That way, you could be a bit more carefree about how you pass things around.
function $(id){
  if(id.nodeType) {
    return id;
  } else {
    return document.getElementById(id);
  }
}
Add in a couple of AJAX methods, some array manipulation and before you know it, you've got a full-blown web development toolkit.
Here's your Library Card
By now, you've rooted around in the jQuery undergrowth, dug through some of Moo's AJAX and pulled apart Prototype's string manipulation. You've written your own mini library, gotten a bit frustrated and wished you had a community of several thousand contributors to make it more robust. Now you're ready to start getting irked every time someone on Forrst asks if there's a jQuery plugin for charAt. Enjoy.
-
Vendor-prefix questions
There's something that's always niggled me about vendor-specific prefixes on CSS.
Best practice dictates that you should always include non-prefixed properties last. This is so that when the property does become standard and the browser implements the non vendor-prefix version, it will use the standard rule as it comes later in the stylesheet than the prefixed one. The thing that has been bugging me is the assumption that the agreed standard version produces the same or better results than the prefixed one.
A convulted and completely made-up example
Imagine you have a paragraph:
<p>Made-up text.</p>And you want it to have a white border with rounded corners. I'm fully aware you now don't need the vendor prefixes here but bear with me.
p {
  border:1px solid white;
  -webkit-border-radius:5px;
  -moz-border-radius:5px;
  -ms-border-radius:5px;
  -o-border-radius:5px;
  border-radius:5px;
}
In this scenario, the non-prefixed border-radius hasn't been implemented by any browser but you're following best practice so you include the values matching the current specification. Okay, now imagine that for Webkit's implementation of
-webkit-border-radius, they decided that the radius value was actually to be divided by two. No problem, you can include the required value for Webkit. Again, not a real example but stick with me.p { border:1px solid white; -webkit-border-radius:10px; -moz-border-radius:5px; -ms-border-radius:5px; -o-border-radius:5px; border-radius:5px; }You launch the site and send it out into the world.
Six months later, the standard is set, it turns out developers agree on Webkit's implementation. It becomes standard to double your radius value. A month after that, browsers start recognising the non-prefix version of the rule and rendering with the new standard. At this point, webkit, moz, ms and o are all rendering wrong because they are ignoring their vendor-specific implementation and using the non-prefixed standard. Even though webkit currently has the right value, it's being overwritten. If the rules had been included the other way round, they'd still be rendering the same as they were.
p {
  border:1px solid white;
  border-radius:5px;
  -webkit-border-radius:10px;
  -moz-border-radius:5px;
  -ms-border-radius:5px;
  -o-border-radius:5px;
}
Eventually,support for the prefixed version will be dropped and the browsers will only use the standard but that will be a little way down the line and gives you more time to correct your code or your client's code or wherever the code happens to be. Basically, prefix-last order buys the developer more time to correct any potential issues. I know that by using the vendor-prefixed rules, the developer is implicitly accepting the fact that they are using experimental properties which could change but in this scenario, it is not the prefixed properties that change but the non-prefixed one.
Open to suggestions
I'm open to any explanation as to why this scenario might never happen or comments on how I've misunderstood something.
-
Feed the RSS
For no real reason and definitely not to prove once again that RSS isn't dying, I just thought I'd write about a couple of the nice bits about the RSS feeds on this site so that readers could get the maximum amount of awesome per unit of blog.
There's a handy trick you can do with the feeds if you don't want posts from every category. You can subscribe to an individual category by using the link http://thingsinjars.com/rss/categoryname.
But that's not all.
If, for instance, you like the JS and CSS stuff but can't stand the rest, just list the categories you want with a plus and you'll get those feeds combined and nothing else. Like this: http://thingsinjars.com/rss/js+css. Nifty, eh?
Also, the RSS link changes depending on which category you're in.
-
Psychopathic megalomaniac vs Obsequious sycophant?
- or -
Tabs vs Spaces?
Which are you? Is there any middle ground?
In any modern, code-friendly text editor, you can set tab size. This means that one tab can appear to be as wide as a single space character or - more commonly - 2 or 4 spaces. It's even possible in some to set any arbitrary size so there's nothing stopping you setting tabs to be 30 spaces and
format() {
                              your code() {
                                                            like;
                              }
                              this;
}
However you do it, the point is that using tabs allows the reader personal preference.
Indenting your code using spaces, however, is completely different. A space is always a space. There's actually a simple conversion chart:
- 1 = One
- 2 = Two
- 3 = Three
- and so on.
The fundamental difference here is that the person reading the code has no choice about how it's laid out. Tabs means you get to read the code how you want to, spaces means you read the code how I want you to. It's a subtle difference but an important one.
Space indenting is therefore perfectly suited to psychopathic megalomaniacs who insist their way is right while tab indenting is for obsequious sycophants who are putting the needs of others above themselves. Sure, there may be lots of grades in-between but why let moderation get in the way of a barely coherent point?
There's unfortunately no real middle ground here. Teams must agree amongst themselves what side of the fence they fall down on. It is entirely possible to set many text editors to automatically convert tabs to spaces or spaces to tabs on file save but if you're doing that, you'd better hope your favourite diff algorithm ignores white space otherwise version control goes out the window.
-
Multi-user pages
Whenever I'm away from home, my usual stream of random ideas tends to become more focused on projects involving sharing. Usually something about creating a connection between people where the interaction point is the Internet. This is what first inspired the now defunct MonkeyTV project back in 2007 or noodler.net in 2008 – both created while I was living in Tokyo as ways to connect to people back in Edinburgh.
Until the beginning of August, I'm in Berlin finding somewhere to live while Jenni and Oskar are in Edinburgh packing up our flat (although, I'm not entirely sure Oskar is doing much more than drooling over packing boxes). The result of this is that I started to wonder about how to best show Jenni some of the flats I'm looking at remotely. What I figured I wanted was a way for us both to be looking at the same web page and for each of us to be able to point out things to the other. I tidied up my idea and posted it to the Made By Ideas site hoping that someone else would run off and make it so I could focus on apartment hunting.
The inevitable happened, I couldn't let it lie:
Multi-user page (installable bookmarklet).
If you install that bookmarklet by draggin’ it to your bookmarks bar then launch it anywhere, your cursor position and how far you've scrolled the page will be sent to anyone else viewing the same page who has also launched it. If you launch it on this page just by clicking it just now, you'll see cursors from other people reading this post who've also clicked it.
Technical
This is built in node.js with socket.io.
It heavily reuses Jeff Kreeftmeijer's multiple user cursor experiment but updated to use socket.io v0.7. I also used the socket.io 'rooms' feature to contain clients to a given window.location.href so that it could be launched on any page and interactions would only appear to users on that same page. I also removed the 'speak' feature to simplify things. I'm planning on talking via Skype when I'm using it. In theory, mouse events other than cursor coordinates and scroll could be shared – keyboard input, clicks, selects.
The day after I built this, Christian Heilmann pointed out on twitter a different solution to the same problem. Browser Mirror uses the same technology (node + websockets) but instead of passing cursor positions, it passes the entire DOM of the page from the instigator's computer to their node relay and then out to any invited viewers. This approach gets round a lot of the problems and is probably a more robust solution, all in all. They also have an integrated chat feature.
Warning
The server side is running on a borrowed VPS. It's not even been daemonised using Forever so it might fall over and not come back up. Don't rely on this for anything, just think of it as a point of interest.
The Code
I'm not really going to do any further development with it but for interest, here's the node.js server, almost entirely Jeff Kreeftmeijer's work but updated for the latest socket.io
var sys = require('sys'),
    http = require('http'),
    io = require('socket.io').listen(8000),
    log = sys.puts;

io.sockets.on('connection', function (socket) {
	socket.on('set location', function (name) {
	    socket.set('location', name, function () { socket.emit('ready'); });
		socket.join(name);
	});
	socket.on('message', function (request) {
		socket.get('location', function (err, name) {
			if(request.action != 'close' && request.action != 'move' && request.action != 'scroll') {
				log('Invalid request:' + "\n" + request);
				return false;
			}
			request.id = socket.id;
			socket.broadcast.to(name).json.send(request);
		});
	});
	socket.on('disconnect', function () {
		socket.broadcast.json.send({'id': socket.id, 'action': 'close'});
	});
});
And here's a bit of the client-side JS that I modified to connect via socket.io v0.7 (again, modified from Jeff Kreeftmeijer's):
var socket = io.connect('http://yourserver.com', {port: 8000}),
socket.on('connect', function() {
	socket.emit('set location', window.location.href);
	socket.on('message', function(data){
    if(data['action'] == 'close'){
      $('#mouse_'+data['id']).remove();
    } else if(data['action'] == 'move'){
      move(data);
    } else if(data['action'] == 'scroll'){
			clearTimeout(noscrolltimeout);
			disabled = true;
      scroll(data);
			noscrolltimeout = setTimeout('disabled = false;',2000);
    };
  });
});
If you'd like to snoop around the code more, it's all available on the lab: Multi-user pages
-
Torch
Concept
Another proof-of-concept game design prototype. This is kind of a puzzle game. Ish. It's mostly a simple maze game but one in which you can't see the walls. You can see the goal all the time but you are limited to only being able to see the immediate area and any items lit up by your torch. You control by touching or clicking near the torch. The character will walk towards as long as you hold down. You can move around and it'll follow.
The first 10 levels are very easy and take practically no time at all. After that, they get progressively harder for a while before reaching a limit (somewhere around level 50, I think). The levels are procedurally generated from a pre-determined seed so it would be possible to share high scores on progression or time taken without having to code hundreds of individual levels.
Items that could be found around the maze (but aren't included in this prototype) include:
- Spare torches which can be dropped in an area and left to cast a light
- Entrance/exit swap so that you can retrace your steps to complete the level
- Lightning which displays the entire maze for a few seconds (but removes any dropped torches)
- Maze flips which flip the maze horizontally or vertically to disorient you.
I worked on this for a few months (off and on) and found it to be particularly entertaining with background sound effects of dripping water, shuffling feet with every step, distant thunder rumbling. It can be very atmospheric and archaeological at times.
Half-way through a level, two torches dropped 
Slightly technical bit
The game loop and draw controls are lifted almost line-for-line from this Opera Dev article on building a simple ray-casting engine. I discarded the main focus of the article - building a 3D first-person view - and used the top-down mini map bit on its own. The rays of light emanating from the torch are actually the rays cast by the engine to determine visible surfaces. It's the same trick as used in Wolfenstein 3D but with fewer uniforms. It's all rendered on a canvas using basic drawing functionality.
The audio is an interesting, complicated and confusing thing. If I were starting again, I'd look at integrating an existing sound manager. In fact, I'd probably use an entire game engine (something like impact.js, most likely) but it was handy to remember how I used to do stuff back in the days when I actually made games for a living. Most of all, I'd recommend not looking too closely at the code and instead focusing on the concept.
Go, make.
As with Knot from my previous blog post, I'm not going to do anything with this concept as I'm about to start a big, new job in a big, new country and I wanted to empty out my ‘To do’ folder. The code's so scrappy, I'm not going to put it up on GitHub along with my other stuff, I seriously do recommend taking the concept on its own. If you are really keen on seeing the original code, it's all unminified on the site so you can just grab it from there.
The usual rules apply, if you make something from it that makes you a huge heap of neverending cash, a credit would be nice and, if you felt generous, you could always buy me a larger TV.
-
Go on, google me.
A little while back when I was still job-hunting, I saw an interesting position come up with FI in Stockholm. They're the agency behind things like Google's 20 things I learned about browsers and the web. They were looking for a Web Producer to be clever and creative and innovative and insightful and all the usual things Web Producers are. I decided to apply but with such a high-profile agency, I figured my application had better be something appropriately clever and creative to get noticed.
I spent a couple of weeks tweaking key-words in my site to manipulate search results for the phrase "Awesomest Web Producer". I then used Moo to print up a postcard featuring a google search box with that phrase entered and the mouse cursor hovering over the "I'm feeling lucky" button (this trick doesn't work quite so well now that Google have launched Google Instant).
The postcard application 
I posted the card off to them with the job reference number on the back and the words "My application" handwritten. No name, no signature, no contact details. If the scheme worked, they'd find me, proving the value of taking me on. That was my thinking, anyway. To be honest, once I'd sent off the postcard, I figured that was the end of it. It was a cocky, big-headed move and probably wouldn't work.
It did work. Kinda. It worked perfectly on a technical level, at least: you could enter the phrase, hit the button and land on my CV site. If you didn't hit "I'm feeling lucky", you were still presented with a page of search results, each about me, my career history and some of my projects. It also worked to get FI to contact me. I went through a few stages of the recruitment process before we parted ways. I never did find out exactly why but I wasn't quite 'the right fit'.
Of course, if I'd gone there, I wouldn't be starting a kick-ass job with Nokia next week.
-
Debugging
One of the interesting things about web development is the number of different layers involved. On a low-down technical level, there are bits clogging the tubes, higher up you have TCP/IP then HTTP. A little further up still and you have the HTML of the page and eventually, on the top, there's what it looks like when it arrives on the user's screen. A lot of debugging can be done at the source code level but there is a level between that and the way it looks - the Document Object Model (DOM). This is web page as it appears in the 'mind of the browser' and some of the most useful debugging tools allow you to look directly at it.
All the main browser platforms have tools either built-in or available as easy-to-install add-ons which allow you to play with the DOM, add elements to it, take them away, change behaviours or styles on-the-fly and generally feel like a brain surgeon sitting with an electrode in one hand and a nice, squishy brain in the other. Playing with your pages at this level is an extremely useful way to get a good feel for the structure of a page and how the browser 'thinks'.
Some of these DOM analysis tools allow access to another behind-the-scenes level of the process - network traffic. Every file - HTML, JavaScript, image, CSS, XML, etc - starts at the server at one end and finishes at the browser. Using a network analysis tool is like standing at the front door of a party watching everyone come in. You can see where they came from and what they looked like when they arrived so that if they look different later on, you can tell they've had a few too many trips to the punch bowl. Or something. I think the analogy went a bit wrong somewhere. You know what I mean.
There's a good in-depth but understandable article of how browsers actually work on the HTML5 Rocks site.
-
Knots
Game design
I had an idea around Christmas for a new game design. it was basically to be a single or multi-player game where you would tie knots in a piece of ‘string’. The single-player game would focus on discovering new patterns while the multi-player one would be a time-based challenge where each would tie a knot, pass it over to their opponent and the first to untie it would win.
I built a basic prototype and had some fun inventing a few interesting knots (my favourite being ‘Yoda’) but didn't get round to doing anything with it. As I'm tidying up all my projects before immigrating to Germany, I figured I should just go ahead and put this out into the world.
Slightly technical bit
The system is built using an invisible 3x3 grid and 4 quadratic curves. The curves' start, control and end points are the centre of a tile. When you move a tile, it basically swaps position with the tile nearest where you drop it. This can also be done with multiple tiles simultaneously if you're on a multi-touch device. You can see the tiles if you enable debug mode. You can also switch between the two colour schemes it has at the moment.
Yoda in Knot form 
The only addition I've made to it since Christmas was to add on a system to allow players to save knots back into the system. I've only built in 22 patterns so if you make a nice, interesting or funny one, give it a recognisable name (nothing too rude, please) and save it, it will then be available to everybody who plays with it. You can also set whether the pattern is to count as ‘matched’ when rotated 90°, 180°, flipped vertically or flipped horizontally. Calculating the isomorphisms (when two knots look the same to the viewer but aren't necessarily the same to the computer) was probably the trickiest bit of the system.
Go, make.
If you're interested in taking the idea further, grab the code from GitHub and make something from it. The usual rules apply, if you make something from it that makes you a huge tonne of neverending cash, a credit would be nice and, if you felt generous, you could always buy me a larger TV.
-
Forrst Podcast
Last year, I had an idea for a Web Development Podcast Breakfast Show. The idea was that I'd get up early-ish in the morning GMT, catch up on the overnight tech news and record a short, 15-minute-or-so podcast. By the time I had tidied it and uploaded, it'd still be early for the US so listeners over there would be able to listen to it over breakfast. There might even be a tie-in app which would automatically play it as an alarm clock. It was a great idea.
The only downside was that recording, editing and uploading a podcast daily is a heck of a lot of work and requires a serious commitment. I managed to do an offline dry run of it for a week before I woke up, turned over and went back to sleep. It turns out the only downside is a major one.
Bearing that in mind, I have a lot of respect for the guys that run The Forrst Podcast, Mike Evans and Kenneth Love. True, they don't always manage to make the four-episodes-a-week they aim for but they do record more often than not. At the time of writing this, they've just publish episode 115 having been going for about 8 months.
Last week, I got in touch with them and mentioned that if they ever wanted a guest presenter they should give me a shout. Being the nice fellas they are, less than 24 hours later, I was recording with them. They actually would have had me on the same day I got in touch but I was balancing a drooling, sleeping, slightly sickly Oskar on me at the time and he has a tendency to gunk up the keys if I'm too close to the computer.
Long story short, if you're interested in tech, design and development news on a more-or-less daily-ish basis, I recommend subscribing to the Forrst Podcast. And, of course, if you're looking for a sample to find out what it's like, I can only recommend Episode 113 featuring a guest presenter who, hopefully, will be allowed back some day...
-
Design Archive
Along with (yet another) redesign, I decided to collect all my old blog designs together for posterity. The thing that surprised me is my own progression in design terms. I would still find it difficult to call myself a designer in any sense but I will admit that I'm a bit better now than I was back when I started this site.
Note: this is just a gallery of the previous designs for the blog incarnation of this site. The site itself existed for quite a while before that when it hosted my two webcomics “Things in Jars” and “Scene & Herd”.
These are all simply themes that were applied to the base CMS ‘Dooze’.
Previous blog themes
- Dooze (2007-2009)
- Underwater Slate (2009-2010)
- Felt (2010-2011)
- Desk (2011-?)
-
Travelling tales
When I was a young game designer wannabe living in St Andrews, I interviewed with a company in Manchester. For years, this was my biggest travel time:interview time ratio in that I got up shortly before 6, took a taxi, train and different train to get there by 1, had a 15 minute interview and then took two trains and a bus to get home by 11pm 1.
Now, the ratio is still unbeaten (31:1) but I have now definitely overtaken the basic numbers. I've recently travelled to Berlin twice to interview with Nokia's Ovi offices. I have since come to the conclusion that there is some mysterious force at work who really doesn't like me travelling through Schiphol. Note: I don't mean an omniscient being, I mean some actual arch enemy.
Trip one
Leaving on a Tuesday afternoon, I jumped on a plane at Edinburgh Airport to Amsterdam Schiphol then changed onto a plane to Berlin Tegel. I eventually arrived at my hotel in Berlin around 11pm. After checking in, hanging up my interview shirt and scrubbing my face to get rid of the sheen of fellow air passengers, it was after midnight. Not the best prep for a full day of interviews, to be honest. The next morning, I got up, tried to partake of a German breakfast of rye bread and wurst, settled for a croissant and coffee and headed out into the -10°C weather. I won't go into the details of the interview process but by the end of the day, I'd been interviewed by 8 different people, drunk two pots of coffee myself and been told that I don't look particularly German. Not being German, I thought this statement was accurate.
I left the office, caught a taxi back to the airport and relaxed safe in the knowledge that I'd be back in Edinburgh in a few hours. An incorrect assumption, it would seem.
I arrived in plenty time to double-check the flights were all okay. There was even a flight to Schiphol before mine that some passengers were offered the chance to catch. I was relaxed, it was fine, I wasn't in a hurry, I'll catch the next one. Several hours later, I regretted that decision. The second flight was held in Schiphol before coming to Tegel due to broken air conditioning. By the time it had landed, turned round and let us board, I should have already been half way to Edinburgh and had missed the last connection. Boo.
One over night in a hotel later, I finally made it back to Edinburgh at 8am. Approximately 40 hours after I left. About 5.7:1.
Trip two
When it came to my second round of face-to-face interviews, I wasn't lucky enough to get an overnight stay, unfortunately. I had to get to Berlin and back in a day. The 2.45am start would have been bad enough under any circumstances but when you have a teething 5-month old and have generally been running on empty for the best part of 2 months, it very nearly killed me. Still...
Edinburgh to Schiphol � fine; Schiphol to Tegel � also fine. I arrived at the office only 3 minutes late for my 12 o�clock interview which isn't too bad after travelling about 800miles. Three hours of geek talk later, I'm back in the taxi on the way to Tegel, snapping photos out the taxi windows just to prove I was there. This time there's no delay at Tegel and I land in Amsterdam with about 2 hours to make it to my gate. I'm not exactly a relaxed traveller so I'm not the kind who can go via the airport pub, have a sit-down meal and casually meander to the gate in time to board. I'm more inclined to high-speed sprints and panicked departure board-scanning just to make sure I get to the gate several hours early so I can sit and do nothing. That's exactly what I did. I got to the gate in plenty of time to see the �Flight delayed� ticker come up. Plenty of time to watch the �Estimated Departure� go from 21:00 to 22:00 to 23:00 to 00:00. It was when it flashed �00:30� it finally decided to stop.
I made it back to Edinburgh around 1am and got back to my house around 2.30am. Just in time to pick up Oskar as another night of painful teething screams started off, in fact. 7:1, this time.
-
Up-sticks
So, after almost 2 years at National Museums Scotland, I'm moving on. And not just me, Jenni's coming too (and Oskar, of course).
After delivering a kick-ass, ground-breaking website and implementing some cool shiny stuff, I feel confident I can move on having made a bit of a difference. I initially took the job for two main reasons:
- To bring advanced web-awesome to the cultural sector
- To prove my technical ability to myself at an international level
I'm happy I've done that. The National Museums Scotland site looks a lot nicer above and below the surface than it did when I and the rest of the web team arrived in 2009. Hopefully the systems and techniques I've put in place will ensure it stays at the front edge of the culture sector in terms of well-considered use of technology. The rest of the web team are still there, of course, and will continue to make cool stuff. I'll be satisfying my urge to build cool cultural stuff by providing the tech behind the various Museum 140 projects.
The second reason is just as important. Working on a large national organisation website made me triple-check everything I wrote but my desire to build ‘Cool Stuff’ meant that I couldn't play it too safe. Favourable reviews from .NET magazine and ReadWriteWeb suggest that we got the balance right.
Personal projects
In the last 12 months, I've also had a fair amount of success with my various personal tech projects – 8bitalpha, harmonious, The Elementals, Whithr, Shelvi.st as well as being a featured case study on phonegap.com. All of which have served to remind me I like the challenge of doing something beyond what I can already do.
Where now, then?
Now is the right time to step up from the top half of the First Division to somewhere in the middle of the Premier League (yeah, that's right, sport analogies). I'm going to be starting in July as Senior CSS Developer at Nokia in Berlin. I'll be working on the desktop interface for the services that used to be ovi.com (until a couple of weeks ago) building interface frameworks and UI components.
Nokia have been going through a bunch of changes recently so I'm excited to be joining them now when there's a great opportunity to make a significant difference on a big scale.
I've only been to Berlin twice (an upcoming blog post will give more details about that) and, despite being German, Jenni's never been so it'll be an interesting move. Berlin does, however, have over 170 museums so if there's anywhere Jenni can perform her particular brand of museum-wizardry, it'll be there. We've asked Oskar's opinion but he's not saying much. He's mostly drooling.
Über-curricular activities
I'm also hoping to give more conference talks and presentations (like ) as well as write more educational articles for this blog and others. I've got a few written that I've not had the chance to present anywhere so I might put them here at some point.
If you have any questions, throw a tweet in my direction.
-
HTML5 for Large Public Bodies
Your country needs you...
...to stand at the cutting edge of technology.
Sounds awfully impressive, don't you think?
There are quite a few regulations to bear in mind and comply with when developing a website for a Government organisation or any large public body. This has lead to a lot of sites being developed in a very defensive manner, ensuring safe compliance at the expense of a great and consistent user experience.
This video features a presentation about how large publicly-liable institutions should and can embrace the latest in web technologies without sacrificing standards. By embracing them, in fact.
The content of this was developed while planning and building the National Museums Scotland website which launched last November. The messages presented are applicable to museums, galleries, swimming pools, councils, anywhere, really.
If you're a techie person in the cultural or government sector, you might find this useful in convincing others to take advantage of the latest cool (and useful) technologies.
Video
HTML5 for Large Public Bodies from Simon Madine on Vimeo.
Links from the presentation
- PolyFills
- .NET magazine article
- (Almost) complete list of polyfills
- Dive into HTML5
- HTML5 Boilerplate
- Smashing Magazine
- HTML5 Doctor
- AlphaGov
Slideshow
The source for the slides is available online although it's mostly webkit-friendly. I realise the irony of a presentation about cross-platform HTML5 not being a great example itself of that but it does degrade adequately. If I get the time in the future, I'll tidy it up. An actual good (and relevant) example of cross-platform web technologies is the National Museums Scotland website itself which performs fantastically across all manner of platforms.
-
Instant art
I love making silly little digital toys. If I were more confident at talking waffle, I'd call them art and get a government grant to pursue the possibilities presented in projects integrating off and online expression and interaction and blah, blah, blah.
Anyway.
I took my 'Automatic Tumblr Art Maker' from last year and combined it with the hot new thing in town – Instagram – to make some kind of comment about the inherent nature of technology to remove the individuality from a composition and to put another barrier between the intention and reception. Or something. I dunno. It randomly generates a pseudo-meaningful statement and puts it on top of a randomly selected recent Instagram photo. It makes a new one every 15 seconds or you can click to generate one if you prefer your ironic art on demand.
I've also added a couple of nice little extras to it: the tweet button in the bottom right will let you share a link to the exact combination of image and statement you're looking at so if you find a particularly poignant/ironic/idiotic one, you can share it. Also, on the off-chance you fancy using it as a screensaver, making it fullscreen will hide that tweet button so as not to get in the way of The Art.
Go, make ironic Insta-art.
-
Archiving Tweets
Archiving Tweets - Technical
Twitter has an amazing amount of data and there's no end to the number of ideas a coffee-fuelled mind can come up with to take advantage of that data. One of the greatest advantages of Twitter – its immediacy, its currency, its of-the-moment-ness – is, however, also one of the drawbacks. It is very easy to find out what people are thinking about now, yesterday or a few days ago but trying to find something from more than a week ago is surprisingly tricky. The standard, unauthenticated search only returns the last 7 days of results, beyond that, there's nothing. You can get around this by building custom applications which authenticate themselves correctly with Twitter and provide a level of traceability but that's quite tricky.
The easiest way to archive search results for your own personal use is actually surprisingly simple. Every search results page includes an RSS feed link1. This will be updated everytime there are new results. Simply subscribe to this feed with a feed reader (Google Reader is simple and free) and your results will be archived permanently. This is great if you're searching for personal interest stuff but doesn't work so well if you want to share the results with the public.
This was the problem I was presented with when I was asked to build a tweet-archiving mechanism for Museum140's Museum Memories (#MusMem) project. Jenni wanted some kind of system that would grab search results, keep them permanently and display them nicely. I didn't want to create a fully OAuth-enabled, authenticated search system simply because that seemed like more work than should really be necessary for such a simple job. Instead, I went down the RSS route, grabbing the results every 10 minutes and storing them in a database using RSSIngest by Daniel Iversen. The system stores the unique ID of each Tweet along with the time it was tweeted and the search term used to find it. The first time a tweet is displayed, a request is made to the Twitter interface to ask for all the details, not only of the tweet, but also of the user who tweeted it. These are then stored in the database as well. This way, we don't make too many calls to Twitter and we don't get blocked.
If you want your own Tweet Archive, I've put the code on GitHub for anyone to use. It requires PHP, MySQL and, ideally, a techie-type to set it up.
Archiving Tweets - Non-technical
With the technical side out of the way, we're left with the human issues to deal with. If you're automatically saving all results with a particular phrase, all a malicious person needs to do is include that phrase in a spam-filled tweet or one with inappropriate language and suddenly, it's on your site, too. If you aren't going to individually approve each tweet before it is saved, you must keep a vigilant eye on it.
The other thing which has turned out to be a problem is the Signal-to-Noise ratio. When we initially decided on the hashtag #MusMem, nobody else was using it. To use Social Media parlance, there was no hashtag collision. The idea was to encourage people to use it when they wanted their memories stored in the MemoryBank. Unfortunately, it is now being used by anyone tweeting anything related to Museums and Memories. This is particularly troublesome at the moment as this month is International Museum month, one of the themes of which is ‘Memory’ (which is why we built the MemoryBank in the first place). This means that the permanent memories we want stored (the Signal) are getting lost in the morass of generic Museum Memories (the Noise). There is no way to solve this problem algorithmically. If we are to thin it down, we actually need to manually edit the several thousand entries stored.
If anyone can think of a solution to this issue, please let everybody know – the world needs you.
-
Mini Zombie Pipe
Here are some mockups I did for a game design last year.
The general premise is a 2d physics game with multiple single-screen levels. When the level starts, you have a few seconds to rearrange whatever items/furniture/planks of wood you find lying around and place your hero somewhere on the screen. After the initial timer has run out, the pipe opens and hundreds or thousands of tiny zombies or robots (or robot zombies) pour into the level. You have to avoid being touched by them for 30 seconds, after which the level is cleared and you're on to the next level. The difficulty is in being able to quickly rearrange the furniture and choose your safe spot to prolong the time before they get you. As they are able to eat through most things, they would eventually get through.
There is the possibility for tweaks to the difficulty setting by changing the amount of available furniture, whether the protagonist can move mid-level, how many zombies there are, how small they are and so on.
At the time, I was too busy building The SMWS Spirit Cellars and when i had time again, I started building The Elementals so I never came back to it. Looks like it could be a fun game, though.
-
Yet another wood texture
The web needs more wood textures. If there's one thing the web is short of, it's wood textures.
Here's a wood texture I photographed, tidied and straightened.
Enjoy.
-
Uncooked Composition 5
Now for a complete break from the norm... a guitar.
I'm not nearly as confident improvising on the guitar as I am on the piano. Mostly because discordant noises on the piano sound intentional. The same noise on a guitar sounds like failure.
Still, I found this in amongst a pile of old recordings (a virtual pile, it was on a backup drive). It was recorded some time in late 2003, I think. As always, there's a bit of a stutter at the start. That's kind of the point of this project.
-
I made this
Reading over recent posts, you may have gotten the impression that I'm a bit of a geek. I occasionally need to remind myself that I wasn't always so this weekend, I took a few hours and drew a picture of Oskar (the youngling).
Here are a few pictures I took of the drawing as it came along. Apologies for the quality not being great but my drawing studio isn't the best setup for photography.
Initial sketch of his head. 
A bit more arm. 
Some detail on the eyes to try and get a feel for the style. 
Shading around the head and detail on the mouth. 
Detail on his clothing. 
Texture and depth added to the arm. 
More depth to the clothes. 
Finished. -
Investigating IE's innerHTML
I'm currently working on a tool which uses JS to parse an XML document and output it as JSON. Straightforward enough, you'd think. The issue I'm fighting against crops up when the XML tags have an arbitrary namespace. True enough, some of the files I'll be processing have this namespace defined at the top of the document but the tool has to be robust enough to cope when they don't.
To cut a long story short, IE6, IE7 and IE8 have an interesting attitude to innerHTML when the tags you are trying to insert have a namespace. IE9 seems to do the job as you'd expect. I've created some jsFiddle pages which try and identify the issues. They both use QUnit and the test code is included below.
createElement nodeName vs get(0).nodeName
I started off using jQuery to help identify this as the tool uses jQuery for the XML heavy-lifting. The two tests in this demo create elements in two different ways. First, we create the element using document.createElement and grab the nodeName then we use jQuery's constructor and use get(0) to grab the bare DOM element's nodeName. Also, in this first set of tests, we're creating non-standard elements.
test("Compare elements without namespace", function() {
 var element1, element2;

 element1 = document.createElement('spud').nodeName;
 element2 = $('<spud/>').get(0).nodeName;

 equals(element1, element2, "We expect these to match");
});
The code above runs fine everywhere – IE, FireFox, Opera, Chrome, etc. etc. Good.
test("Compare elements with namespace", function() {
 var element1, element2;

 element1 = document.createElement('a:spud').nodeName;
 element2 = $('<a:spud/>').get(0).nodeName;

 equals(element1, element2, "We expect these to match");
});
This runs fine in non-IE browsers, they all report the nodeName as
'a:spud'. IE now reports the nodeName as'spud'. Ah. I dug through the jQuery source, tracking down the bare roots of the constructor and eventually figured out that just looking at the element itself isn't going to provide any clues. The bit that does the actual string-to-elements work (somewhere around line 5619 in jQuery 1.5.2) creates a container div then injects the (slightly modified) code as innerHTML. The issue must be in IE's interpretation of innerHTML, I thought to myself. And then to you by writing it here..innerHTML aside
or ‘jQuery is clever’
Before we continue with this long and, ultimately, unnecessary investigation into namespaces, I have to take a small diversion to cover some smart stuff jQuery does. One thing in particular, in fact. Around that line I mentioned earlier (5619-ish), an extra bit of text is inserted into the innerHTML to cope with IE's oddity. If you are trying to create a non-standard element using innerHTML, IE will not complain but also just do pretty much nothing at all:
        var div = document.createElement('div');
        div.innerHTML = '<spud></spud>';
        alert(div.innerHTML);
The above code will alert
'<spud></spud>'in most browsers but''in IE. What jQuery does is firstly wrap your element in an extra<div></div>(producing'<DIV></DIV>') then prepends the word 'div' to that. The innerHTML reported by IE is now'div<DIV><SPUD></SPUD></DIV>'! There it is! Next, the extra gubbins is removed by calling .lastChild and you're left withinnerHTML = '<SPUD></SPUD>'. That's pretty darned clever..innerHTML vs document.appendChild
Back on track. Armed with this little trick, we can reliably test innerHTML in IE using non-standard elements.
module("Known elements (span)");
 test("Compare elements without namespace", function() {
  var div1, div2;

  div1 = document.createElement('div');
  div1.innerHTML = '<span></span>';

  div2 = document.createElement('div');
  div2.appendChild(document.createElement('span'));

  equals(div1.innerHTML.toLowerCase(), div2.innerHTML.toLowerCase(),
     "We expect these to match");
 });

 test("Compare elements with namespace", function() {
  var div1, div2;

  div1 = document.createElement('div');
  div1.innerHTML = '<u:span></u:span>';

  div2 = document.createElement('div');
  div2.appendChild(document.createElement('u:span'));

  equals(div1.innerHTML.toLowerCase(), div2.innerHTML.toLowerCase(),
     "We expect these to match");
 });
The first test in this pair runs fine everywhere exactly as we'd hope and expect. The second fails miserably in IE. Let us quickly run the same test with unknown elements just to make sure we're identifying the right problem:
module("Unknown elements (spud)");
 test("Compare elements without namespace", function() {
  var div1, div2;

  div1 = document.createElement('div');
  div1.innerHTML = 'div<div>' + '<spud></spud>' + '</div>';
  div1 = div1.lastChild;

  div2 = document.createElement('div');
  div2.appendChild(document.createElement('spud'));

  equals(div1.innerHTML.toLowerCase(), div2.innerHTML.toLowerCase(),
     "We expect these to match");
 });
 test("Compare elements with namespace", function() {
  var div1, div2;

  div1 = document.createElement('div');
  div1.innerHTML = 'div<div>' + '<u:spud></u:spud>' + '</div>';
  div1 = div1.lastChild;

  div2 = document.createElement('div');
  div2.appendChild(document.createElement('u:spud'));

  equals(div1.innerHTML.toLowerCase(), div2.innerHTML.toLowerCase(),
     "We expect these to match");
 });
As before, the first test in this pair works fine, the second fails. Cool. Or not. Either way, you can now see that it doesn't really matter whether the elements are standard or custom and that little diversion we took earlier really was unnecessary. Still, you know more now about some of the cleverness in jQuery than you did before.
It turns out the reason IE reports the nodeNames as the non-namespaced ones is because it has been busy behind the scenes and added an extra XML namespace prefix into our current context. The innerHTML of the div we filled up using innerHTML has been modified to:
  <?xml:namespace prefix = u />
  <u:span></u:span>
Where'd that namespace declaration come from?! Goshdarnit, IE. From its point of view, within that little context,
u:spanis equivalent tospanThe most stripped-down example
Seriously, it does not get more fundamental than this.
element = document.createElement('div');
testHTML = '<div></div>';
element.innerHTML = testHTML;
element.innerHTML.toLowerCase() == testHTML.toLowerCase()
The last line there is true for all browsers.
element = document.createElement('div');
testHTML = '<a:div></a:div>';
element.innerHTML = testHTML;
element.innerHTML.toLowerCase() == testHTML.toLowerCase()
The last line there is true for all browsers except IE 6, 7 and 8!
In conclusion?
Ultimately, there are no winners here. Identifying the problem is quite different from fixing it. I've added a note to the relevant jQuery bug in the tracker but it's not so much a bug in jQuery as a humorous IE quirk. There's some talk of refactoring the .find() method to handle more complicated tagnames so this might get picked up then. The fix will probably be something along the lines of checking the outcome of the innerHTML doesn't have an unexpected namespace declaration when the selector has a colon in it:
div.replace( /<\?[^>]*>/g, '' )I'd submit the patch myself but I'm having difficulty getting unmodified jQuery to build on any of my machines without failing most of the QUnit tests. I've probably typed something wrong.
-
Autogenerated Everything
After seeing this collection of the 892 different ways you can partition a 3 x 4 grid1, I was struck by a thought. If these were generated as HTML templates, they could be combined with a couple of other useful websites and become a nice, API-driven site builder2.
The process
- On the site-building webpage, you'd enter a few keywords describing the site you want and drag a slider along between 1 and 12 to specify how many content areas you want. The value from the slider would be used to pick a template randomly from the number available for that combination of panels.
- This template would be dropped into the middle of an HTML 5 boilerplate (possibly generated via Initializr)
- The keywords would be passed to ColorAPI to generate an asthetically pleasing colour-scheme
- The keywords would then be passed to FlickHoldr along with the dimensions of some of the areas from the template to get relevant imagery
- Grab some lorem ipsum of the right length from LoremIpscream to fill out the content areas of the site
- Done. Your asthetically pleasing, nicely designed site is ready to download within a few seconds.
Once this service has been created, I'm fairly sure me and the rest of the industry will be out of a job.
-
Uncooked Composition 4
Listening again to these tracks makes me think I must have spent a lot of my time in the 80s watching heartwarming, uplifting, made-for-tv movies.
This should be thought of as a companion piece to the waltzy one from before as there was 23 seconds between finishing that one and starting to record this one.
As described here, this is one of a series of random, unprocessed piano doodles posted to remind me to play more often.
-
8 bit alpha
Another week, another launch. I really need to find a cure for whatever illness I have that results in compulsion to built stuff. Maybe there's a Builders Anonymous group where you can go for support in coming to terms with the fact that you don't always have to solve the problem yourself. Learn to accept that sometimes things are just the way they are.
Pshaw!
A few days ago, I read this article by Kornel Lesiński. It describes the curious and interesting ways of PNGs, particularly highlighting the fact that the 8-bit PNG with an embedded alpha channel needs a lot more love than it gets. It gives you the small file sizes you get from 8-bit PNGs (resulting from the maximum 255 colour palette) but also the benefits of a full partial transparency alpha channel unlike GIFs or standard 8-bit PNGs in which pixels are on or off, nothing in between. The reason this file type is ignored is because the most common web graphic creation application in the world (Adobe Photoshop) doesn't support them. At least not yet. You need Adobe Fireworks or some other application to convert your 24-bit alpha channel images.
After a quick search turned up nothing but instructions on how to enable command-line convertion on a Linux server, I figured this would be a handy web service. Drag, Drop, Download, Done. This also gave me an excuse to play with some File API stuff. In the end, I decided to use a jQuery plugin because there was a greater chance that it had been tested and bugfixed than my own script.
With a name like that, I had to go for a retro theme. I even created a nice 8-bit spinner.
If you have a use for the service, let me know, if you want to learn how it works, browse the source. If you want to popularise the phrase “Drag, Drop, Download, Done” for this kind of simple web application, do that too.
-
Shelvist
I've been a bit quiet for the last couple of weeks. Now I can reveal why!
All my spare time has been taken up building Shelvist (well, that and looking after a 4-month old). It's a way of keeping track of which books you have read, which ones you are currently reading and which ones you want to read. That's it.
Just over a year ago, I started listening to a lot of audiobooks and, 12 months after I subscribed to Audible, I decided I wanted to see just how many books I'd read*. All the existing book tracking sites (e.g. Shelfari, Goodreads) focus on recommending, rating, reviewing which just seemed like hard work.
Building this was also a chance to learn some new tech. I've been wanting to play with CakePHP for a while so this seemed like the best opportunity. It's been a while since I used any kind of framework and I've never used a PHP MVC framework (although I did build one last year as an intellectual exercise).
I got over 90% of the site built in spare time over about 5 days and most of that was spent just reading the CakePHP docs. The reason for the lengthy delay between initial build and launch is down to that last 10%. As often happens with frameworks, nearly everything you'd ever need to do is bundled into some nice, easy to access functionality. That is, after all, kinda the point of a framework. It's the stuff that makes your product or website unique that proves trickier. I won't go into any details just now although I might come back to it in a later post.
More later, first of all, go shelve some books: Shelvist.
-
Scoped Style
I couldn't let it lie. The nifty JavaScript from the previous post was all well and good but I had to have a go at jQuery plugin-ifying it. It has been Enpluginated.
Your options now are simple:
- Have a look at a demo
- Check out the source on GitHub
- Download it and start scoping some styles.
If you still have no idea what I'm talking about, you can read about the attribute. There are still a couple of bugs when the scoped blocks are deeply nested within other scoped areas so I'm hoping someone with a keen sense of how to straighten out Webkit oddness can help. When browsers don't implement functionality, it's a bit tricky to guess what they'd mean.
Aside from that, it's cross-browser (IE7+) compatible and ready to use. I'm interested to know if anyone finds it useful or finds any odd combinations of styles that don't scope nicely.
-
CSS Scoped
One of the things in HTML5 that caught my eye a while back was the new 'scoped' attribute for style tags. The idea of it is that you can include a style element mid-document, mark it as scoped and its declarations will only apply to the style elements parent element and its child elements. The styles won't affect anything outside this. The biggest problem with bringing in this attribute is that it's not backwards compatible. If you include a style block mid-page, its declarations will be applied to ever element whose selector matches, inside or outside scope. It is anti-progressively enhancable. This means that designers and developers can't start using it until there's enough support. What we need is another of those JS tricks to make it usable.
My first attempt at solving this problem with JS involved generating a unique class, adding it to the parent element and then parsing the style blocks using JSCSSP so that I could rewrite them with the new class to add specificity. This approach only worked for the most basic declarations, unfortunately. The parser worked perfectly but there's a lot of detail in CSS specificity that mean this would be a much larger problem than I thought.
My second attempt involved:
- Allowing the style blocks to affect everything on the page (at which point, the elements in-scope look right, those out-of-scope look wrong)
- Using JS to read the current computed styles of each element in-scope and copy them to a temporary array
- Emptying out the scoped style element (in-scope look wrong, out-of-scope looks right)
- Copying the styles back from the temporary array onto each element
This worked great unless you had more than one scoped block – step 1 allowed scoped styles to affect each other.
The current attempt involves temporarily emptying all other scoped styles before taking the computed styles from a block. I'm now just thinking that this method might not work if you have multiple scoped blocks within the same context. Oh well, there's something to fix in the future.
This is where I'm at just now.
Yes, it's a mess, yes the JS is scrappy and yes, it doesn't currently work in IE but I'll get round to that next. It took long enough to get it working in Firefox as there's no simple way to convert a ComputedCSSStyleDeclaration to a string in Mozilla unlike Webkit's implementation of cssText or IE's currentStyle. I might even make it into one of those new-fangled jQuery plugins everyone's using these days.
-
jQTouch Calendar Extension

I needed to build an offline calendar in jQTouch for a project and found this particularly nice-looking jQTouch iCal project by Bruno Alexandre. Unfortunately, it required a server connection.
A day later and I've pulled the thing apart, refactored and rebuilt into a shiny jQTouch extension (still using the original project's CSS). It's built for Mobile Safari but still looks good in other webkits.
Grab the code from the GitHub repository
-
Uncooked Composition 3
I apparently felt in a waltzy mood when I recorded this one
-
Toolkit

I'm not entirely sure what the toolkit's for but it's got everything she needs.
Again, the paper texture came from here. This was basically an excuse to look at pictures of Diana Rigg...
-
I wish...

What do you do when you find a nice paper texture? Juxtapose a couple of pop culture references on it and Save for Web.
That's what I do, anyway.
-
iMagritte
-
Context-free content and content-agnostic design
Last year I wrote about the trend towards separation between the design creators and the content creators and I think it’s time to revisit that topic. The idea was that, although the tools of the future would mean there would be less need for individual content to be designed and developed by hand, there would be an increasing number of opportunities for content to be viewed within the context the consumer wants to view it rather than the way the designer wanted it viewed.
Okay, that sounds a lot more complicated than it is. Here’s a scenario:
Part One
- I write interesting articles
- I post them on my MySpace-inspired, geocities refugee, blink-tag-heavy page
- You refuse to read them because the design literally makes your eyeballs itchy.
Part Two
- Some other guy writes reeeeeeeally dull articles
- He posts them on his beautifully-designed, subtly gradiented, drop-shadowed, Helvetica Neue Light site
- You refuse to read them because the content is so dull your heart-rate slows almost to a stop and you forget to breathe.
The type of content/design separation I’m talking about here would mean you take my wonderfully written articles, his exquisitely-designed layout and put the two together. Technically, you might be able to create a brain-numbingly-dull but eye-ball-searing monster out of the left-over parts but you shouldn’t. At the moment, we can’t just take any arbitrary design and apply it to any arbitrary content but it won’t be that long. As I mentioned last year, the separation of design and content is not a bad thing for designers, in fact, it’s an opportunity to create a better content consumption experience than the next guy.
The last year has provided a great number of examples of this trend and it seems it can only continue. Some of the more high-profile ones are:
FlipBoard
The hype around this was so immense that everybody absolutely had to have it on launch day. It was so popular, in fact, that it was about a week before anyone could actually use it, the load on their servers bringing them grinding to a halt. It was kinda justified, though. Having all of your own tailored content pulled from Twitter, FaceBook and any number of recommended channels (groups of RSS feeds and websites) then presented to you as a personalised magazine is quite enjoyable. The creators got into a bit of trouble for screen-scraping (what they refer to as ‘parsing’) rather than using the content the way the creators intended but that seemed to die down once the content creators realised they were still getting the ad revenue.
Reeder
This really applies to any RSS reader but Reeder by Silvio Rizzi is a particularly nice and well-known example. RSS is really the best example of context-free content where, for many years now, the audience has had the ability to take in the content of articles in their reader of choice. Initially, this was for convenience – why access content in 20 different places when you could access one – but now that the RSS-consuming public are au fait with that, it has moved on to more aesthetic concerns. Reeder presents articles in off-black text on an off-white background in Helvetica. It’s possibly an overused visual cliché but it’s a nice one and it works.
Bookmarklets, UserScript, UserStyles and Extensions
There are a number of bookmarklets whose specific purpose is to apply a predefined design to any arbitrary content. Many of them use Helvetica. Although Bookmarklets have been around for a long time, their popularity never really took off with the mainstream web audience. It’s probably something to do with the conflicting messages tech-types give to non-tech-types: “Never install programs from the web, they’re almost certainly viruses” and “A Bookmarklet is a little program that runs in your browser...”. UserScripts keep pushing the boundaries for what is possible via JS but require a level of technical ability beyond the vast majority. UserStyles are a more passive way of doing many of the same things as UserScripts and Bookmarklets although whereas they run JS and actively modify the page, UserStyles take the markup they’re given and change it.
At the moment, it seems the most user-understandable way to enhance the browser experience is with browser extensions, even if they are simply used to run the same JS you’d have in a bookmarklet or a userscript.
Helvetireader
We’re getting quite meta here. If you’re using Google Reader for consuming your RSS, you’ve already brought the content into a new context. Helvetireader from Jon Hicks takes that content and overlays another design. Which uses Helvetica.
Readability
I mentioned this briefly last year. This is probably the highest-profile bookmarklet in this field. In the words of the creators, arc90, it ‘...makes reading on the Web more enjoyable by removing the clutter...’ actually, that’s a far better way of describing what I’m talking about than my whole first three paragraphs. This allows a few variations in designs giving the user a bit more control over how they want things presented.
NotForest
This is superficially similar to readability but whereas with readability, you customise the design before you install the bookmarklet, this allows you to choose your design each time it is launched.
More than words...
When I’m referring to content, I don’t just mean text. Any media – audio, video, photo – can be separated from its original context and presented in a more accessible way. QuietTube does this for YouTube videos, presenting them on a white page with no recommended videos, no channel subscription buttons and, most importantly, no comments[1]. Flickriver presents the photos from a Flickr user’s account on a black background in an endless scroll so that you can just immerse yourself in the photos without having to look for the ‘next’ button every time. Huffduffer picks up any audio files you want in webpages and gives them to you as an RSS feed that can be subscribed to in iTunes. You’re taking the audio out of its original context and consuming it how you choose.
-
Cash machine frustrations
Cash machines, ATMs, AutoTellers, Cashpoints... whatever you call them in your bit of the world, have been around since the 1960s and yet there is still no user-interface standardisation. There’s a wide difference in user experiences, designs, hardware, layout. A certain amount can be attributed to the kind of variation you’d expect – font, colour, terminology – but after almost 50 years, there’s still a gulf between a good experience – the kind where you barely notice the machine: you have a task, you do it, you’re done – and a bad one – the kind that would prompt you to write a post about it, for example.
It may seem like a trivial thing to most people but I find I’ve actually started avoiding the machine near my house just because it is the worst offender I have ever come across in terms of consistency, design and sense. This interface was definitely planned by programmers and not designers.
Roughly, the process goes like this:
Screen one
Insert your card
Inserts card
Okay so far.
Screen two
Please type your PIN then press Enter
beep, beep, beep, beep[1], look for the Enter button...
Screen three
Please wait, processing...
Wait, I haven’t pressed enter yet! Apparently I didn’t need to press enter, did I? You were lying when you said ’press Enter’. You’re already making me dislike you.
Screen four
Would you like a receipt with this transaction?


                         yes >
                          no >
The gap between the question (at the top of the screen) and the options (at the bottom) is just big enough to make me want to double-check the question. This would be much better if the options were themselves descriptive:
       I want a receipt >
I do not want a receipt >
Even better if this was asked at the end of the transaction. Maybe I haven’t decided whether or not I want a receipt. I’ll have a better idea after my transaction. What if I say no now and change my mind later? Is it too late then? Will I get another chance? Oh no, I’m hyper-ventilating...
Related to this screen is my biggest cause for complaint. When there is no receipt paper left what does the machine do? Miss out this question? Replace it with a single notification screen? No, instead, we get this screen:
Screen four, take 2
Unable to print receipt, would you like to continue
with this transaction?


                         yes >
                          no >
If you’re in the habit of anticipating the receipt question, you’re prepped and ready to press ’no’ as in "No, I don’t want a receipt". However, if this screen comes up, even if you notice the question is different, nine times out of ten, muscle memory kicks in and you find yourself pressing it anyway with a voice in your head shouting ’Stooooop!’ at whatever’s controlling your finger. You press it, your card is spat out, you have to start again. This experience will ensure that the next time you’re presented with the screen, you’ll double-check the question then the options then the question and then the options. Twice. Even if you try to scan the text, your eyes will still pick out ’receipt’ in the middle and ’with this transaction’ at the end. That doesn’t help, you actually need to read and comprehend fully. And here was you thinking you only wanted to get some cash out.
Screen five
Please select transaction


                         View Balance >
                             Withdraw >
I don’t have too many complains about this screen except for the unnecessary distance between the question and the options. It is a touch irksome that they’ve now switched to action-based label text ("view") from the option-based labels ("yes" above)
Screen six
Please select amount to withdraw


        < £100                  Other >
        < £70	                   £50 >
        < £40	                   £30 >
        < £20	                   £10 >
I would like £30, please. *beep*
Screen seven
Please wait, processing...
About 30% of the time, this is the next screen:
Screen eight
Unable to dispense required amount. Please enter a
different amount.

   Suggested amount(s): £20, £40

   £[   ]
There are several annoyances with this screen:
- why was I even asked if I wanted £30 if the machine was never going to give me £30?
- what if I were to type in £50? Would the machine also be unable to dispense that amount? £20 and £40 are suggestions but there’s nothing to say why I can’t have £50.
- was it so utterly impossible for the programmers to figure out whether they were displaying one suggested amount or two? There should never be any reason for dynamically generated text to resort to the bracket(s).
The operators of these machines must have a lot of usage statistics so rather than give equal billing to all possible options throughout the process, why not reorganise so that the greatest number of people have the smallest amount of work to do? If 90% of users use the machines to withdraw £20, put that on the front screen (just after the PIN). Don’t insist on brand colours when they’re annoyingly intrusive on the user experience. Heck, why not just set the whole thing in off-black Helvetica on an off-white background with that ubiquitous swiss red colour?
I’d rather something like this
than something like this

Am I over-reacting?
Yes, completely. That’s not the point. Well thought-out user interfaces are what separates us from the animals. Or something like that. There are now over 2 million ATMs in the world, so unifying them will probably never happen but that doesn’t give the designers of the next generation of machines free reign to start from scratch all over again.
Am I generalising?
Okay, maybe a bit. Maybe a lot, actually. I’ve successfully used ATMs in a number of countries in a variety of languages but then, I do ‘tech stuff’ for a living. Without getting my hands on those usage statistics, I couldn’t really say.
Anyway, aren’t we supposed to be paying for everything by thumbprint these days?
-
Uncooked Composition 2
Here's another short session of random piano noodling. As far as I can picture, this would be suitable for a montage in a film where the protagonist is mulling over the fact that his wife has left him and it takes him a while to get used to the idea but he finds solace in his dog. Or something like that.
If the end seems a bit abrupt, it's because Jenni came in and reminded me we were actually supposed to have gone to the shops 10 minutes previous.
-
Testing CSS3 stuff
You may have seen Google's 'Watch this space' advertising appearing all over the place. They have quite eye-catching diagonally striped backgrounds in various colours. A couple of days ago, I was wondering how easy it would be to recreate this in CSS without images. Unfortunately, the state of CSS 3 is such that some things work wonderfully, some just plain don't (scoped attribute, I'm looking at you). The following code relies on vendor extensions and so, unless you're willing to tend it and correct it after the spec is finalised, don't use this on a production server.
The most obvious thing to notice from the following code, though, is the competing syntax for the repeating linear gradient style. Mozilla have separated it into a distinct style (
-moz-repeating-linear-gradient) while Webkit have built it as an option to their general gradient style (-webkit-gradient).body { background-image: -moz-repeating-linear-gradient( -45deg, transparent, transparent 25%, rgba(0,0,0,0.15) 25%, rgba(0,0,0,0.15) 50%, transparent 50%, transparent 75%, rgba(0,0,0,0.15) 75%, rgba(0,0,0,0.15) ); background-image: -webkit-gradient( linear, 0% 0%, 100% 100%, from(transparent), color-stop(0.25, transparent), color-stop(0.25, rgba(0,0,0,0.15)), color-stop(0.50, rgba(0,0,0,0.15)), color-stop(0.50, transparent), color-stop(0.75, transparent), color-stop(0.75, rgba(0,0,0,0.15)), to(rgba(0,0,0,0.15)) ); }To get a better idea of what this does, view source on this demo page. This includes a button to change the class on the body (using JS) which simply changes the background colour – the stripes are semi-transparent on top of that. Remember, due to the vendor prefixes, this only works in -moz or -webkit browsers.
It's supposed to look like this:
-
Tokyo Recommendations
Food
If you're going out for food the best place I can recommend is Shin Hi no Moto (a.k.a. Andy's Izakaya). It's run by a friendly English guy (Andy) and his family. It gets really busy later on so you're best to phone and book on +81 3 3214 8021. It's okay, you can book in English. They do amazing sashimi platters and big mugs of beer. Just make sure you don't order rice (there's no rice in an izakaya and they might scowl at you if you do). You can get there by taking the Yamanote line to Yurakucho.
For general daily eats, I'm addicted to Yoshinoya. Especially their Gyuu-don. Tasty, healthy and cheap. You can find Yoshinoya everywhere.
Walks
West Central Tokyo
If you're going to be there over a Sunday, you have to go to Harajuku. Even if you aren't there on a Sunday, the walk up Takeshita-dori is great fun. Here's a map of a little walk you can take up Takeshita-dori, round Harajuku and down to Shibuya:
North-East Central Tokyo
If you fancy some culture, try this route. It takes in the Imperial Palace, Sumo museum and Edo-Toyko museum. You can finish off in Akihabara for sheer geek awesome or save that for another day.
Tokyo bay/Odaiba
Some people called me crazy for enjoying it but I like the walk across the rainbow bridge to Odaiba. Take the Yamanote to Tamachi and wander east-ish. You'll see the bridge once you're closer to the shore. You can take the lift up to the start of the walk and then wander out for some amazing views. It is, unfortunately, very noisy due to all the traffic but it's worth it. Head right across the bridge and follow it down, it'll probably take about an hour. Once you're on dry land again on Odaiba, you can wander around the shopping malls there (Aquacity, Seaside mall), take in the Statue of Liberty, go for a bite to eat and eventually head back. If you time it for getting dark, you can either get some amazing views of the bridge lit up at night or just enjoy the Yurikamome ride back (it's a completely automated train with no driver).
Views
For the best view across Tokyo, the Tokyo Metropolitan Government building (a.k.a. TMG or Tocho) really can't be beaten (especially as it's free to go up). It's in Shinjuku.
-
Uncooked Composition
Music, much like mathematics, is a young person's game. If you haven't made it by the time you're 25, your chances of making an impact on the world are significantly diminished. That's not to say it's impossible, it's just much less likely.
Basically, I'm beginning to come to the realisation I'm not going to be a rock star. I might not even make it into space. To that end, I've decided that, instead of scribbling away at writing and rewriting the same songs I've been trying to improve for the last 10 years, I'd go the other way. A few months ago, I put a dictaphone next to the piano and started recording the occasional random improvisation. Originally, the idea had been to pick the best bits and rework them for some reason or another but after listening back to them, I found there's some appeal in just hearing the raw first-take complete with do-overs and occasional accidental 'quotes' from other pieces.
Over the next little while, I'll be uploading some of them just so that I know I've done something with them other than leave them on a tape in the back of a drawer. When listening to them, bear in mind two things:
- The piano needs retuned almost every week so some of it might be a bit rough.
- This is, as the title says, 'Uncooked Composition'. I come in from work, take my shoes off, sit down at the piano, press record. There's no post-processing anywhere so there will be mistakes and do-overs.
-
Fake girl protects fake fish from fake cat
-
The Elementals
In one of my day jobs I do something involving education, large public institutions and web stuff and a while back I thought it might be an excellent idea to have a go at designing some cool educational toys. Learnin' 'n' Fun! At the same time! omg! And so forth!
The idea was to build the kind of thing you could use to squeeze knowledge into people's heads without them complaining. Y'see, it's never a good thing to trick people into learning. If your educational toy/game/experience relies too much on hiding the information behind the fun then the big reveal at the end – "Ha, I tricked you into learning something!" – will leave the player feeling cheated and not change their attitude towards learning. If, on the other hand, you try and push the ideas you want to get across at the expense of the core game mechanic, you'll end up with a bored user. My opinion is that you've got to be up front about the learning. You've got to say to the user "Look, this is learning and it's fun. No tricks here, it's exactly what it looks like". As for getting it to appeal in the first place, I find that very few things can beat extremely cute cartoons.
To that end, I present my first dabble in interactive educational whaddyamacallits: The Elementals, a fun periodic table where every element has its own unique personality.
It's available as an iPhone app initially but I'll be venturing into the Android Marketplace soon and putting it online as a web app.

-
Appington concept
Appington. Your applications brought to you.
 Appington is, fundamentally, a single-application VNC client with a simple interface for task switching. Where most VNC applications present the user with the entire screen, Appington only shows a single window at any one time. This simplified interface makes interaction easier and saves on client application memory and reduces data transfer allowing the viewer to be more responsive. In some applications, this data transfer saving may be used to facilitate audio capture and transmission.
Applications list
This screen shows a list of all available applications grouped by first letter. In the lower-left, the user can toggle between listing all applications or only listing currently running applications. The right-hand panel shows more information about the selected application. In this example, Google Chrome is selected and running. The current memory and CPU usage are shown along with a note of how many active windows the application has. Because Chrome is currently running, the option to quit is shown. If we had selected an unlaunched application, this button would show the option to launch. In case of emergencies, there is always the option to Force Quit a running application.
Application window (portrait)
This shows a standard single application window. The button in the top left would return the user to the previous screen. From the right, the remaining buttons allow the user to capture a screen shot, maximize the application window to match the current iPad viewport (if possible), refresh the current screen (in case of render errors) and access the application's menu. In OS X, menu access would be accomplished by way of the accessibility API. At the moment, I'm not sure how it would work on other OSs.
Application window (landscape)
This shows a single window of an application with multiple windows. You'll notice the extra button at the top between Menu and Refresh. This menu will allow you to select which window you want to access between however many the application currently has open.
Other images
The partner application to this is a modified VNC server running on the host machine. It is responsible for window management, task-switching, menu parsing and audio capture (Ã la SoundFlower). If there is already a VNC server running, the partner app will leave the standard VNC functionality alone and act purely as a helper, providing the extra functionality but not using extra memory by duplicating functionality. This is a variation of noVNC using the python proxy to manage the socket connection allowing the client to be built in PhoneGap using HTML 5.
Like I said at the top, this hasn't been built yet. It'd be cool if someone did build it, though.
-
Bad tweet, go to your room
I don't tend to say much on the subject of Twitter. I also don't tend to say that much on Twitter itself. That said, I do spend a lot of time on the Internet so here are some things you should stop doing now. Like, right now. Call it ‘Social media bad practice’ if you will, or ‘Tips and Tricks for a Tidier Tweet’ if that's the kind of thing you're into. Whatever, stop doing these:
Autotweeting from 3rd party apps
When you use one of the many apps that track your weight, book-reading habits, location, tweetability or shoe-size, disable the 'post to Twitter?' option, please. When I see these posts, all I read is either:
“According to amIanEejit.com, I'm an Eejit. Are you? Try it now.”
or
“I need public validation. Did I do good? Did I?”
Tweeting a shortened URL which performs an action on the logged-in user's account
Of course, fault for this should also be spread equally between the tweeter, the website which allows GET operations to modify data and the user who isn't wary enough of shortened URLs to expand them first. The person who creates the shortened URL without being aware of the consequences is to blame and an eejit. If you're not sure what I'm talking about, here's an example:
- You have an account on website X which you are logged into
- I have an account on website X which I am logged into
- Website X allows you to delete your account by going to www.example.com/deletemyaccount.php
- You copy that URL and shorten it using bit.ly
- You tweet “Hey, this is what I think of Website X: http://bit.ly/madeupthing”
- I click the link
- My account on Website X gets deleted
- I stab you with pencils.
Using inappropriate hashtags to piggy-back on an unrelated discussion
Some people use #hashtags as tweet meta data providing an extra piece of context on the tweet – “Om nom nom #fridaymorningbaconroll” – while others use them to create fluid, transient chatrooms. Where in the past you'd have used IRC and created a relevant room, using Twitter and a hashtag, you can jump into a conversation and out again without even trying. If you attempt to barge your way in with irrelevant comments, advertising nonsense or general eejicy, you act no better than an out-and-out-spammer and I don't follow no spammers.
Flooding followers with real-time reporting
Use a separate account for this kind of thing. Macrumors do this whenever there's one of those big Steve Jobs parties – if you want to follow all the info, follow the @macrumorslive account. Similarly, Fridaymix do the same thing. Discussions happen with the @fridaymix account while the announcements of what is currently being played come from @fridaymixdj.
Related: Retweeting your other account.
If I wanted to follow the other account, I'd follow the other account.
Also related: Retweeting your own main account
I heard you. Don't be the guy at the party with one punchilne that you tell again and again. I already know that guy. I don't follow him on Twitter.
Posting quotes from conference presentations without context or grammar
This doubly applies if the quote sounds like a half-hearted Zen koan.
“Listen to the youth. They have younger voices.”
“Use torches to light the way. Technology is your torch.”
This triply applies if you use antimetabole
“Don't follow the herd, herd the followers.”
“Don't live beyond means, have meaning beyond living.”
Of course, the worst is probably tweeting about your own blog post in which you discuss tweeting as if it actually matters.
-
...and a salesman, too.
It seems to be a fundamental aspect of the world that, whatever you do for a living, you have to do that and be a salesman. When I say selling, I don't mean the purely business related contract-signing, accounting and banking aspect of sales, I mean really 'Selling yourself'. Marketing, if you will. The bit of the process that involves firm handshakes, giving presentations at conferences, reminding people at every opportunity that you are selling something they need. Even if they don't know they need it. Even if they don't need it.
You could be the greatest web developer known to the history of the interweb creating progressively-enhanced, backwards-compatible masterpieces of semantic mark-up which not only push the boundaries in the latest Webkit nightlies but still fly pixel-perfect in IE6 and you still wouldn't be able to run your own agency without selling your services.
Your iPhone app might be 'The Greatest App Ever Invented' combining the power of Google, the ease of use of Twitter and the graphics of Epic Citadel. It might prove the Riemann Hypothesis, remind you of birthdays, cure cancer all while showing pictures of cats falling asleep but unless somebody actually knows it exists, it's no more useful than those apps that play the noises of bodily functions while simultanesouly being less succesful. By putting it in the iTunes Store you are technically selling it but you're not 'selling it'.
The same situation applies in every industry – writing books, making sandwiches, playing piano, juggling. Unless you are lucky enough to be 'discovered' by someone with the ability to sell but without anything to actually sell, there is no difference between you and everybody else in your field. Despite what you may have learnt in school, you do not get to the top of the class by being the smartest. You get to the top by putting your hand up when the teacher asks a question.
A few months back I saw an article entitled 'Talent does not go unrewarded'. I've seen too many shy, socially awkward developers who won't progress past the minimum acceptable salary for their job title to believe this. More accurately, I'd say 'Talent does not go unrecognised'. They don't get rewarded for their technical wizardry, they get rewarded for convincing their bosses they're worth more than they're currently being paid. For selling themselves.
Evan Williams' recent step down from CEO of Twitter to focus on product develpment strikes me as the developer's ideal – all the success and reward (financial and kudos) without the daily requirement to constantly sell. Of course, Twitter wouldn't have gotten to where it is if he hadn't been able to take on that role along the way.
-
Writing a Plex Plugin Part III
Right.
We've done the required built-in functionality (preference management, for instance) and the bits that talk to Transmission itself. Basically, we're done. Anything else added here is just extra. That is, of course, the best reason to add stuff here. As I have previously ranted at length, there's no point doing anything if you aren't trying to do it as well as it possibly can be done. In this particular instance, that manifests itself in the ability to browse, search for and download torrents all within the Plex client interface.
EZTV
I love EZTV. It makes things easy. Previous versions of this plugin included an EZTV search but after rooting around in the source of the µTorrent plugin, I found some nifty code which turned me onto the clever XML parsing Plex can do.
This function grabs the H2s from the page http://ezrss.it/shows/. If you go there, you'll see that the page lists every TV show in EZTV. The original µTorrent function listed everything but there are a lot of shows there now so it was actually taking a long time just to get that list. As they've split the page up by section, we can just grab the bits we want. This is going to be a full page in Plex (not a popup) so we're using a MediaContainer.
def TVShowListFolders(sender):
  dir = MediaContainer()
Using the built-in XML module, we can simply pass in a URL and get back an object containing the hierarchical structure of the entire page. Seriously, how simple is this? As it's HTML, add in the option
isHTML=True.showsPage = XML.ElementFromURL( 'http://ezrss.it/shows/', isHTML=True, errors='ignore' )Now that we have the whole page structure, take the chunks of the page we want. All the sections we want (and one we don't) are divs with the class 'block' so use that in xpath to pull them out.
blocks = showsPage.xpath('//div[@class="block"]')The first block is the one we don't want (if you look at the page, it's the one that lists all the letters) so we remove it.
blocks.pop(0)For each of the remaining blocks, find the text in the first H2. That is the letter title of the section ('A', 'B', 'C', etc). Add that to Plex as a menu item then return the entire list.
  for block in blocks:
    letter = block.xpath("h2")[0].text
    dir.Append(
      Function(
        DirectoryItem(
          TVShowListSubfolders,
          letter,
          subtitle=None,
          summary=None,
          thumb=R(ICON),
          art=R(ART)
        ),
        letter=letter
      )
    )
  return dir
I hope I'm not the only one impressed with that (although I have a feeling I might be). Using just a couple of lines from the XML module and a sprinkle of xpath and we've got another menu, dynamically generated from a third-party website. If EZTV ever change their layout, it should be a simple matter of changing the xpath to match and we're done. Again.
We can now do the same again but this time, we only pull out a single section based on the letter passed in.
def TVShowListSubfolders(sender, letter):
  dir = MediaContainer()
  showsPage = XML.ElementFromURL(
                'http://ezrss.it/shows/',
                isHTML=True,
                errors='ignore'
              )
  blocks = showsPage.xpath(
            '//div[@class="block" and h2 = "%s"]' % letter
           )
Remembering to ignore any 'back to top' links, write out a list of the shows in this section. These will call the TVEpisodeList method next.
 for block in blocks:
  for href in block.xpath('.//a'):
   if href.text != "# Top":
    requestUrl = "http://ezrss.it" + href.get("href") + "&mode=rss"
    dir.Append(
     Function(
      DirectoryItem(
       TVEpisodeList,
       href.text,
       subtitle=None,
       summary=None,
       thumb=R(ICON),
       art=R(ART)
      ),
      name=href.text,
      url=requestUrl
     )
    )
 return dir
This lists all available torrents for the chosen show. By this point, you should be familiar with how this works. We're using the XML module to grab the page at the URL (this time it's an RSS feed so we don't need to parse it as HTML); we use XPath to iterate through the items in the feed; we generate a menu item from the data which will call a function when selected; we append that to a MediaContainer then return the whole thing to Plex. Done. The AddTorrent function was defined higher up.
def TVEpisodeList(sender, name, url):
 dir = MediaContainer()
 feed = XML.ElementFromURL(url, isHTML=False, errors='ignore').xpath("//item")
 for element in feed:
  title = element.xpath("title")[0].text
  link = element.xpath("link")[0].text
  dir.Append(
   Function(
    DirectoryItem(
     AddTorrent,
     title,
     subtitle=None,
     summary=None,
     thumb=R(ICON),
     art=R(ART)
    ),
    torrentUrl=link
   )
  )
 return dir
Adult considerations...
There is currently a section in the plugin which will allow you to search IsoHunt. This might get dropped in future versions of the plugin as results from IsoHunt are almost exclusively...ahem...adult, regardless of search terms. Sure, that might be exactly what you were looking for but if you were actually looking for Desperate Housewives, you might be surprised when your file comes down and it's actual 'desperate housewives'...
Search EZTV
The final part is a straightforward search of EZTV. The interesting thing to note is that this uses a different type of menu item. Where normally, you'd use a DirectoryItem in a Function, this uses an InputDirectoryItem in a Function. This type of menu item will pop open an on-screen keyboard before calling the target function giving you the opportunity to grab some user input.
It's appended to the menu in the usual way:
dir.Append( Function( InputDirectoryItem( SearchEZTV, L('MenuSearchTV'), "Search the TV shows directory", summary="This will use EZTV to search.", thumb=R(SEARCH), art=R(ART) ) ) )When the user has entered their input and submitted, the named Function
SearchEZTVis called with the standard argumentsenderand the extra argumentquerycontaining the user's input.This function was a lot longer in the previous version of the Framework. It was so much simpler this time round.
def SearchEZTV(sender, query=None):
  dir = MediaContainer()
  url = "http://ezrss.it/search/index.php?simple&mode=rss&show_name="
  if query != None:
   url += "%s" % query
  feed = XML.ElementFromURL(
          url,
          isHTML=False,
          errors='ignore'
         ).xpath("//item")
  if feed == None:
    return MessageContainer("Error", "Search failed")
  if len(feed) == 0:
    return MessageContainer("Error", "No results")
  for element in feed:
    title = element.xpath("title")[0].text
    category = element.xpath("category")[0].text
    link = element.find("enclosure").get("url")
    size = prettysize(int(element.find("enclosure").get("length")))
    dir.Append(
      Function(
       DirectoryItem(
        AddTorrent,
        title,
        subtitle=None,
        summary="Category: %s\nSize: %s" % (category,size),
        thumb=R(ICON),
        art=R(ART)
       ),
      torrentUrl=link
     )
    )
  return dir
Done
That's it. The only other little thing to mention is how handy it is to use the built-in Log function. The first argument is a standard Python string, the second is 'Should this only turn up in the console when in debug mode?' to which the answer will almost always be 'True'. There is a third argument but unless you're messing with character encodings, you don't need to worry about it.
Log("Message to log is: %s %d" % (errorString, errorCode), True)Go, make...
If you made it to the end here, you're probably either keen to start making your own Plex plugins or my wife who I am going to get to proofread this. Assuming you're the former, here are some handy links:
Online plugin development manual
There are plenty of bits missing but it's still the best reference available for the framework.
Plex forums
Particularly the Media Server Plugins forum
Plex Plugins Lighthouse
This is where bugs are filed, suggestions made and final plugin submission happens. It's handy for picking little tips if someone else has had the same problem as you.
-
Writing a Plex Plugin Part II
The previous part dealt with the basic required functions and preparing the main menu. This bit goes through the torrent control and the next will cover the built-in site-scraping functionality. To be honest, I'm not sure how much of this middle section will be of use to anyone but other torrent client plugin makers. The cool stuff really happens in the next one. Think of this as the difficult second album that you have to listen to before the return-to-form third.
Listing the torrents
This is the main interface to Transmission. Using the
RTCmethod from before, this prepares a request to send via HTTP and reacts depending on the result (or error) we get back. First of all, we say we want information ('torrent-get') and we specify what info we want (the 'fields')def TorrentList(sender): error, result = RTC("torrent-get", { "fields": [ "hashString","name","status", "eta","errorString", "totalSize","leftUntilDone","sizeWhenDone", "peersGettingFromUs", "peersSendingToUs", "peersConnected", "rateDownload", "rateUpload", "downloadedEver", "uploadedEver" ] } )If we get an error back, we check what it was.
  if error != None:
    if error != "Connection refused":
      return MessageContainer(
          "Transmission unavailable",
          "There was an unknown error."
      )
    else:
      return MessageContainer(
          "Transmission unavailable",
          "Please make sure Transmission is installed and running."
      )
Now we have our information, we create a MediaContainer to display it. We'll be building these entries up as if they were standard library MediaItems although the final action will not be to play them.
  elif result["torrents"] != None:
    dir = MediaContainer()
For each set of torrent information we get back, we need to prepare the info and make it pretty.
    for torrent in result["torrents"]:
      progress    = 100;
      summary = ""

      if torrent["errorString"]:
        summary += "Error: %s\n" % (torrent["errorString"])
If we have some time until we're done and we're not seeding, display the progress as "12.3 MB of 45.6 GB (0%)". We add this to the MediaItem's summary field. This is where we use the
prettysizeandprettydurationfunctions we imported at the top. They take a computer-friendly value (1048576 bytes) and return a human-friendly one (1MB).if torrent["leftUntilDone"] > 0 and torrent["status"] != TRANSMISSION_SEEDING: progress = ((torrent["sizeWhenDone"] - torrent["leftUntilDone"]) / (torrent["sizeWhenDone"] / 100)) summary += "%s of %s (%d%%)\n" % ( prettysize(torrent["sizeWhenDone"] - torrent["leftUntilDone"]), prettysize(torrent["sizeWhenDone"]), progress )Similarly, if there's an estimated time until the file is finished downloading, add that to the summary as "3 days remaining"
    if torrent["eta"] > 0 and torrent["status"] != TRANSMISSION_PAUSED:
      summary += prettyduration(torrent["eta"]) + " remaining\n"
    else:
      summary += "Remaining time unknown\n"
Display download status ("Downloading from 3 of 6 peers") and download and upload rates ("Downloading at 3KB/s, Uploading at 1KB/s").
  if torrent["status"] == TRANSMISSION_DOWNLOADING:
    summary += "Downloading from %d of %d peers\n" % (
      torrent["peersSendingToUs"],
      torrent["peersConnected"])
    summary += "Downloading at %s/s\nUploading at %s/s\n" % (
      prettysize(torrent["rateDownload"]),
      prettysize(torrent["rateUpload"]))
For all other downloading statuses, we don't need extended information so we just return a human-friendly version of the status we get back (we do this via another method below).
  else:
    summary += TorrentStatus(torrent)
If we're seeding (the torrent has finished downloading and we're just uploading now), write out information about the uploading.
  else:
    if torrent["status"] == TRANSMISSION_SEEDING:
      summary += "Complete\n"
      progress=100
      if torrent["downloadedEver"] == 0:
        torrent["downloadedEver"] = 1
"45.6GB, uploaded 22.8GB (Ratio 0.50)" and some detail about the people we're uploading to.
  summary += "%s, uploaded %s (Ratio %.2f)\n" % (
    prettysize(torrent["totalSize"]),
    prettysize(torrent["uploadedEver"]),
    float(torrent["uploadedEver"]) / float(torrent["downloadedEver"]))
  if torrent["status"] == TRANSMISSION_SEEDING:
    summary += "Seeding to %d of %d peers\n" % (
      torrent["peersGettingFromUs"],
      torrent["peersConnected"])
    summary += "Uploading at %s/s\n" % (
      prettysize(torrent["rateUpload"]))
Icon generation
The next addition was a bit of a tricky point for this version of the plugin. Previous versions generated the thumbnail icon dynamically using the Python Imaging Library (PIL). It would create a progress bar showing the exact percentage and write the name of the file on the icon. In order to be able to achieve this, PIL had to be imported which generated a whole bunch of deprecation warnings. There are rumours that a future version of the plugin framework will include some functionality to generate images on-the-fly (possibly a variation of PIL itself) but until then, I decided the best way forward would be to generate the images by hand and include them in the plugin. This meant that I could either generate 101 images (0% - 100%) or display the percentage rounded off. In order to save space, I went with rounding to the nearest 10%.
nearest = int(round(progress/10)*10)The last thing to do in this loop (remember, we're still looping through the torrent information we received all the way back up at the top of the page) is to actually add this item. It is added as a PopupDirectoryItem so that selecting it will display a context menu of action choices specified in the TorrentInfo method below. With that, we also add the summary we've spent so long crafting, the percentage icon as the thumb and a couple of extra bits of information to help later functions know what to do.
  dir.Append(
    Function(
      PopupDirectoryItem(
        TorrentInfo,
        torrent["name"],
        summary=summary,
        thumb=R("%s.png" % nearest)
      ),
      name = torrent["name"],
      status = torrent["status"],
      hash = torrent["hashString"]
    )
  )
To finish this menu, we add the same functions that are available to individual torrents but acting on all – 'Pause all' and 'Resume all' – then return the menu to Plex for display.
  dir.Append(
    Function(
      DirectoryItem(
        PauseTorrent,
        L('MenuPauseAll'),
        subtitle=None,
        summary=None,
        thumb=R(PAUSE),
        art=R(ART)
      ),
      hash='all'
    )
  )
  dir.Append(
    Function(
      DirectoryItem(
        ResumeTorrent,
        L('MenuResumeAll'),
        subtitle=None,
        summary=None,
        thumb=R(RESUME),
        art=R(ART)
      ),
      hash='all'
    )
  )
  return dir
Here's the TorrentStatus lookup. Again, this uses the built-in localisation function 'L' to display the text and, again, I still haven't actually translated any of it so there's still only english. I must get round to that eventually.
def TorrentStatus(torrent):
  if torrent == None or torrent["status"] == None:
    return L('TorrentStatusUnknown')
  elif torrent["status"] == TRANSMISSION_WAITING:
    return L('TorrentStatusWaiting')
  elif torrent["status"] == TRANSMISSION_CHECKING:
    return L('TorrentStatusVerifying')
  elif torrent["status"] == TRANSMISSION_PAUSED:
    return L('TorrentStatusPaused')
  elif torrent["status"] == TRANSMISSION_DOWNLOADING:
    return L('TorrentStatusDownloading')
  elif torrent["status"] == TRANSMISSION_SEEDING:
    return L('TorrentStatusSeeding')
  else:
    return L('TorrentStatusUnknown')
Torrent action menu
This is the popup menu displayed when you select one of the listed torrents. The only thing to notice from these is that the option to pause is only shown for active torrents and the option to resume is only shown for paused torrents. The hash mentioned here is the id of the torrent which will be needed later.
def TorrentInfo(sender, name, status, hash):
  dir = MediaContainer()
  dir.Append(
    Function(
      DirectoryItem(
        ViewFiles,
        L('MenuViewFiles'),
        subtitle=None,
        summary=None,
        thumb=R(ICON),
        art=R(ART)
      ),
      hash=hash
    )
  )
  if status == TRANSMISSION_PAUSED:
    dir.Append(
      Function(
        DirectoryItem(
          ResumeTorrent,
          L('MenuResume'),
          subtitle=None,
          summary=None,
          thumb=R(ICON),
          art=R(ART)
        ),
        hash=hash
      )
    )
  else:
    dir.Append(
      Function(
        DirectoryItem(
          PauseTorrent,
          L('MenuPause'),
          subtitle=None,
          summary=None,
          thumb=R(ICON),
          art=R(ART)
        ),
        hash=hash
      )
    )
    dir.Append(
      Function(
        DirectoryItem(
          RemoveTorrent,
          L('MenuRemove'),
          subtitle=None,
          summary=None,
          thumb=R(ICON),
          art=R(ART)
        ),
        hash=hash
      )
    )
    dir.Append(
      Function(
        DirectoryItem(
          DeleteTorrent,
          L('MenuDelete'),
          subtitle=None,
          summary=None,
          thumb=R(ICON),
          art=R(ART)
        ),
        hash=hash
      )
    )
  return dir
Torrent action functions
Each of the torrent action functions called (
ViewFiles,ResumeTorrent, etc.) could have been references to a more generic function with an action option passed in but I decided to keep them distinct and separate so that any extra customisation that might be done later would be easier to do rather than hacking it in. This isn't so much a problem with this plugin but if this were to be adapted for another torrent client, there might be specific hoops that needed jumped through.I won't go through each of them in detail as they are all very similar. Instead, I'll just describe one of them –
RemoveTorrent.Each Function menu item (pretty much every menu item in this plugin) takes at least one argument:
sender. This tells Plex where it's supposed to return control after it's finished here. The second argument is the id of the torrent we want to act on.def RemoveTorrent(sender, hash):We define the action to perform and the arguments to pass to Transmission.
  action = "torrent-remove"
  arguments = { "ids" : hash }
Call Transmission's RPC via the RTC method defined earlier catching the results and any errors returned.
error, result = RTC(action, arguments)If there's an error, any error, display it. Otherwise, display a success method. Both of these are displayed as a popup MessageContainer.
  if error != None:
    return MessageContainer("Error", error)
  else:
    return MessageContainer("Transmission", L('ActionTorrentRemoved'))
Okay, so the middle section of the plugin might not be that interesting. Next time I'll cover the clever built-in XML parsing bits and everything'll be cool again. I promise.
-
Writing a Plex Plugin Part I
I've just released version 1.0 of the Transmission plugin for the Plex Media Server. As with all good software projects, there were actually many releases before 1.0 but I thought this was the right time to write up a walk-through of what the code looks like and does. I didn't write the initial version of the plugin but I've maintained it since v0.7 and now pretty much rewritten everything a couple of times. I'll post my walkthrough in a few installments because it's quite long.
This plugin is built to be compatible with Plex Plugin Framework v1 which initially looked like quite a major change from the previous version of the framework but isn't really that different. For Plex plugins, every time an action is performed, the system generates a URL and passes it down through its own menu structure until it gets to a plugin that handles that URL. The plugin then deals with the info in the URL however it likes. In the previous versions of this plugin, the URL was parsed manually and split into strings separated by '/'
For example the URL:
/video/transmission/id/status/action/would first cause Plex to look in its 'video' menu item and find the plugin that said it could handle 'transmission' URLs. The plugin would take the rest of the string and separate it out. First contact the Transmission application, ask for all information about the torrent called 'id', check its 'status' and then perform the 'action' if possible.
The new plugin does pretty much the same except I no longer manually parse the URL. The plugin still registers with Plex to say it can handle URLs starting '/video/transmission' but then it passes functions through instead of URL-catching menu items. If you're familiar with JavaScript, it's like passing an anonymous function to handle something instead of catching the event manually.
Anyway, here's the python code with a running commentary:
Imports
First we import the Plex Media Server framework:
from PMS import *
from PMS.Objects import *
from PMS.Shortcuts import *
These are a couple of handy functions from the very first version of the plugin which make the outputs much more readable.
from texttime  import prettyduration
from textbytes  import prettysize
This next line actually causes Plex to issue a warning. These libraries won't all be available in the next version of the framework. Instead of urllib and urllib2, developers are to use the built-in HTTP module. Unfortunately, HTTP doesn't allow access to the headers of responses and the Transmission authentication system relies on exchanging a session ID via headers.
import urllib,urllib2,base64Declarations
Set up some constants to save typing later on
PLUGIN_PREFIX = "/video/transmission"
PLUGIN_TITLE = "Transmission"
This is the first call to the Localisation module. Plex plugins allow for complete string localisation via a JSON file (I've only included English in this version because my torrent-related German and Japanese are poor). This will look in the JSON file for the key 'Title' and return whatever value is associated with it (or 'Title' if there is none).
NAME = L('Title')More shorthand
ART        = 'art-default.jpg'
ICON      = 'icon-default.png'
SETTINGS  = 'settings-hi.png'
PAUSE      = 'pause-hi.png'
RESUME    = 'resume-hi.png'
SEARCH    = 'search-hi.png'
TV        = 'tv-hi.png'

TRANSMISSION_WAITING      = 1
TRANSMISSION_CHECKING      = 2
TRANSMISSION_DOWNLOADING  = 4
TRANSMISSION_SEEDING      = 8
TRANSMISSION_PAUSED        = 16
Definitions
Required
Here is where we start the plugin code. This is one of the standard functions which gets called when the plugin is initialised.
def Start():Tell Plex we can handle '/video/transmission' URLs and that our main function is called 'MainMenu'
  Plugin.AddPrefixHandler(
    PLUGIN_PREFIX,
    MainMenu,
    PLUGIN_TITLE,
    ICON,
    ART)

  MediaContainer.art = R(ART)
  MediaContainer.title1 = NAME
  DirectoryItem.thumb = R(ICON)
Another standard function, this handles the preferences. To connect to Transmission, you need the URL and port it is running on (127.0.0.1:9091 if it's on the same machine as the Plex Media Server) and the username and password if you have set them.
def CreatePrefs():
    Prefs.Add(id='hostname', type='text', default='127.0.0.1:9091', label='Hostname')
    Prefs.Add(id='username', type='text', default='', label='Username')
    Prefs.Add(id='password', type='text', default='', label='Password', option='hidden')
This is called immediately after the preferences dialog is submitted. This is the most basic checking you can do but it could include a call to Transmission to verify the info provided.
def ValidatePrefs():
    u = Prefs.Get('username')
    p = Prefs.Get('password')
    h = Prefs.Get('hostname')
    if( h ):
        return MessageContainer(
            "Success",
            "Info provided is ok"
        )
    else:
        return MessageContainer(
            "Error",
            "You need to provide url, username, and password"
        )
You'll notice the return here is a MessageContainer. That's Plex's version of an alert. It doesn't generate a new page, just pops up a little window.
Custom
That was the end of the predefined functions, the plugin proper starts here. As Transmission requires a username, password and a short-lived session ID (since Transmission v1.53) to perform actions, we define a function which will attempt to make a connection with just username & password. Transmission will then send back a 409 Conflict response to basically say "Urk, that's not quite right. If you want to talk to me, you'll need this:" and give us our session ID in a header.
def GetSession():
  h = Prefs.Get('hostname')
  u = Prefs.Get('username')
  p = Prefs.Get('password')
  url = "http://%s/transmission/rpc/" % h
  request = { "method" : "session-get" }
  headers = {}
  if( u and p and h):
    headers["Authorization"] = "Basic %s" %
      (base64.encodestring("%s:%s" % (u, p))[:-1])
    try:
      body = urllib2.urlopen(
        urllib2.Request(
          url,
          JSON.StringFromObject(request),
          headers
        )
      ).read()
    except urllib2.HTTPError, e:
      if e.code == 401 or e.code == 403:
        return L('ErrorInvalidUsername'), {}
      return e.hdrs['X-Transmission-Session-Id']
    except:
      return L('ErrorNotRunning'), {}
Once the HTTP module allows access to returned headers, we will be able to use something like this to set global authorisation once and forget about it:
response = HTTP.Request(
    url,
    { "method" : "session-get" },
    headers={},
    cacheTime=None
    )
HTTP.SetPassword(h,u,p)
HTTP.SetHeader(
  'X-Transmission-Session-Id',
  response.headers['X-Transmission-Session-Id']
  )
Remote Transmission Calls
This uses the RPC API of Transmission to do everything we need. We pass into the function 'What we want to do' and 'Who we want it done to' basically.
def RTC(method, arguments = {}, headers = {}):
  h = Prefs.Get('hostname')
  u = Prefs.Get('username')
  p = Prefs.Get('password')
  url = "http://%s/transmission/rpc/" % h

  session_id = GetSession()

  request = {
    "method":    method,
    "arguments":  arguments
  }
Setup authentication here because, even though we've already gotten the session ID, it's useless if we don't actually use it.
  if( u and p ):
    headers["Authorization"] = "Basic %s" %
      (base64.encodestring("%s:%s" % (u, p))[:-1])

  headers["X-Transmission-Session-Id"] = session_id
Now that we've built our instruction, throw it at Transmission and see what comes back.
  try:
    body = urllib2.urlopen(
      urllib2.Request(
        url,
        JSON.StringFromObject(request),
        headers)
      ).read()
  except urllib2.HTTPError, e:
    if e.code == 401 or e.code == 403:
      return L('ErrorInvalidUsername'), {}
    return "Error reading response from Transmission", {}
  except urllib2.URLError, e:
    return e.reason[1], {}

  result = JSON.ObjectFromString(body)
We don't do error handling here as we want this function to be as generic as possible so we send anything we receive straight back to the calling function.
  if result["result"] == "success":
    result["result"] = None

  if result["arguments"] == None:
    result["arguments"] = {}

  return result["result"], result["arguments"]
Menus
Right, we've got our helper methods set up, we're ready to make our first menu. This is the main one we mentioned earlier.
def MainMenu():You can set your menu screen to be laid out as “List”, “InfoList”, “MediaPreview”, “Showcase”, “CoverFlow”, “PanelStream” or “WallStream”. I'm keeping it simple here. Also, there's an extra call to
GetSessionjust to check everything's fine and wake the app up.dir = MediaContainer(viewGroup="List") GetSession()Pretty much all the menu items throughout the rest of this plugin are added using the same code which boils down to:
  dir.Append(
    Function(
      DirectoryItem(
        FunctionName,
        "Pretty Menu Item Name",
        subtitle="Short subtitle",
        summary="Longer menu item summary and description",
        thumb=R(ICON),
        art=R(ART)
      )
    )
  )
Starting in the middle, this reads as:
- Create a
DirectoryItem. - When this item is selected, use the function
FunctionNameto handle it. - Display the text
"Pretty Menu Item Name"for this item - Display the text
"Short subtitle"underneath this item (or None) - Display the text
"Longer menu item summary and description"for this item if required (or None) - Use the resource called ICON (mentioned above) as the icon for this item
- Use the resource ART as the background
- This is a
Functionmenu item - Finally,
Appendthis to the current menu
The first two main menu items are built exactly like that:
  dir.Append(
    Function(
      DirectoryItem(
        TorrentList,
        "Torrents",
        subtitle=None,
        summary="View torrent progress and control your downloads.",
        thumb=R(ICON),
        art=R(ART)
      )
    )
  )
  dir.Append(
    Function(
      DirectoryItem(
        SearchTorrents,
          "Search for a torrent",
          subtitle=None,
          summary="Browse the TV shows directory or search for files to download.",
          thumb=R(SEARCH),
          art=R(ART)
        )
      )
    )
This is a special 'Preferences' item that will call the Prefs functions defined at the top.
dir.Append( PrefsItem( title="Preferences", subtitle="Set Transmission access details", summary="Make sure Transmission is running and 'Remote access' is enabled then enter the access details here.", thumb=R(SETTINGS) ) )Send the directory (or Menu) back to Plex
return dirThe rest of the code deals with torrent control and some clever built-in site scraping functionality which I'll cover later.
- Create a
-
licences.xml
JavaScript libraries and CSS frameworks are very popular these days. With each library, plugin, extension and template, comes another licencing statement. For most of these licences (MIT, for instance), you must include the licence statement in order to be able to use the code. In many cases, you also have to provide the original source and your own modifications. While, for uncompiled technologies such as these, this is a trivial matter, both this requirement and that of including the licence are awkward to implement if you like to minify your code. The licence is usually kept in an uncompressed comment at the top of the library (the YUI compressor specifically takes this into account with comments marked /*! */ ) and, although anyone can read your modifications to whatever you've used, post-minification code is much harder to follow (cf. three of my last four blog posts) and is really not 'in the spirit' of sharing your code.
I'd like to be able to bundle all the licences and sources together outside the production files. Somewhere the interested user would be able to look them up if they liked but not somewhere that would automatically be downloaded on a standard visit. To that end, I have looked around for an established standard for this and not found anything. If you know of one, please let me know. Until I do find a good standard, here's my suggestion – a simple XML file located at /licences.xml in the format outlined below. It contains details of the file the licence pertains to, the uncompressed source (optional), the title of the licence and a URL where the full licence text can be found (on opensource.org or creativecommons.org, for instance). It also includes a (probably superfluous) shortname for the licence. I might remove that bit. You can optionally include this meta in your HTML if you want an explicit link between your source and the licence file:
<meta name="licences" value="/licences.xml" />I'm currently undecided as to whether to go with XML or JSON. They're fairly interchangeable (barring XML attributes) but JSON takes less space. Then again, there's not as much need to save space in this file. Anyone have any recommendations? The entire format is, of course, up for discussion. Have I forgotten anything? Have I included anything unnecessary? I'm going to start using this in my projects until someone points out some major legal problem with it, I think.
XML
<licences>
 <licence>
  <source>
   <url>
    /includes/script/jquery/1.4/jquery.min.js
   </url>
   <uncompressed>
    /includes/script/jquery/1.4/jquery.js
   </uncompressed>
  </source>
  <deed>
   <title>
   MIT License
   </title>
   <url>
    http://www.opensource.org/licenses/mit-license.php
   </url>
   <shortform>
   MIT
   </shortform>
  </deed>
 </licence>
 <licence>
  <source>
   <url>
    /includes/script/custom/0.1/custom.js
   </url>
   <uncompressed>
    /includes/script/custom/0.1/custom.min.js
   </uncompressed>
  </source>
  <deed>
   <title>
   Attribution Share Alike
   </title>
   <url>
    http://creativecommons.org/licenses/by-sa/3.0
   </url>
   <shortform>
   cc by-sa
   </shortform>
  </deed>
 </licence>
</licences>
JSON
{ licences:{ { source:{ url:'/includes/script/jquery/1.4/jquery.min.js', uncompressed:'/includes/script/jquery/1.4/jquery.js' }, deed:{ title:'MIT License', url:'http://www.opensource.org/licenses/mit-license.php', shortform:'MIT' } }, { source:{ url:'/includes/script/custom/0.1/custom.min.js', uncompressed:'/includes/script/custom/0.1/custom.js' }, deed:{ title:'Attribution Share Alike', url:'http://creativecommons.org/licenses/by-sa/3.0', shortform:'cc by-sa' } } } } -
Maze 1k
Okay, this is the last one for a while. Really.
Unlike my previous 1k JavaScript demos, I really had to struggle to get this one into the 1024 byte limit. I'd already done all the magnification and optimization techniques I knew of so I had to bring in some things which were new to me from qfox.nl and Ben Alman and a few other places. This, combined with some major code refactoring, brought it down from 1.5k to just under 1. In the process, all possible readability was lost so here's a quick run through what it does and why.
First up, a bunch of declarations.
These are the colours used to draw the maze. Note, I used the shortest possible way to write each colour (
redinstead of#F00,99instead of100). The value stored in the maze array (mentioned later) refers not only to the type of block it is but also to the index of the colour in this array, saving some space.u = ["#eff", "red", "#122", "rgba(99,255,99,.1)", "#ff0"],This is used for the number of blocks wide and high the maze is, the number of pixels per block, the size of the canvas and the redraw interval. Thanks to Ben Alman for pointing out in his article how to best use a constant.
c = 21,Here is the reference to the canvas. Mid-minification, I did have a bunch of function shortcuts here -
r=Math.random, for instance - but I ended up refactoring them out of the code.m = document.body.children[0];For most of the time when working on this, the maze was wider than it was high because I thought that made a more interesting maze. When it came down to it, though, it was really a matter of bytesaving to drop the distinct values for width and height. After that, we grab the canvas context so we can actually draw stuff.
m.width = m.height = c * c;
h = m.getContext("2d");
The drawing function
The generation and solution algorithm is quite nice and all but without this to draw it on the screen, it's really just a mathematical curio. This takes a colour, x and y and draws a square.
l = function (i, e, f) {
  h.fillStyle = i;
  h.fillRect(e * c, f * c, c, c)
};
Designing a perfect maze
"You've got 1 minute to design a maze it takes 2 minutes to solve."
- Cobb, Inception.Apologies for the unnecessary Inception quote. It's really not relevant.
Algorithmically, this is a fairly standard perfect maze generator. It starts at one point and randomly picks a direction to walk in then it stops picks another random direction and repeats. If it can't move, it goes back to the last choice it made and picks a different direction, if there are no more directions, all blocks have been covered and we're done. In a perfect maze, there is a path (and only one path) between any two randomly chosen points so we can make the maze then denote the top left as the start and the bottom right as the end. This particular algorithm takes 2 steps in every direction instead of 1 so that we effectively carve out rooms and leave walls. You can take single steps but it's actually more of a hassle.
For more on how this kind of maze-generation works, check out this article on Tile-based maze generation.
Blank canvas
This is a standard loop to create a blank maze full of walls with no corridors. The
2represents the 'wall' block type and the colour#122. The only really odd thing about this is the codef-->0which is not to be read 'as f tends to zero' but is instead 'decrement f by 1, is it greater than zero?'g = function () { v = []; //our stack of moves taken so we can retrace our steps. for (i = [], e = c; e-- > 0;) { i[e] = []; for (f = c; f-- > 0;) i[e][f] = 2 }By this point, we have a two-dimensional JavaScript array filled with 2s
Putting things in
  f = e = 1;    // our starting point, top left.
  i[e][f] = 0; // us, the zippy yellow thing
Carving out the walls
This is our first proper abuse of the standard for-loop convention. You don't need to use the three-part structure for 'initialize variable; until variable reaches a different value; change value of variable'. It's 'do something before we start; keep going until this is false; do this after every repetition' so here we push our first move onto the stack then repeat the loop while there's still a move left on the stack.
for (v.push([e, f]); v.length;) {P here is the list of potential moves from our current position. For every block, we have a look to see what neighbours are available then concatenate that cardinal direction onto the strong of potential moves. This was originally done with bitwise flags (the proper way) but it ended up longer. It's also a bit of a nasty hack to set p to be 0 instead of "" but, again, it's all about the bytes.
p = 0;Can we walk this way?
These are all basically the same and mean 'if we aren't at the edge of the board and we're looking at a wall, we can tunnel into it.'.
 if (e < 18 && i[e + 2][f] == 2) p += "S"
 if (e >= 2 && i[e - 2][f] == 2) p += "N";
 if (f >= 2 && i[e][f - 2] == 2) p += "W";
 if (i[e][f + 2] == 2) p += "E";

 if (p) { //    If we've found at least one move
  switch (p[~~ (Math.random() * p.length)]) { // randomly pick one
If there was anything to note from that last chunk, it would be that the operator
~~can be used to floor the current value. It will return the integer below thye current value.Take two steps
This is a nice little hack. Because we're moving two spaces, we need to set the block we're on and the next one to be 0 (empty). This takes advantage of the right-associative unary operator 'decrement before' and the right associativity of assignment operators. It subtracts 1 from e (to place us on the square immediately above) then sets that to equal 0 then subtracts 1 from the new e (to put us on the next square up again) and sets that to equal the same as the previous operation, i.e. 0.
  case "N":
      i[--e][f] = i[--e][f] = 0;
      break;
Do the same for s, w and e
    case "S":
      i[++e][f] = i[++e][f] = 0;
      break;
    case "W":
      i[e][--f] = i[e][--f] = 0;
      break;
    case "E":
      i[e][++f] = i[e][++f] = 0
    }
Whichever move we chose, stick that onto the stack.
v.push([e, f])If there were no possible moves, backtrack
  } else {
    b = v.pop(); //take the top move off the stack
    e = b[0]; // move there
    f = b[1]
  }
 }
End at the end
At the very end, set the bottom right block to be the goal then return the completed maze.
  i[19][19] = 1;
  return i
};
Solver
This is the solving function. Initially, it used the same algorithm as the generation function, namely 'collect the possible moves, randomly choose one' but this took too much space. So instead it looks for spaces north, then south, then west, then east. It follows the first one it finds.
s = function () {Set the block type of the previous block as 'visited' (rgba(99,255,99,.1) the alpha value makes the yellow fade to green).
n[o][y] = 3;A bit of ternary background
This next bit looks worse than it is. It's the ternary operator nested several times. The ternary operator is a shorthand way of writing:
if ( statement A is true ) {
  Do Action 1
} else {
  Do Action 2
}
In shorthand, this is written as:
Statement A ? Action 1 : Action 2;In this, however, I've replace Action 2 with another ternary operator:
Statement A ? Action 1 : ( Statement B ? Action 2 : Action 3 );And again, and again. Each time, it checks a direction, if it's empty, mark it as visited and push the move onto our stack.
(n[o + 1][y] < 2) ?
  (n[++o][y] = 0, v.push([o, y])) :
    (n[o - 1][y] < 2) ?
      (n[--o][y] = 0, v.push([o, y])) :
        (n[o][y - 1] < 2) ?
          (n[o][--y] = 0, v.push([o, y])) :
            (n[o][y + 1] < 2) ?
              (n[o][++y] = 0, v.push([o, y])) :
If none of the neighbours are available, backtrack
(b = v.pop(), o = b[0], y = b[1]);Show where we are
Finally, set our new current block to be yellow
n[o][y] = 4;Are we there yet?
If we are at the bottom right square, we've completed the maze
if (o == 19 && y == 19) { n = g(); //Generate a new maze o = y = 1; //Move us back to the top right s() //Solve againIf we haven't completed the maze, call the solve function again to take the next step but delay it for 21 milliseconds so that it looks pretty and doesn't zip around the maze too fast.
} else setTimeout(s, c);Paint it black. And green. And yellow.
This is the code to render the maze. It starts at the top and works through the whole maze array calling the painting function with each block type (a.k.a. colour) and position.
for (d in n) for (a in n[d]) l(u[n[d][a]], a, d) };Start
This is the initial call to solve the maze. The function s doesn't take any arguments but by passing these in, they get called before s and save a byte that would have been used if they had been on a line themselves.
s(n = g(), o = y = 1)Done
This little demo isn't as visually appealing as the Art Maker 1k or as interactive as the Spinny Circles 1k but it is quite nice mathematically. There are now some astounding pieces of work in the JS1K demo competition, though. I do recommend spending a good hour playing about with them all. Don't, however, open a bunch of them in the background at the same time. Small code isn't necessarily memory-efficient and you could quite easily grind your computer to a standstill.
-
Art Maker 1K
Even though the rules for js1k only let me make one submission, I couldn't stop myself making another. This one is inspired by those pseudo-romantic pictures that you get all over tumblr that get reblogged endlessly (actually, it was inspired by the blog That Isn't Art by someone with the same opinion as myself).
It randomly creates a sentence, adds some softly-moving almost bokeh coloured-circles and look, I made an art! Wait for the sentence to change or click (or touch) to change it yourself.
And of course, don't forget the original spinny-circles 1k
-
The quest for Extreme JavaScript Minification
As described in detail previously, I've recently taken part in the JS1K competition where you have to squeeze something cool and clever into 1024 bytes of JavaScript. The quest to condense has become quite addictive and I found myself obsessing over every byte. This is the kind of stuff that the Closure Compiler does quite well automatically but there are some cases where you just need to get in there and manually tweak.
Here are some of the tricks I've picked up in my struggle for extreme minification:
Basic improvements
Use short variable names.
This one's fairly obvious. A more useful addition to this is:
Shorten long variable names.
If you're going to be accessing an element more than once, especially if it's a built-in element like 'document', you'll save a few bytes every time you reference it if you create a shortened reference to it.
document.body.style.overflow="hidden" document.body.style.background="red" (74 characters)can shorten to
d=document;b=d.body;s=b.style; s.overflow="hidden"; s.background="red" (69 characters)and any references to
safter are going to save 19 characters every time.Remove whitespace
This one's so obvious, I don't need to mention it.
Set Interval
The extremely handy
setIntervalfunction can take either a function or a string. If you give it an anonymous function declaration:setInterval(function(){x++;y--},10);You will use up more characters than if you give it just the inside of the function as a string:
setInterval('x++;y--',10);But the outcome will be the same.
Little-used aspects
Not many people use JavScript's scientific notation unless they're doing scientific stuff but it can be a great byte saver. The number
100is equivalent to1 * 10^2which is represented in JavaScript as 1E2. That's not a great saving for 100 but 1000 is 1E3, 10000 is 1E4. Every time you go up a factor of 10, you save 1 byte.Fight your good style tendencies
In the war against space, you have to bite the bullet and accept that you may need to sacrifice some of your hard-earned practices. But only this once. Don't get in to the habit, okay?
No zeroes
0.5 = .5Yeah, it looks ugly but it works and saves a byte.
Naked clauses
if { : : } else yThe
ylooks so naked out there. No braces to keep it warm. But if you only have one statement in your else clause, you don't need them...No semi-final. . . final-semi. . . Semi-colon. No final colon.
You don't need a semi-colon on your last line, even if it does make it look as though you've stunted its growth.
The final few bytes
Operator precedence
You don't need brackets. Brackets are handy for you as the programmer to remember what's going on when and to reduce ambiguity but if you plan correctly, most of the time you won't need brackets to get your arithmetic to work out.
b.getMilliseconds()/(a*250) is the same as b.getMilliseconds()/a/250Shorthand notation
l=l+1;l=l%14; l++;l%=14; l=++l%14;The three lines above are equivalent and in order of bytes saved.
Shorthand CSS
If you need to set some CSS values in your script, remember to pick the most appropriate short form. Instead of
s.background='black', uses.background='#000'but instead ofs.background='#F00', uses.background='red'. In the same vein, the statementsmargin="0px"andmargin=0mean the same but the latter saves bytes.Don't be generic
One final thing to mention is that these little challenges are not the norm. If you find yourself trying to squeeze code down like this you're probably working on a very specific project. Use that to your advantage and see if there are any savings to be made by discarding your usual policies on code reuse. In the JS1K challenge, we're provided with a specific HTML page and an empty script tag. One good saving made here (and mentioned in my previous post) was the way I grabbed the reference to the canvas element. The standard method is to use the id assigned to the canvas.
d.getElementById('c')Which is a good generic solution. No matter what else was on the page, no matter what order stuff was in, this would return the canvas. However, we have a very specific case here and the canvas is always going to be in the same place - the first child of the body element. That means we can do this instead:
b.children[0]This makes use of the reference we grabbed to the body earlier. If the page were rearranged, this would stop working but as it won't, we've saved 8 bytes.
In conclusion
Yes, this is all quite silly but it's also fun and tricky. Attempting these kinds of challenges keep us developers mindful of what it is we actually do and that makes it an extremely productive silly hobby.
-
Elementally, my dear JavaScript
The Angry Robot Zombie Factory launched its second iPhone/iPad app . I haven't mentioned it much yet because I spotted a minor typo in the final version after it had been approved so I submitted an update immediately. To get an early copy (like those misprinted stamps where the plane is upside down), go check out The Elementals. It's free, too. It's a simple, cartoonish periodic table.
Yesterday, the 1k JavaScript demo contest (#js1k) caught my eye. The idea is to create something cool using 1024bytes of JavaScript or less. I rootled around in the middle of The Elementals, grabbed the drawing function and 20 minutes later had made my entry.
The code I submitted is quite minified but isn't obfuscated. When it's unfolded, you can follow the flow fairly easily.
var d = document, b = d.body, s = b.style, w = innerWidth, h = innerHeight, v = b.children[0], p = 2 * Math.PI, Z = 3, x = tx = w / 2, y = ty = h / 2;The above is a bunch of declarations. Using things like
d = documentandb = d.bodyallows reuse later on without having to resort to the fulldocument.body.styleand saves a bunch of characters. When you've got such a small amount of space to play with, every character counts (mind you, the ZX81 only had 1k of RAM and look what you could do with that). Now that I'm looking at it, I think I could have tidied this a bit more. Darn. The sneaky bit about this code is the way we grab the reference to the canvas. The coded.getElementById('c')uses 21 characters but if we look at the provided HTML, we can use the fact that the canvas is the first child of the body element. The codeb.children[0]uses 13 characters instead.s.margin = "0px"; s.background = "black"; s.overflow = "hidden"; v.width = w; v.height = h; t = v.getContext("2d");This sets the provided canvas to be the full width and height of the window then grabs the drawing context of it so we can make pretty pictures.
zi = function () { Z++; Z %= 14 }; m = function (X) { return (X * 200) % 255 };Functions to be reused later.
ziincreases the number of spinning circles and is used by onmousedown and ontouchstart (oh yes, it works on the iPad, too).mis a mapping of the index of the circle to a colour. The 200 is arbitrary. I played about a bit until I found some colour combinations I liked.d.ontouchstart = function (e) { zi(); tx = e.touches[0].pageX; ty = e.touches[0].pageY }; d.onmousemove = function (e) { tx = e.clientX; ty = e.clientY }; d.onmousedown = zi;Setting the event handlers.
function r() { t.globalCompositeOperation = 'lighter';I played about with the various composite operations. Lighter seemed the nicest.
t.clearRect(0, 0, w, h); t.save(); x = x + (tx - x) / 20; y = y + (ty - y) / 20; t.translate(x, y);Originally, the circles followed the mouse pointer exactly but it lacked any life. By adding in this bit where the movement is delayed as if pulling against friction, it suddenly became a lot more fun and dynamic.
var c = new Date(); for (var i = 1; i <= Z; i++) { t.fillStyle = 'rgba(' + m(i) * (i % 3) + ', ' + m(i) * ((i + 1) % 3) + ',' + m(i) * ((i + 2) % 3) + ', 0.5)'; t.beginPath(); t.rotate((c.getSeconds() + i) / (i / 4) + (c.getMilliseconds()) / ((i / 4) * 1000)); t.translate(i, 0); t.arc(-10 - (Z / 5), -10 - +(Z / 5), 100 - (Z * 3), 0, p, false); t.fill() }Erm. Yeah. In essence, all this does is figure out where to draw the circles, how big and what colour. It looks worse than it is. Line-by-line, it translates to:
- Find out the current time
- For each circle we want to draw,
- Pick a colour based on the index of the circle
- Start drawing
- Turn by some amount based on the time and the index
- Move by a small amount based on the index
- Actually draw, making the circles smaller if there are more of them.
- Fill in the circle with the colour.
- Right curly bracket.
t.save(); t.fillStyle = "white"; for (var i = 1; i <= Z; i++) { t.beginPath(); t.rotate(2); t.translate(0, 28.5); t.arc(-120, -120, 5, 0, p, false); t.fill() } t.restore(); t.restore() }This does pretty much the same as the one above but always the same size and always the same colour. The
t.saveandt.restoreoperations throughout mean we can add the transformations onto each other and move stuff relative to other stuff without messing up everything. Goshdarn, that was technical.setInterval(r, 10);Kick it all off.
That make sense? Good. Now go make your own js1k entry and submit it. Then download The Elementals. Or Harmonious.
-
PhoneGap - The Drupal of App development
I'm a fan of Drupal even though I don't use it that often. I like that I can see exactly what's going on. I can easily follow the execution from URL request to page serve.
What I usually end up doing on any Drupal project is:
- build the majority of the site in a few hours
- find one small piece of functionality missing that's absolutely essential
- dig into the core to make it happen
- find a simpler way of doing it and step out of the core a bit
- find an even simpler way and step back a bit more
- figure out how to do it in a single module file and put the core back the way it was.
That probably seems utterly inefficient but it has served me well since Drupal 4 and it means I've got a really good picture in my head of the internal workflow.
This is in stark comparison to other systems, particularly some .NET CMSs where a request comes in, something happens and the page is served. There are even some PHP frameworks and CMSs where everything is so abstracted, the only way you can get an accurate picture of what is happening is to already have an accurate picture of what is happening.
I've used several different ones and I keep coming back to Drupal (also, recently, Perch, but that's besides the point here).
“What on earth does this have to do with PhoneGap?” I hear you ask. Quite rightly, too.
When I was planning Harmonious, I looked at various frameworks for turning a combination of HTML, CSS & JavaScript into an app - PhoneGap, Appcelerator Titanium, Rhomobile. Rhomobile (or the Rhodes Framework) is built on Ruby so I didn't investigate too far. That's not to say it's not a good framework, I couldn't say either way. The idea behind using one of these frameworks is to save you the time of having to learn Objective-C and seeing as I've only done very minimal amounts of Ruby, I'd be replacing 'learn Objective-C' with 'learn Ruby'. That said, I've always thought Ruby developers opinion of themselves was slightly too high.
The first framework I properly spent some time with was Appcelerator. It seemed quite shiny and I liked having single interface access to compilation for iPhone and Android but I wasn't so keen on having to sign up for an account with them for no obvious reason. Some further investigation suggested that this was so you could send your project to their servers for proprietary cross-platform compilation of your desktop app. This is less useful, however, if you're developing just for iPhone and Android as for both, you need the SDK installed locally and the compilation is done on your own machine.
The main thing that I wasn't comfortable with in Appcelerator was that there seemed to be a lot happening behind the scenes. This is not necessarily a bad thing, of course, but it started that little buzz in the back of my head that I get when working on .NET. When I press 'compile', I want to know exactly what it's doing. I want to know exactly how it takes my JavaScript and embeds it, when does it include its own API files and what do I change to make it do stuff it doesn't do by default?
After that, I moved to PhoneGap (version 0.8.3) and found myself immediately falling into my Drupal workflow. The app fell into place in less than an hour (with a liberal sprinkling of jQTouch and the Glyphish icons). I then needed to take a screenshot and couldn't see an obvious way to do it but, due to the nature of PhoneGap being completely open-source, it was easy to spot where to jump into the code. I hacked in a screenshot function in another hour, spent another half hour making it better and another making it simpler. Just to complete the cycle, I have now wrapped up all my code into a plugin and removed my hacking from the core. Hmmm... that all seemed eerily familiar.
That's not to say PhoneGap is perfect. All the benefits of a completely open-source project referred to previously also come with all the drawbacks. The current version (0.9.0) is fiendishly difficult to download and get started with. It has been split into one parent project and several child projects (one per mobile platform) and it's no longer obvious what you do. It's easy enough if you're already set up but actually getting there is tricky. The most common failing of any open-source project is also true: poor documentation. There's a wiki but it's mostly out-of-date. There's a section on phonegap.com called 'docs' but they're also out-of-date. There's an API reference but it's autogenerated from comments and is also out-of-date. The only place to get accurate information is the Google group but that's not documentation, that's solutions to problems.
There have also been some claims that PhoneGap is unstable and crashes but personally, I haven't seen that. It's possible that the crashes and performance issues are the result of memory leaks in the JavaScript. Appcelerator automatically runs JSLint on your code before compilation so it will highlight any problems. If you can fit that into your standard workflow, you might be able to avoid some of the instability.
Additional comments
Comment from Jeff Haynie (@jhaynie)
A few comments about Appcelerator.
1. We're completely open source and you can see all our active development every single commit on github.com/appcelerator. We have plenty of outside core open source contributors.
2. Yeah, to do what we're doing, it's complicated - much more than Phonegap - so it does mean with complexity it's hard to grok. however, the source is all there. Also, it's full extensible through our SDKs and we this SDK as the way we build Titanium itself.
3. For Desktop, we _only_ upload to our build servers as a convenience to cross-platform packaging. Nothing mysterious and all the scripts we run are included (and open source) so you can run them on your own. Plenty of our customers do this behind the firewall. When you're developing locally (say on a OSX machine), it's all local during dev. Only cross-platform packaging is done as a convenience to developers. We have to pay for this bandwidth and storage and we do it to make it easier. And it's free.
Hope this clarifies some of the above. Phonegap's a great project and we love the team - but I think we're trying to do different things and come at it from different approaches. In the end, this is good for developers as it gives everyone more choice based on their needs.
-
List of Touch UI gestures
Just now, I'm trying to improve the UI for the Factory's first iPhone app. While doing this, I've come up with a list of available areas and gestures in a touch-driven app that you can use for actions. I thought I'd put them here so other people could point out where I've gone wrong and what I've forgotten:
- Menus
- Permanent on-screen menu
- Transient on-screen menu (requires trigger)
- Different screen menu (any number of them, requires trigger)
- Static (can be overloaded with function based on position)
- Single-tap
- Single-tap 1 touch
- Single-tap 2 touches
- Single-tap 3 touches
- Double-tap
- Double-tap 1 touch
- Double-tap 2 touches
- Double-tap 3 touches
- Touch and Hold
- Touch and Hold 1 touch
- Touch and Hold 2 touches
- Touch and Hold 3 touches
- Single-tap
- Dynamic (Gestures)
- Touch and Move 1 touch
- Up
- Down
- Left
- Right
- Touch and Move 2 touches
- Up
- Down
- Left
- Right
- Apart (Zoom)
- Together (Pinch)
- Rotate clockwise
- Rotate anticlockwise
- Touch and Move 3 touches
- Up (Swipe)
- Down (Swipe)
- Left (Swipe)
- Right (Swipe)
- Apart (Spread)
- Together (Gather)
- Rotate clockwise
- Rotate anticlockwise
- Touch and Move 1 touch
- Menus
-
Scene and Herd archive
Continuing the webcomic theme from yesterday, I finally uploaded the archive of strips from the webcomic I used to do in 2003.
It actually started off as a cartoon on flyers advertising Baby Tiger gigs before developing into music reviews for a while before ending up in the final version.
Start at the far end of the cartoon department, third floor.
-
Rules: The Comic
I found some old sketches at the weekend and decided that I shouldn't just leave them in a drawer doing nothing.
I, therefore, present to you:
It's kind of a web comic but it only has 19 issues, no plot and won't be continuing.
-
The Shadow Government and a Hyperbagel
I listen to a bunch of podcasts. I watch the Daily Show and the Colbert Report. I listen to a lot of They Might Be Giants. When you combine this with the audiobooks I listen to, the shows I go to and the paper books I read, you start to spot a pattern. A slightly sinister pattern...
This originally started as a connectivity diagram of American Literary Non-fictionists but after I'd finished I realised it's not entirely American, it's not entirely non-fictionists. It's not entirely comedy and not entirely literary. After showing it to a friend though, he immediately suggested 'The New Illuminati' or possibly the Literary Illuminati. Maybe just the Illiternati. Any way round you have it, John Hodgman appears to be as some kind of Literpope in the middle of a literspiracy.
From what I can figure, I need to write some world economics exposé with Planet Money, discuss the software I used to analyse the markets with This Week in Tech and appear onstage at The Moth to tell the audience how the experience changed my life then I can join the dots on the diagram and reveal the secret Iliternati symbol. I think it'll be somewhere between the CND logo and a hyperbagel.
-
-
Some kind of monster

I've been trying to make myself sketch a lot more recently. This was mostly prompted by my decision to start up The Angry Robot Zombie Factory as an actual company doing web development and illustration.
I've been keeping an almost daily sketch blog over on tumblr and promoting any good pieces over onto my actual illustration portfolio. At some point, I'll bring all these different sites and things together. Until then, here's a sketch of a few things from the last couple of weeks.
-
Synchronised Podcasts
This must exist somewhere. I just can't find it.
I listen to a lot of podcasts in a week and I use quite a few different computers. One desktop at home, one laptop while out and about and a PC and an iMac at work. I want some service (or combination of web service and application) that I can use to manage my podcast subscriptions regarless of where I am.
At the moment, I have iTunes installed on my desktop, my laptop and the iMac at work and I have subscribed to my collection of podcasts in each of them. I want to be able to plug in my iPod and have it delete the podcasts I've listened to and get the latest episodes of each of my subscriptions. At the moment, I plug it into the desktop, copy on the latest 'Planet Money' and listen. A couple of days later, there's another episode released so I plug into my laptop and it offers the episode I've just finished listening to and the new one. A few days later, I'm working on the office iMac and plug in my iPod, it suggests the last weeks-worth of episodes. I have to manually go into every subscription and drag over the individual files that I want to listen to.
What I'd like to have is a web site where I can put in my podcast subscriptions and it will track the latest episodes of each. I can then either point iTunes to this site so that I can point all my installations at it or it will provide an application which can be used to put the latest episodes onto my iPod. When I plug in my iPod, the application tells the site which ones I've listened to and it removes them from my listening queue. The application could, also be stored on the iPod itself to enable it to be used wherever the iPod is plugged in, not just on computers with iTunes.
Am I explaining myself clearly enough? It just seems so simple, it should already exists within iTunes. It is entirely possible that Apple's recent acquisition of Lala could be the first step in an online iTunes which would solve these problems. If anyone has any suggestions for the best way to achieve this, please let me know. I thought of a way of doing it with Dropbox but it would only work if the music bit of my iTunes library weren't bigger than my Dropbox account.
-
Still Life Under Ice
I like the textures in this one but I might prefer it black & white. Hmmm.. undecided.
Originally uploaded by thingsinjars on flickr
-
Appreciate the artisans
I know that every professional thinks their bit of the process is more important than people give them credit for. Designer's don't just colour in wireframes handed to them by the Information Architect. IAs don't just draw boxes and arrows. Copy writers don't just copy-and-paste the company brochure over the lorem ipsum.
Now that I've said that, I must now point out: Developers don't get nearly enough credit.
This may be something to do with the odd confusion that is 'web designer vs. web developer'. In some - and possibly the majority of - agencies, the web designer not only designs what the page looks like in Photoshop/Fireworks/Whatever but also produces the HTML templates, CSS and whatever JavaScript they feel comfortable with (the tutorials at jQuery for Designers probably help, too). In these agencies, if there is such a person as a web developer, they are most likely responsible for moving the relevant bits of HTML into template files, adding in any back-end integration and possibly writing some of the trickier JavaScript. The confusion arises in the other kind of agencies. The kind where web designers make Photoshop files and web developers turn them into HTML. The designer doesn't necessarily need to know anything about HTML, semantics or scripting. Not to minimise the importance of this kind of designer - they'll know a lot about typography, and visual relations, probably quite a lot about user experience and the process involved in bridging the gap between what the client wants to say and how the user wants to hear - but it's this kind of web developer I think doesn't get enough credit.
If you're designing a site with a full knowledge of how it could be marked up, you will naturally - even if it's subconsciously - be marking it up in your head. This will influence your design and not necessarily in a bad way. You might ensure the semantics are just that little bit clearer or you might nudge these bits over that way so they can be grouped with those other ones there. If, however, you design with no thought at all about how this is going to be made, you will, most likely, do some things that you wouldn't otherwise. If your front-end developer can take this and turn it into a perfectly semantic, clean-coded masterpiece of HTML and CSS then apply JavaScript to progressively enhance the heck out of it and still keep it looking like you designed, they deserve to be lauded, applauded, praised and thanked. Publicly. The usual outcome of this situation is that the designer gets asked along to the awards ceremonies, puts it on their portfolio, an article in the Drum, happy. The developer gets a pat on the back from the team leader and asked if they could just tidy up how it looks in IE5.5 before they head home for the night, that'd be great, thanks.
Sure, maybe we just need some better awards ceremonies for geeks. The kind of thing that the agency sales team will be able to brag about to potential customers (as that, in essence, seems to be the point of awards ceremonies) but I also think there might need to be a bit of a change of opinion in the industry. Just as designers don't just colour in wireframes, developers don't just open the designs in Photoshop and press 'Save for web...'.
I hope this doesn't sound too ranty. These thoughts were prompted after seeing a few designer and copy writer portfolios which contained sites that either I'd built or one of my team had built. Writers credited, designers credited, developers (who built some awesome stuff on them, by the way) lost in the mists of time.
-
Heidi
This probably won't mean much to anyone unless you're familiar with the Japanese Heidi cartoon which was popular in Germany in the 80s.
When I first heard the theme, I thought the intro should have gone like this.
-
User style
A few years ago, I made a prediction about the way the web was going and so far it hasn't come true but it's definitely coming closer. To me it seems that the logical extension of us developers separating style and substance – what we've been doing for years with semantic mark-up – is for the general consumer to take that substance and give it their own style. I'm in no way suggesting that everyone become a designer. That would be a terrible, terrible thing. What I mean is that the consumer takes in/reads/experiences whatever it is you're giving to them in the manner that best suits them. There are many examples of what I mean around already but they're still not quite where I think they will end up.
RSS
We (web developers) already provide RSS feeds on our sites. By subscribing to a site's RSS feed, you get the content delivered directly to your RSS reader. As long as the site is providing the full article content (shame on you, if not) the consumer gets to see your content in a design format you have little control over. There is a basic level allowed for RSS formatting but nothing you can rely on. The control for the visual appearance of your content is now in the hands of the designer of the reader and the consumer (by way of choosing which reader they use).
userstyle.css
This was what initially prompted my thoughts on the subject. I've used Opera as my main browser for almost 10 years and I've always liked the Author mode/User mode switch. In essence, you can quickly toggle between seeing a web page as it was intended by the designer or disregarding the original layout and applying your own stylesheets to it. For the most part, this is used to be able to set high contrast for visually impaired users or to test various criteria (showing only images that have missing alt attributes, for example) but they can be used to produce any visual effect achievable with CSS.
User stylesheets can also be assigned on a per-site basis rather than globally which means that you could have your Google results rendered in courier, right-aligned in green on black while your facebook pages can be set in Times in a sepia colourscheme.
As with many things on the web, userstyles became a lot more popular once this functionality was available in Firefox (via the add-on Stylish) and not just Opera. Now there's a growing community of Userstyle developers and a directory of styles. Unfortunately, this is still not quite ready for mainstream use. It requires at least a basic level of technical ability to enable userstyles and to install them.
userscript.js
The userstyles community is, however, dwarfed in comparison to the userscript community. In pretty much exactly the same way that userstyles work, users can execute a specific Javascript file whenever they visit a site. Again, this can be enabled in Opera using site preferences and in Firefox using the Greasemonkey add-on. These scripts can completely change the way a site functions as well as how it looks. Combine them with userstyles (which userscripts can include automatically) and the only thing you can rely on remaining from your original design is the URL. There's a massive database of userscripts available.
Again, though, these are still just that little bit too hard. The standard user isn't going to install the extension, isn't going to browse for scripts and isn't going to run Opera so these are still a bit too far away.
Grab now, read later
There are now quite a few sites where you can save stuff to read later. If you find an interesting article or a funny blog post but don't have time to read it or if it appears on a site with a garish and unusable design, you can send it to Instapaper or Evernote . You can then read it in their interface, on your iPhone, on your Kindle... all separated from your design.
It's not only text that gets this treatment, you can use Ember and LittleSnapper to grab and store visuals for later perusal or use Huffduffer to collect any audio files you find and serve them back to you as your very own personalised podcast. Again, this is your content separated entirely from the way you wanted it seen. And that's a good thing.
For content creators, all this means is that your content can be consumed anywhere, even via sites, tools and delivery mechnisms you've never heard of. Designers, don't despair, users aren't suddenly going to take their content elsewhere and not need you any more – users still want and need things designed well, this just means that if your design works for the user for a particular type of content, they'll use it for any content of that type. I'd much rather watch youtube videos using vimeo's layout than youtube's. Actually, I'd much rather have vimeo's comments, too.
We're still quite a way off the average user being able to see whatever they want however they want it but these technologies and tools are definitely heading that way. I just wish I'd made a bet on it way back when.
-
Crowdsourced Weather - Part 2
So, I couldn't help myself. I had a niggling idea at the back of my head that I needed to get out. After coming up with this Twitter weather idea last week, I decided to spend a couple of hours this weekend building it. As if I didn't have other things I should have been doing instead...
It works pretty much exactly how the pseudocode I mentioned last time describes. Every few minutes, a script will search Twitter for mentions of any weather words from several different languages. It will then look up the location of the person who tweeted that and store it. Single reports might be wrong and users might not have stored their actual location but over a large enough sample, this system becomes more accurate. The script removes any matching twets older than 6 hours.
To display, I actually ended up using Geohashes instead of Geotudes because it is easier to simplify them when you zoom out just by cutting off the tail of the hash. For example, the physical area denoted by gcvwr3qvmh8vn (the geohash for Edinburgh) is contained within gcvwr3 which is itself contained within gcv. There are a few technical problems with geohashes but it seems the best fit for this purpose. If anyone knows of any better suggestion, please let me know. I do realise that this is quite possibly the slowest, most inefficient JavaScript I've ever written because it makes an AJAX call for every graticule and it probably should just send the South-East and North-West bounds and get back an array of them but, like I said, there were other things I should have been doing. Because the overlaid grid changes resolution based on zoom level, there are a few places where it is either tragically slow (resolution too fine) or terribly inaccurate (resolution too rough). That's just a case of tweaking the algorithm. Similarly, it's set to display reports of weather if there are 2 or more matches but it could be tweaked to only show if a larger number have reported something.
So go, play with the Twitter-generated weather map. If someone can come up with a good, catchy name, or some better graphics, that'd be great, thanks.
-
Crowdsourced Weather
This is a more general version of the #uksnow map idea. It's a crowd-sourced weather map which relies on the fact that any one individual tweet about the weather might be inaccurate but given a large enough sample, enough people will mention the weather in their area to make this a workable idea. It doesn't require people to tweet in a particular format.
To get info
Have an array of weather words in various languages (rain, hail, snow, schnee, ame, yuki) every 5 minutes: foreach weatherword search twitter for that word http://search.twitter.com/search.atom?q=rain retrieve latest 100 tweets foreach get user info http://twitter.com/users/show.xml?screen_name=username get user.location if available geocode save: username, time, lat, long, geotude, weatherword Remove any tweets about this weatherword older than 6 hours.
To display info
Show a Google map Based on current Zoom level, split the current map into about 100 geotudes foreach geotude search database for any weather results for that block (probably using an ilike "1234%" on the geotude field) sort by weatherword count descending draw an icon on top of that block to show the most common weatherword If the user zooms in, recalculate geotudes and repeat.
I quite like that this uses geotudes which I think are an excellent idea.
-
What's your Google Suggest number?
The next step in ego-googling: how many letters of your name do you need to type into the google search box before you are the top suggestion? The lower the better, obviously. Including spaces, My name is the top suggestion after 10 characters so I have a Google Suggest Number of 10. My darling wife (who has recently changed her name) has a Google Suggest number of ∞ as she can type in her whole name and Google doesn't suggest her.
Turns out somebody proposed this first over 5 years ago. Oh well. Nothing's new on the internet.
-
Side Tab
After reading Aza Raskin's post about Firefox moving its tabs down the side of the window, I decided to give it a go in Opera. It turns out to be very useful when you have a widescreen monitor. I usually end up with several dozen tabs open at once and it's much easier to be able to put them down the side in an area which is, for most websites at least, dead space. On the rare occasions I do find myself on a website which requires more than the 1470px horizontal space this gives me, I can just tap f4 and get my full 1650px back. As the window sidepanel also groups by window and lists all tabs open across all windows, I can keep them ordered thematically, too.
This arrangement definitely doesn't work, however, when you have a small screen. When I tried this on my netbook, I had to choose between losing half of my screen to the tab list or only being able to read the beginning of each page title, even if I only had one tab open.
-
Some simple tips
The views and opinions expressed within are not those of National Museums Scotland. This site is in no way affiliated with National Museums Scotland or the website www.nms.ac.uk
First of all, the disclaimer: I am not a designer. If I were to make claim to being anything creative it's an illustrator but there's a huge difference between the two (I've always said that an illustrator makes the thing to go on the t-shirt, the designer says where on the t-shirt it goes). Despite the recent trend for everyone to call themselves web designers, I'm still going to go by web developer. I make things.
Bearing that in mind, there are still quite a few web design and UX tips and techniques I've picked up along the way which can be applied to most sites and not interfere with the mysterious ways of designers.
Recently, I've been reworking templates for National Museums Scotland for faster load times and better SEO and I'll illustrate what I'm talking about with a couple of examples from there. The brief on these templates is that the content can't really change and there are some chunks that the CMS generates which can't be changed. Note: the NMS templates are completely finished yet and those that are haven't been rolled out across the whole site but sticking with that whole release early, release often way of doing things, these little incremental improvements can be applied without affecting too much else.
For reference, here are before and after screen grabs of two of the templates.
Some people will find these tips blatantly obvious but the fact that pages still get made without considering these means they do need reiterating.
Link the Logo
The web's been around for a few years now and there are a few conventions users have gotten used to. One of them is that the logo is a link that takes you back to the home page. It doesn't harm anything to have a link there so even if 99% of visitors don't use it, why annoy the 1% who do?
Don't link to the search
From the moment the visitor decides they want to search your site for something, the most important thing is to get the results in front of them as quickly as possible. It therefore makes for a better experience if you bring the results one step closer to them. Rather than requiring the user to click on a link to get to the search form to do their search to get the results, put the search box on every page. They fill it in and go to the results page. If the user wants to take advantage of any advanced search features you may have, they can modify their search from the results page.

Line up
I'm sure there's more to design than this but there are a couple of well tested rules I recommend any non-designer to learn:
- If it doesn't line up, make it line up.
- If it's already lined up, make it not.
That and a subscription to iStock and you're done...
Make the hit area as big as possible
From the gateway page for Our Museums, there are two ways the user could go. They were either looking for opening times (in which case, they're done), or they want to find out more information about the individual museums on their own pages. To that end, it makes sense to make the next step as easy as possible and bascially turn the content this page into six huge buttons. To keep everything semantic, JavaScript has been used here to extract the destinations from each of the links and apply them to the whole panel area (it'll default to linked text and image with JavaScript disabled). As you can see, doing this changes the hit area for each museum from a line of text to a veritable barn door.
White text on a white background is not good
Actually, I'm not sure whether it's the fact that the link wasn't as readable as it could have been or the fact that to go home requires poking her in the eye that upset me most. Either way, if you do need to use an image that has a light bit underneath some light text and you can't shuffle it along like here, a quick wipe with the burn tool in Photoshop works wonders.
Underline links
I'm not going to get into the debate over whether or not designers hate underlines but for a high-traffic, public sector with an extremely varied demographic, I'd recommend using them. As Paul Boag mentions, what you do with your design and your solutions for various usability issues depends on the audience. A graphic designer's portfolio might very well eschew underlines when denoting links, a government site probably shouldn't. Especially when you remember that you should never rely on colour alone to convey information, including whether not a piece of text is a link.
Titles are titles of something
If you have a title, it generally refers to the thing below it, not the thing above it. Make sure you keep titles and the things they are titles of together.
Avoid disparate navigation
Again, another of the rules of web that has evolved over the last several years: Sections go along the top, navigation down the side. To keep consistent with the rest of the site the horizontal museum links were brought down and integrated with the rest of the navigation. This maybe isn't the most illustrative example but, basically, don't have a top nav, left nav, right nav and several others when you could have just one.
Only a fraction
There we are, a few handy little tips for your next build project. This hasn't gone into any issues of column width, line-height - or leading (pronounced /ˈlɛdɪŋ/) as designers call it, hover states or any of the myriad other things it could, just a few of the more important and easy-to-do ones.
-
Building an Objective-C growlView
Wherein our intrepid hero learns some Objective-C and figures out the easy bits are actually quite hard.
A couple of days ago, I decided to give myself a little software development task to write a Twitter Growl view. Growl is a centralised notification system for Mac OS X that lots of other applications can use so that there's one consistent way of showing notifications.
Background
The idea behind this little experiment wasn't to have tweets appear as growl notifications, there are already plenty of apps that do this, the idea was to have growl notifications sent to Twitter. Some friends have started organising a crowdsourced Friday afternoon playlist via Spotify and I thought it'd be handy if Spotify tweeted each song as it started. The easiest way I could think of doing this was to tap into the fact that Spotify sends a Growl notification on track start and get the Growl display plugin to tweet it as well [1].
Build
I downloaded the Growl Display Plugin Sample 1.2 [Zip - 186 KB] from the developer downloads page and the MGTwitterEngine library. I then downloaded Xcode so I could do the development. I have to point out here that this was my first foray into Objective-C programming and, indeed, my first attempt at anything vaguely C-related since I wrote a command-line calculator about 12 years ago. If I do it wrong, please forgive me.
The first thing to do was open the sample project in Xcode, figure out what files do what, etc. There is very little documentation on how Growl views or display styles work so I pretty much just spend an hour reading all the source from top to bottom. Here's a quick summary:
- Sample_Prefix.pch
- Pre-compiled header. Stuff that's included before every pre-compiled file
- Growl/
- Folder containing standard Growl stuff. Don't need to touch.
- GrowlSampleDisplay.h
- Header file, didn't need to change anything
- GrowlSampleDisplay.m
- Class for setting up things. Again, didn't touch [2].
- GrowlSamplePrefs.h
- Defining default preference values and naming functions to handle them. More on this later.
- GrowlSamplePrefs.m
- The actual functions mentioned in the previous header file
- GrowlSampleWindowController.h
- Not doing anything visual, really so I didn't need to mess around with this
- GrowlSampleWindowController.m
- As above
- GrowlSampleWindowView.h
- Declaring objects needed for execution
- GrowlSampleWindowView.m
- Instantiating the objects then actually using them later on.
Again, I'm not used to doing this stuff so if I'm using the wrong terminology, just pretend I'm not.
I then dragged the MGTwitterEngine library into the project drawer, saved and built. At this point it successfully did nothing different which is what I was hoping it would do. Well, it popped up the 'This is a Preview of the Sample Display' message using the MusicVideo style which is what it does when you don't screw with it.
The next thing was to include the MGTwitterEngine. In GrowlSampleWindowController.h, #import "MGTwitterEngine.h" and create a new object. I just followed the instructions in the README but be sure to follow all of them. If you get errors about LibXML not being installed or YAJL not working, don't worry, you just need to make sure you set USE_LIBXML to 0 in all the places you're supposed to. GrowlSampleWindowController.h now contains this:
#import "GrowlDisplayWindowController.h" #import "MGTwitterEngine.h" @class GrowlBirdWindowView; @interface GrowlBirdWindowController : GrowlDisplayWindowController { CGFloat frameHeight; NSInteger priority; NSPoint frameOrigin; MGTwitterEngine *twitterEngine; } @endIn GrowlSampleWindowController.m, I then instantiated the new object:
@implementation GrowlBirdWindowController - (id) init { : : twitterEngine = [[MGTwitterEngine alloc] initWithDelegate:self]; [twitterEngine setUsername:@"growlbirdtest" password:@"testgrowlbird"]; } :And then modified the setNotification function to also send an update:
- (void) setNotification: (GrowlApplicationNotification *) theNotification { : [view setTitle:title]; [view setText:text]; NSLog(@"sendUpdate: connectionIdentifier = %@", [twitterEngine sendUpdate:[NSString stringWithFormat:@"%@, %@", title, text]]); // The new line : }That was enough to get growl to send messages to appear on http://twitter.com/growlbirdtest but it doesn't make it that useful for anybody else, to be honest. The next thing to figure out was the preferences.
Preferences
Without documentation, this took a bit longer that I expected. To start off changing the english version before worrying about localization, find the GrowlBirdPrefs.xib in resources/en.lproj/ and open it. Interface Builder will launch then you can double-click on 'Window' and see the layout of the preference pane. Search in the Library for 'text' and drag a text field into the window then spend about half and hour clicking round the interface. Open up the various inspectors (right-click on an object), look through the different tabs, click between the newly added text field and the sliders and drop-downs that are already there just to see what's different. Once I was a bit familiar, I opened the connections tab so that I could bind the value of the text field to the value 'twitterUsername' in my code. I checked 'value', Bind to 'File's Owner' and entered 'twitterUsername' in Model Key Path. I then repeated this for twitterPassword using a Secure Text Field from the Library. The option nextKeyView is used to say which item is tabbed to next when you're navigating with the keyboard so to keep things tidy, I dragged lines from nextKeyView from each of them to the right places in the layout.
Back in the code, I added new default preferences in GrowlSamplePrefs.h:
#define Sample_USERNAME_PREF @"Username" #define Sample_DEFAULT_USERNAME @"growlbirdtest" #define Sample_PASSWORD_PREF @"Password" #define Sample_DEFAULT_PASSWORD @"testgrowlbird" : : @interface GrowlBirdPrefs : NSPreferencePane { IBOutlet NSSlider *slider_opacity; IBOutlet NSString *twitterUsername; IBOutlet NSString *twitterPassword; }and named some handlers for them:
- (NSString *) twitterUsername; - (void) setTwitterUsername:(NSString *)value; - (NSString *) twitterPassword; - (void) setTwitterPassword:(NSString *)value;Be careful here, I got confused and didn't have the same spelling here for twitterUsername and twitterPassword as I had put in the interface builder as I hadn't realised the two were directly connected. They are. Obviously. The next thing to do is to write the code for these handlers:
- (NSString *) twitterUsername { NSString *value = nil; READ_GROWL_PREF_VALUE(Sample_USERNAME_PREF, SamplePrefDomain, NSString *, &value); return value; } - (void) setTwitterUsername:(NSString *)value { WRITE_GROWL_PREF_VALUE(Sample_USERNAME_PREF, value, SamplePrefDomain); UPDATE_GROWL_PREFS(); } - (NSString *) twitterPassword { NSString *value = nil; READ_GROWL_PREF_VALUE(Sample_PASSWORD_PREF, SamplePrefDomain, NSString *, &value); return value; } - (void) setTwitterPassword:(NSString *)value { WRITE_GROWL_PREF_VALUE(Sample_PASSWORD_PREF, value, SamplePrefDomain); UPDATE_GROWL_PREFS(); }Build and reinstall and this will now show the same preference pane as before but with two new text fields which allow you to enter your username and password. In fact, build at several stages along the way. Every time you make a change, in fact. If something breaks, check the error log to see if it's something predictable that should have broken at that point or if you've done something wrong. Also, keep the OS X log app Console open in the background. It will spew out error messages if you do something wrong. It's also good to have your code write out console messages to keep a track on what your code is doing like so:
- (NSString *) twitterPassword { NSString *value = nil; READ_GROWL_PREF_VALUE(Bird_PASSWORD_PREF, SamplePrefDomain, NSString *, &value); NSLog(@"twitterPassword = %@", value); return value; }You'll notice we're still sending messages to the growlbirdtest account because, even though we are reading and saving the username and password, we're not doing anything with them. That's easily remedied by editing GrowlSampleWindowView.m again and replacing the hard-coded login details with a couple of lines to read from the preferences or fall back on the default:
twitterEngine = [[MGTwitterEngine alloc] initWithDelegate:self]; NSString *twitter_username = Bird_DEFAULT_USERNAME; NSString *twitter_password = Bird_DEFAULT_PASSWORD; READ_GROWL_PREF_VALUE(Bird_USERNAME_PREF, SamplePrefDomain, NSString *, &twitter_username); READ_GROWL_PREF_VALUE(Bird_PASSWORD_PREF, SamplePrefDomain, NSString *, &twitter_password); [twitterEngine setUsername:twitter_username password:twitter_password]; NSLog(@"Twitter Login: username = %@", twitter_username);And, hooray! It works and posts to the account for which you entered details. Sort of. Some apps double-post. I haven't figured out why yet.
Renaming
After all that, the final bit (which I thought would be the easiest) was to rename the growlView from 'Sample' to 'Bird'. I have read that in the latest version of Xcode (which presumably comes with Snow Leopard), there's a global 'Rename' which will do all the relevant stuff for you. If you don't have that, you'll need to read 'On the Renaming of Xcode Projects' and do everything there. If you're still finding your growlView is called Sample, manually open every Info.plist you can find, 'Get Info' on everything, scour through the settings for the different build environments (Debug and Release)... It took longer to rename the project than to actually build it.
You should now have a completed, installable growlView/Growl View/Growl Display/growlStyle/whatever it's actually called. You can export the current Git project to have a look around or you can just download the finished GrowlBird.zip [Zip - 228KB] if you like. Note, the Git project isn't guaranteed buildable at any moment in time, I might break it. The localisations still need done and the layout of the prefPane isn't the greatest, either.
-
TV Mark
A site which track which episodes of TV shows you have watched. You create an account and enter the name of a TV show (AJAX completed, naturally). Before the show is associated with your account, you are shown a list of broadcast episodes and you must select the latest one you have watched. You can add as many shows as you like. When you visit the site, you see something like the visual here (although with the design not totally ripped from Automatic) so you can instantly tell what the next unseen episode is.
You can ask to be notified when a new episode is broadcast in a variety of ways (twitter, e-mail, rss). Shows can be broadcast anywhere in any country and so to get around the problem of detecting when a show is broadcast, the site actually follows a collection of well-known torrent providers. Note: this site doesn't provide any links to torrents or video files, it just relies on the fact that shows usually turn up on the torrent scene shortly after they have been broadcast. You can buy episodes or seasons from iTunes or Amazon links provided next to your tracking panel.
The visual isn't great as there will also be some big button on each show panel to increment the last show watched.
-
It's not difficult, don't make it difficult
What's easier? Boiling a single potato, letting it cool, mashing it using a toothpick then repeating with a different potato until you have a plateful of mashed potato...
or
Boiling all the potatoes you need at once then mashing them together with a potato masher?
Okay, choose between one of these methods of determining whether the bathroom light is on: Draw up a list of people who have visited your house recently. Interview them to build a data set of all rooms visited and by whom. Re-interview those who visited the bathroom. Determine a timeline of bathroom visits and light switch position on entry and on exit. Analyse the data to find the last visitor to the bathroom and the position of the light switch. Examine the electrical connections between the light switch and the light bulb to determine what the current status of the light itself might be.
or
Go look.
How are you doing on the quiz so far? Okay. So, final question: What's easier? Building a convoluted web site using proprietary code, conflicting CSS requiring you to target everything with !important, making all interaction rely on JavaScript for even the most basic functionality, fighting between form and function so much that you end up having a website that only works occasionally and even then only works for a subset of the available users.
or
Building a straightforward website using nothing but standard mark-up, styles which cascade in a predictable fashion and enhancing already-working functionality with a dash of JavaScript to make people go 'Ooh, shiny'?
If you thought the second option was easier, I'm sorry, you would appear to be wrong. At least, that's the impression I get every single day while wandering round the internet. It must be really easy to make a ham-fisted, in-bred, should be kept in the basement monstrous-crime-against-nature abomination of a website because otherwise, people wouldn't do it so much.
I've used Opera as my main browser for almost 10 years now and I've lost count of the number of times I've been faced with a message apologising to me because it appears my browser is out of date. If I could just update my browser to Internet Explorer 5, I could enjoy their site. Seriously, it must be a lot easier to make a web page locking me out of the site than not to. It must be a matter of a few seconds work to write browser-sniffing scripts and learn all the proprietary foibles of IE whereas not writing that script must take hours and not learning bad habits must take years.
I have some ability to forgive those websites which are obviously the work of someone whose passion is something else. If I'm looking at a site where a guy has meticulously documented the different ways different cats react to different balls of yarn, I'm guessing his interests is in yarn. Or cats. Or the combination thereof. He's not necessarily going to know the best way to make a website. I find it much harder, however, forgive big companies. Either those with an in-house web staff or those who contract agencies. Whatever way they do it, someone is getting paid to make the website. It is someone's job to write code.
I've always been of the opinion that if you're going to do any thing, you should at least try to do it as well as it can possibly be done. It doesn't matter if you're playing piano, rowing, juggling chickens or making a website, you have no excuse for not at least trying to be awesome at it. If you end up being awesome at it: great! You're the world's best chicken juggler, go into the world knowing that and be happy. If you don't: great! You gave it a darn good try and you probably ended up pretty good, at least. Maybe try juggling cats next time. I have a hard enough time getting my head around the idea that not everybody follows this same level of obsession in their interests but to have people who are actually getting paid actual money to do something (in this case, making a website, not chicken juggling) and who feel it's okay to be 'okay' is a concept I have great difficulty understanding.
Okay, impassioned rant over. I'm not going to name any sites. Just consider this a warning, Internet.
-
On holiday, by the way
In case any regular viewers are unaware, I'm currently on honeymoon. To tie in with this (and to celebrate the fact that my darling wife is almost as much of a geek as I am), there's a honeymoon blog to tide y'all over until I get back.
-
Ideas
To continue from the post of a month ago about how Noodle was awesome and ahead of its time, I now have to point out Sidewiki. Darn it, Google. Couldn't you just have bought me out? I'd have sold. Quite cheap, too...
Anyway. Onto the next idea. Or ideas.
Keen-eyed regulars (those whose don't subscribe via RSS, anyway) will have noticed the new category for 'ideas'. I may as well put all these dumb little ideas I have out there and see if anyone wants to have a go at playing with any of them. Actually, those who subscribe via RSS may have been inundated earlier with a bunch of ideas as I uploaded the backdated ones. Sorry 'bout that.
-
Okay, unnecesary redesign
Not two weeks after being pleased with myself that I could subtly rejig the design without only a few lines of CSS, I decided on Friday to completely redo this site.
Not only did I change the layout but I've made some major changes under the hood, too. I decided to have my first attempt at an HTML5 page. Granted, it might just fall apart at any moment in any given browser but...hey, it might not.
On the subject of HTML5, Mark Pilgrim (he of the 'Dive into...' series) brought up an interesting point in the WHATWG Blog last week on the topic of whether XHTML was actually a good idea in terms of enforcing XML syntax on an HTML document:
It provides no perceivable benefit to users. Draconianly handled content does not do more, does not download faster, and does not render faster than permissively handled content. Indeed, it is almost guaranteed to download slower, because it requires more bytes to express the same meaning -- in the form of end tags, self-closing tags, quoted attributes, and other markup which provides no end-user benefit but serves only to satisfy the artificial constraints of an intentionally restricted syntax.And, I guess, it is a good point that a well-formed XHTML document will be larger than the equivalently well-formed HTML document. If, however, developers are given a strict set of rules and a strict validator and told "make your page according to these rules, this alarm will go off if you've done it wrong", they're less likely to fall into bad habits than if they are told "These are mostly rules but sometimes suggestions, this alarm will only go off if you got things very very wrong". Mark Pilgrim is, quite rightly, focusing on the user's point of view but it just seems to me that users will also benefit from more maintainable, better structured code.
Of course, none of this actually matters yet and won't for the next five years or so. It probably won't matter then, either. It is only the interwebs, after all.
-
Truly
I've just updated trulyinnovative.com and www.trulyinnovative.co.uk.
I randomly thought it was about time for a bit of a refresh but writing it, I was amazed at just how much has changed in the 3 years between the first and the second. Despite the fact that they're both supposed to be tongue-in-cheek, they are quite accurate descriptions of two different aspects of the people who 'do web'. Must remember to update them again in 2012.
-
Not-too-subtle subtle redesign
Okay, it's one of those occasions where I get to feel a bit smug. I decided to update the layout here a little bit, just make the content a bit wider, fonts a bit bigger, that kind of thing. Not a major restyling, just a quick once-round with the vacuum-cleaner, if you like. Less than a minute messing around with CSS later and it's done. It doesn't look like much but I was quite pleased that everything scaled nicely. It's still a bit scrappy round the edges and I wouldn't use this as a CSS showcase but I'm pleased never the less.
-
A new niche?
"And several months later, our intrepid hero returns to the village to find it full of people he doesn't know..."
A quick update. It's now over a year since Noodle launched and about 4 months since Wwwitter launched and I seem to have started a whole new niche of web-conversation sites. Most of them, I won't mention here but there are two notable examples: Convotrack and Tweetboard. If only I'd figured out a way to make money out of it before others did...oh well.
As I've said many times before, I need some kind of marketing genius to take all these little projects of mine and find out where the money-making potential is. I'll quite happily sit in my room repeatedly coming up with the Next Big Thing if someone will then go off and sell it. On a related note, if anyone fancies marketing MonkeyTV, let me know...
-
The Digital Whateveritscalled
Recently, I've been trying to get to grips with this Brave New Digital Future that I've been hearing so much about. I figured that, seeing as I do this for a living, I should probably try and engage, interface, interact, give face time, connect and generally be a bit proactive about...oh, I don't know. Some buzzword or other.
That's why I joined Twitter and it has proven to be moderately useful in providing inspiration for the rebirth of Noodle. Wwwitter has had a few thousand unique visitors and several nice reviews (as an aside, I always find the best reviews have a sprinkling of exclamation marks and the worst have a smattering of question marks). The only real issue I have with Twitter is that in order to truly get Twitter, you need to follow the right number of people. Too few and it's like overhearing someone having a good conversation on the telephone – "Yeah, and that was only the first colour!" – too many and checking your feed is like sticking your head into a sugar-rushed playgroup – "I like ham!", "Ha-ha-ha!", "@everybody Look at me, look at me!"
This connected, emergent, digital whateveritis is also the reason I joined LinkedIn. I am, however, having a hard time trying to figure out what on earth it is. Is it "Your CV online"? I already have that. Is it "Facebook for business professionals"? Surely the business professionals who sign up to LinkedIn are already on Facebook so...why? I don't accept the argument that Facebook is for your fun side and LinkedIn is for your serious side. If it's online, it's out there in the public domain. If you are embarrassed by the possibility that someone from work might log into facebook and see "Jane Fakename joined the group 'LOL, I got drunk and dropped my mobile in the toilet'", the most obvious course of action is to not join that group, no?
I'm straying from my point, however. I had a look at LinkedIn. It keeps asking me for my goals, my objective, my "Specialties in Your Industries of Expertise". What is it asking? I always thought my goal was "Get old, fat and happy". The way I figure it, if I can do that, I've won whatever game the goal counts in.
Maybe it's just not aimed at people like me. Then again, I am a "Digital Media Professional" or at least, I play one on TV. I even have the word 'Manager' in my job title. I should be slap-bang in the middle of the target demographic, no?
Ugh. I need to become a pioneer in anti-social media.
-
Oh, hi again
And after a six-month hiatus, I'm back at the blog. Coincidentally, for the same six month period I stopped studying Japanese. Pretty much the day I got back from Tokyo, I put away my dictionary and didn't open it again until yesterday. Still, I'm back now and I'm starting private lessons again tonight so sit down and I'll make you a cuppa.
So, what's been keeping me away from the blogs and books for the last six months? Loads of stuff, to be honest. The new job for one: Digital Media Studio Manager for Whitespace. I wish I could say it's like herding monkeys just because I want to use the phrase "just like herding monkeys" but as it is, it's more like...managing a digital media studio. Or something like that. Outside work (but still within the geek realm), I've been working on Wwwitter, a cool little tool to show twitter discussions about a web page. Regular readers will of course recognise this as a direct copy of noodle but using someone else's content. It turns out that was all that was required to grab the attention of the internets.
The biggest thing to keep me busy, however, was getting engaged to my beautiful lady, Jenni and all the organising that entails. Well, all the organising Jenni's been doing and the confused nodding from me that entails. I'll try and post when I have more details but the big day is 12th September. Don't worry if you haven't received any kind of 'save the date' notification or anything, Jenni's sent hers out, I've just been a bit slow.
-
New Rose Hotel
So there we are, It's my last night in Tokyo and I've definitely got that Case feeling. Standing at my hotel window with a jar of sake, face lit up by the flashing neon outside. Behind me, the room has a cold glow under the light from my computer screen. Unfortunately, the laptop doesn't contain the Dixie Flatline but it's close enough.
I never did find a Chiba chop shop...
-
Video Encoding on the Sony Mylo COM 2
Those who know me will know that I have - using the parlance of the modern kids - mad skillz when it comes to video encoding and transcoding. I'll happily admit to wasting far too many hours learning the finer points of ffmpeg, mencoder and vlc, combining them with all manner of shell scripts, web interfaces, cron jobs and the like to set up my own mediacentre, video RSS feeds and shared video chatrooms (currently in maintenance mode).
So imagine my combination of frustration ("it should just work") and elation ("ooh, a challenge") when I discovered that my shiny new Mylo is extremely temperamental when it comes to video. I had assumed PSP-friendly video would have been fine but it turns out I was wrong. Any slight variation in frame-rate, bitrate, frame-size, aspect ratio, codec or container and I'd get a lovely "Sorry, the Mylo doesn't support this format" error (but in Japanese).
Anyway. In case you're interested, here's a shell script:
#!/bin/bash
ffmpeg -i "$1" -y -threads 2 -map 0.0:0.0 -f mp4 -vcodec xvid -b 768 -aspect 4:3 -s 320x240 -r ntsc -g 300 -me epzs -qmin 3 -qmax 9 -acodec aac -ab 64 -ar 24000 -ac 2 -map 0.1:0.1 -benchmark "$1.MP4"call this from the command-line with the path to the file you want converted and 10 minutes later, your Mylo-ready file will be sitting next to the original.
I'm really only posting this here because in about 6 months, I'll have forgotten all about this and, given my current luck with technology, all my computers and all their backups will have simultaneously formatted themselves.
-
Some kind of code...
I found this Ema (votive tablet) in the grounds of Meiji Jingu last month. A month of playing around with various cyphers has yeilded no results. It's not a straightforward substitution code so frequency analysis doesn't work, I've tried substitutions with an increasing or decreasing offset, backwards and forwards alphabets...
Obviously the person who wrote it wants to keep it a secret so we probably shouldn't probe further but...anybody got any ideas?
Originally uploaded by thingsinjars on flickr
-
Kotoba
After some shuffling around of code and some gradient paint-bucket in Photoshop, the translation widget is done. Remember, of course, that you need a Sony Mylo to use it. Unless you just want to download it, unzip it and have a look at the code, that is.
You can also download it from the official widget gallery. I'd be interested to find out how well/badly it functions on a non-Japanese Mylo. I have no idea about the language capabilities of other versions.
-
Coding Sickness
Okay, it's time to accept I have a coding problem. A sickness, an obsession, if you will.
I was sitting in my kitchen studying Japanese, my shiny new Sony Mylo sitting next to me. I was enjoying having the opportunity of having my computer switched off (seeing as I can just switch on skype on my Mylo). I found a word I didn't recognise in my notes. My paper dictionary was over the other side of the room. Surely there must be a way for me to look up this word easily...
This is the point at which you can spot the obsession. Any normal person would have opened up the mylo, launched the web browser and looked up the word online. Job done*. I, on the other hand, fired up my laptop, downloaded the reference documents and tech specs of the Mylo and spent two hours writing a Japanese-English dictionary widget for it. It's fully functional and translates between English, romaji Japanese and kana Japanese. I'll upload it here and on the official Sony Mylo Widget gallery once I've come up with a cool name and a shiny logo.
It's a sickness, I tell you, a sickness...
* [edit] In retrospect, a normal person would have just walked across the room to get the dictionary.
-
Weather

I'm currently sitting outside typing on my new Sony Mylo watching another mad lightning storm. I'm able to sit outside because there's absolutely no rain at all. The storm is happening directly above me but it's so high, the thunder barely makes it down here. It's also been going on for a surprisingly long time. Normally - in my experience at least - storms come and go in a few minutes but for the last hour, the entire sky's been flickering like a broken fluorescent light. I like the weather here, it's interesting.
Also, despite having sat patiently through several lightning storms taking photos, this is the closest I've come to a proper photo of a fork. One single bolt barely visible round the corner of my flat. Must try harder.
-
Extension building is complicated
With Firefox releasing version 3.0.1 yesterday, I spent a chunk of last night trying to update the noodle extension. I decided it would probably be a good idea to enable automatic updates so keen users would be able to take advantage of the latest features immediately (or some such marketing gubbins).
Basic extension building itself is unnecessarily complicated in my opinion. For a start, XUL is an extremely clever and powerful tool but has abysmal documentation. I've now done two sizeable projects using it and I still don't have a clue how it works. Once you've got that bit sorted, however, you then need to package up your extension in a very particular way taking care not to forget updating all of the required versioning bits.
If you want to enable automatic updating, you now need to digitally sign it. Not a bad idea, really. It just makes the whole process even more complicated.
My process roughly goes as follows:
- Update Extension
- Update install.rdf with the new version number
- On the terminal, run './build.sh' (automatic shell script to package, zip, remove hidden files, copy, paste, resequence, etc)
- Upload noodle.xpi to this server
- On the terminal, run 'md5 noodle.xpi' (to calculate one of the application hashes)
- copy key to noodle extension post for in-browser installation
- update update.rdf with the new version number
- run 'openssl sha1 noodle.xpi' to generate another application hash)
- update update.rdf with new update hash
- resign update.rdf with McCoy (embeds another application hash)
- upload update.rdf to server
- cross fingers
This process is somewhat more complicated the first time you do it as you also have to use McCoy to digitally sign the install.rdf before you build your extension. McCoy itself is also password-protected.
In total, you have 1 password to run McCoy, 1 extension signature, 1 md5 hash to allow in-browser installation, 1 sha1 hash to allow add-ons menu automatic updating and 1 signed update.rdf. I'm sure I've missed one.
-
The Legend of the Travelling Nev

The Legend of the Travelling Nev
Whenever world-weary travellers gather to share a yarn or spin a tale, there will always be a clean shaven, leather-skinned old man with a thick bushy beard who settles in the corner with a whisky in each hand and a pipe in the other, pushes his hat to the back of his head and peers out from under it.
"Have ye heard the tale o' the trav'llin' Nev?", he'll say, eyes glinting in the moonlight, sun shining through the boarded up windows. Experienced travellers - those that have been around the world twice and back again - will smile to themselves quietly and eye their glass thinking about the next drink. They've heard the tale before and they'll doubtless hear it again but it's never the same twice; maybe this old fellow can weave a good belly laugh or two in there, maybe he can't. We'll keep an ear on him and another can listen for the call for last orders. The other can pick up the gasps of amazement coming from the younger travellers during the telling of the tale.
Ah, those youngsters...fresh faced and naive as they come. Everyone here was like that at some point but were they ever that young? First time they've been involved in a good old gab and they've thrown themselves into it with every little event that's happened since they left home. Everyone smiles. They're keen. There's nothing nobody's heard a hundred times before. Now they're gathering closer to the old man to find out more about the Travelling Nev.
"Some say he started his journey many years ago in the foothills of Edinburgh, some say that when he started, there was no such thing as Edinburgh. Either way, it's been many a year since he was able to settle anywhere." the old man takes a deep draught from his glass, wipes the beer from his beard and beckons the youngsters closer.
"Cursed he was, y'see. With a terrible curse. A terrible, terrible curse had been cursed upon him like a curse. No-one knows why, how, when or why but, since many a year past, the Trav'llin' Nev has been cursed to wander the planet until he finds a town where nobody knows who he is but wherever he goes, his story is already known. Of course, that's the cunningness o' the curse - the more he travels, the more his tale is spread; the more his tale is spread, the further he has to travel to find peace."
The youngsters are spellbound, their glasses sitting untouched, their mouths open in wonderment. No, it can't be true, can it? Is it? A man travelling endlessly around the world only to find he already knows everyone? No...?
"Ah, I see fr'm yer faces we've a coupla disbelievers amoungst ye. Well, feast yer eyes on this...", the old man fishes in the inside pocket of his travelling jacket, a jacket that's circumnavigated the globe a few times now and looks like it could probably do it once more on its own. He pulls out an old wrinkled, faded photograph that's been folded more than a few times and hands it over to the group which now includes the season travellers whose interest had been piqued.
"That, my friends, is the Trav'llin' Nev", he says as he sits back in his chair, a faintly triumphant smile spreading across his lips, and falls asleep.
In other news, I bumped into Nev this week.
-
How to hose your website...
...in several easy steps.
1: Have a too-clever-for-its-own-good CMS that is child-like in its simplicity yet Canadian-lumber-forest-like in its ability to be hacked.
2: Build several different websites using said CMS, each with their own unique hacks.
3: Have all the sites open in your FTP client and in your text editor
4: Play an episode of Firefly in the background to distrct you.Now, the next few steps must be done in very quick succession:
5: Upload files from site A to site B
6: Realise mistake, download replacements from site C
7: Upload replacements to site D
8: Realise mistake, reset Subversion backup C
9: Upload site C to site A
10: Watch River Tam kick ass
11: Realise you're getting confused, delete everything and start again
12: Delete Subversion backup B
13: Delete entire project BNow that you've done that, all that's left is to put everything back the way it was on A, C and D and trawl old backup disks and Google cached pages to try and get B back.
14: Watch Mal shoot someone.
15: Write it up in a post on the freshly-restored, looks-like-it-was-never-broken site B.Fairly straightforward, really.
-
Again with the Barber stories...
Regular readers will, of course, remember my previous experiences with my Japanese barber. Well, I started to look like some kind of scruffy hippie again so I braved the rain, grabbed the infamous umbrella and headed out for another haircut. This time, I decided to go the whole hog and find out what the full shave-and-a-haircut experience was like.
He shaved my forehead.
My forehead! Shaved! With a cut-throat razor! Exclamation mark!11One!Factorial
I was so busy being shocked that I only just noticed he followed it by shaving my earlobes. I'm now hairless in places that have had hair since before I was born.
I don't really have any conclusion to take from it other than - He Shaved My Forehead...
-
Noodle Firefox Extension
You can either download the Noodle Firefox extension from the Mozilla Addons Site (recommended but requires registration) or below.
Noodle Firefox extension [1.0.5].
If you download from the Mozilla site, you can leave a review and increase the chance it'll get accepted into the public area (no registration required).
It has been tested with Firefox 2 and 3. Surprisingly, it also works fine with both of them, too.
-
Stormy weather
-
Aww, shucks...

Despite the fact that I generally keep my birthday a fairly well-hidden secret, it seems that some people just won't let it lie. It's not that I'm trying to keep my age a secret - I'm proud to say I was born in 1978, the Golden Age of Disco - I just tend to avoid the kerfuffle that goes with presents, parties and cards.
Having said that, I was still over the moon on Thursday night when my wonderful other half threw a mini surprise birthday party in a cool little cafe/bar called the Orblight Café (Note: I'm not saying Thursday was my birthday, Jenni just happened to be in the country then). Then, after getting over the surprise (and after the first Guinness), she presented me with what seems to have been several months in the planning: cards and birthday e-mails from practically everyone I know! Really, everyone!* There were all kinds: cards written in binary, cartoon cats, even a picture of me when I was 20 (although I look 14)
Thanks everybody. I'm now going off to listen to some Bee Gees.
*except Gary who seems to have completely disappeared. Seriously, e-mail me.
-
Comments
I've removed the comment form from below each post here and replaced it with a Noodle button. I figured there's no sense in making a website devoted to instant commenting if I'm not going to use it myself.
This does coincide with the evil evil spambots cracking my (previously thought to be impregnable) anti-spam system earlier this week but it isn't related. Honest. Darned spam. So it may not have been impregnable but it had a fairly decent run. It lasted seven months and several tens of thousands of attempts to bypass it. Oh well.
At least Noodle uses Google Accounts. If spam starts to come through on it, I'll just remove the ability to post anonymously so everyone will need a google account. I'd rather not do that unless I really have to, though.
-
Noodle
I think my latest little project is pretty much done. It still doesn't work absolutely perfectly in Internet Explorer 6 but I figure I'll fix that if enough people ask me to.
So, here it is: Noodle.
"Okay, what is it?", I hear you ask (I don't but play along). Noodle is a variation on a good old-fashioned forum except that every page on the internet has its own thread. Any time you're looking at something, you just press a button and you get to see the discussion for that page. Sometimes a page won't have any comments on it for months (or ever, even), sometimes a page will be extremely busy.
The pages that are currently the most popular will appear on the Noodle homepage (it's set to show the top 10 at the moment but I might change that) along with the most recent comments.
"So, where's this magic button?" you ask (you're full of questions today, aren't you?). It's here:
If you're using Firefox with the bookmarks bar switched on or Opera with the status bar switched on, you can just grab the button, yank it off the page and drag it to your bar. If you're using Internet Explorer 6 or 7, right-click and 'Add to Favourites'. Bear in mind that IE6 is...flaky at times.
Known issues
At the moment, the 'Most popular now' section looks a bit daft, seeing as it only has 1 site in it.The google account login screen is cut off at the top.
The google logout screen gives a nastly looking error. This is a problem at google's end. Apparently, you don't get this error in the USA but you do in the UK and Japan.
Nicknames are cut short. After my earlier musings, I decided the safest way to display nicknames (until google fix it) is just to trim bits out. If anyone has a better RegEx for doing this than the one I'm using, let me know.
I'm sure I'll post more about this soon, I'm now off to bang my head against IE for a while.
Yes, I do need better hobbies.
-
Japanese Barbers are great.
A quick transcript of the conversation I had with my barber just as I was about to leave:
Barber: Do you have an umbrella?
Me: No, is it raining? (look outside, it's not)
Barber: Ah, wait a second
Barber runs off through the back, comes back with an umbrella.
Barber: Please, take this.
Me: But it's not raining.
Barber: Ah, but it might.
Me: No, really, it's okay, I live just round the corner.
Barber: (looking sad) Please? You don't even need to bring it back.I took the umbrella. He also gave me a hairbrush.
-
Language
My latest pointless programming project is just about finished. There's just one little bit left to figure out and then it's done.
I'm building this using the new Google AppEngine system (mostly because I needed an excuse to learn python) but there seems to be a bit of a problem with the User object. They haven't finished the User nickname bit yet so when you sign into an AppEngine application or site using a standard Google Account, it uses the bit of your e-mail address that comes before the '@' and, although Google accounts can use any e-mail address, the majority of them will be gmail.com or googlemail.com. This means that if you want to make any kind of public forum, you have to do one of the following:
- Implement your own nickname system (not really in the spirit of a unified User object)
- Obfuscate the nickname before displaying
- Display the nickname and open users up to spam or other unwanted e-mail
None of these are particularly great. If it were even possible to access the user's first name, that'd solve the problem but, until the nickname functionality is finished, it's not as useful as it could be.
As an aside, doing a project in python means that I've written code in pretty much every mainstream (i.e. not esoteric) programming language except COBOL.
-
Edited Millionaire
Here's an updated version of my Ramen Millionaire story. Honestly, I'm going to write an english version soon...
ラーメン長者
むかしばなしじゃない。さいきん、渋谷にうんのわるい男が住んでいました。毎日、朝から晩まで まじめに働きましたけどなかなか金持ちになりませんでした。ある日、おなかがぺこぺこだから、ラーメンやたいにいきました。食べながらラーメンやたいの人と話していました。
「どうしてなかなか金持ちにならない?何をするればいんだろう?」と言いました。
「ここから出る時に、ころびます。こたいをみつけます。」とおかしく言いました。
「えええ。。。?彼はあたまがへん。。。」と思っていました。そしてらラーメンやたいを出ました。
「がんばって」らラーメンやたいの人大きい声で言いました。
ふりかえったら男がころびました。しかし、立つ前にやたいの下におもしろい物をみつけました。小さいドラエモンのケータイのストラップでした。立ってからラーメンやたいの人に「ああ。。。かわいい物、ね。。。」と言ったけど彼はいませんでした。
「ええ。。。どこ?」と言いました「じゃ。。。」
それから道を歩き出しました。「よく考えなくちゃ。。。」と思っていました「たぶん。。。ああ!うるさい!なんか?」
お母さんと赤ちゃんが店を出ました。赤ちゃんがうるさくないていました。
「あああ。。。かわいい、ね」
とつぜん思い出したーストラップ!
「えーんえーん!」赤ちゃんと大声でないていました。
男は赤ちゃんにドラエモンのスストラップをあげました。赤ちゃんはすぐに静かになりました。
お母さんは「どうもありがとう」と言いました。「赤ちゃんがよろこんだんからお礼がしたいんです」。ハンドバッグの中をさがしてペットボトルを取り出した 「あ!ウロン茶どうぞ」お母さんからウロン茶をもらいました。
男は歩きつづけました。まもなく、女の人と合いました。顔色がよくありません。
「スポーツクラブ。。。から。。。つかれった。。。のど。。。かわく。。。」と言いました。
男がお茶をあげまてから女の人が飲み出した。
「あああ。どうもありがとうございます。体がよくなりました。ああ!明日、KAT-TUNのコンサートがあります。時間がないので、行くことができません。」
男は女の人にチケットをもらいました。
男は歩きつづけました。まもなく、サラリマンを見ました。サラリマンの車が壊れました。彼は車をけりつけていました。
男は「どうしたの?」と言いました。
サラリマンは「分かりません。動かない。。。」と言いました。「むすめにKAT-TUNのチケットを買ってあげたかったけど店がしまっちゃいました。。。」
男は「どうぞ」と言ってチケットをあげました。
サラリマンはよろこびました。車のかぎをあげました。
「どうもありがとう。車はあなたの。。。」と言って家に走って帰りました。
男は車の中を見ました。小さいワイアが切れていました。男は繕いました。簡単でした。
車のとなりにたっていたらおじいさんが来ました。
「ああっ!さいこう!」と言いました。
おじいさんは有名な映画のディレクターでした。
「古いしおもしろいし僕の新しい映画のシーンで車はパフェクトです」。
「いっしょうに行こう!」と言いました。
男とディレクターさんはさつえい場所にいったら女の人が来ました。
ディレクターさんは「こちらは娘です。映画のしゅやくです。もうすぐ、有名じょゆうになります。」
彼女はスポーツクラブの女の人です!
アシスタントディレクターがディレクターのところに来て静かに耳打ちしました。
ディレクターさんは男に「映画のしゅやくが止めたであなたはこの映画の新しいしゅやく。」と言いました。
後で映画はとても人気になりました。男とディレクターの娘さんも人気になってけっこんしてうれしくなって億万長者になりました。
皆が幸せになりました。
-
A bit too social?

I've been looking at adding some more features to the greatest PHP CMS around and decided that simple social bookmarking doohickeys would be useful. The idea is to have a little panel in the admin area where you can check which ones you want listed on your page. Straightforward enough so far, right? Nothing groundbreaking or difficult or anything.
It got tricky when I started trying to figure out what sites should be included. It turns out that while I wasn't looking, social bookmarking sites became quite popular. Full points go anyone who can name them all.
-
Hachiko Crossing
I have nothing much to say about this photo other than I like it.
Originally uploaded by thingsinjars on flickr
-
That 'back-of-the-wardrobe' feeling...
I've just realised what's so odd about being back in Edinburgh. It feels exactly like I've just come back from an adventure in Narnia. I left normality behind 6 months ago and travelled to a magical, mystical land full of everything I could possibly dream of (mostly really cool geek stuff) where everybody spoke strangely. I stayed just long enough for everything to become normal, where I'd come to expect onigiri to be sold in every corner shop then I travelled back and stepped into life exactly where I left. Everything and everyone exactly the same as it was when I left. That's what's weird about it.
Still, I'll be clambering back into the wardrobe next week now that I've got my new visa.
-
Ramen Millionaire
For my japanese lessons, I've been writing short little essays recently. Usually it's opinions on the weather or plans for the weekend but last week I went a bit mad and rewrote the traditional japanese story "Warashibe Chouja" or "Straw Millionaire" in a modern setting.
My current version is below but I'll probably update/rewrite it as I continue my studies. I'll also get round to typing up the english translation. Apologies to anyone reading on a PC, you'll probably just see a load of boxes...
ラーメン長者
むかしばなしじゃない。さいきん、渋谷にうんのわるい男が住んでいました。毎日、朝から晩まで まじめに働きましたけどなかなか金持ちになりませんでした。ある日、おなかがぺこぺこだから、ラーメンやたいにいきました。食べながらラーメンやたいの人と話していました。
「どうしてなかなか金持ちにならない?何をするんの?」と言いました。
「ここから出る時に、ころびます。こたいをみつけます。」とおかしく言いました。
「えええ。。。?彼はあたまがへん。。。」と思っていました。そしてらラーメンやたいを出ました。
「がんばって」らラーメンやたいの人とどなていました。
ふりかえって男がころびました。しかし、立つ前にやたいの下におもしろい物をみました。小さいドラエモンのケータイのストラップでした。立ってからラーメンやたいの人に「ああ。。。かわいい物、ね。。。」と言ったけど彼はいませんでした。
「ええ。。。どこ?」と言いました「じゃ。。。」
道を歩きました。「よく考えなくちゃ。。。」と思っていました「たぶん。。。ああ!うるさい!なんか?」
お母さんと赤ちゃんが店を出ました。赤ちゃんがうるさくないていました。
「あああ。。。かわいい、ね」
とつぜん思い出したーストラップ!
「わああああああ!」赤ちゃんと大声ないていました。
男は赤ちゃんにドラエモンのスストラップをあげました。赤ちゃんはすぐに静かになりました。
お母さんは「どうもありがとう」と言いました。「赤ちゃんがよろこぶしてからお礼がしたいんです」。手かばんの中にさがしてペットボテルを取り出した 「あ!ウロン茶どうぞ」お母さんからウロン茶をもらいました。
男が歩きつづけました。まもなく、女の人と合いました。顔色がよくありません。
「スポーツクラブ。。。から。。。つかれった。。。のど。。。かわく。。。」と言いました。
男が茶をあげまてから女の人が飲み出した。
「あああ。どうもありがとうございます。体がよくなりました。ああ!明日、KAT-TUNのコンサートがあります。時間がないので、行くことができません。」
男は女の人にチケットをもらいました。男が歩きつづけました。まもなく、サラリマンを見ました。サラリマンの車が壊れました。彼は車をけりつけていました。
男は「どしたの?」と言いました。
サラリマンは「分かりません。動かない。。。」と言いました。「むすめにKAT-TUNのチケットを買ってあげたかったけど店は閉店しました。。。」
男は「どうぞ」と言ってチケットをあげました。
サラリマンはよろこびました。車のかぎをあげあした。
「どうもありがとう。車があなたの。。。」と言って家に走りました。
男は車の中を見ました。小さいワイアが切れていました。男は繕いました。簡単でした。車のとなりにたっておじいさんが来ました。
「ああっ!さいこう!」と言いました。
おじいさんは有名な映画のディレクターでした。
「古いしおもしろいし僕の新しい映画のシーンで車はパフェクトです」。
「いっしょうに行こう!」と言いました。
男とディレクターさんは映画の場所にいったら女の人が来ました。
ディレクターさんは「こちらは娘です。映画の大切の人です。まもなく、有名じょゆうになります。」
彼女はスポーツクラブの女の人です!アシスタントディレクターがディレクターに来て静かに耳打ちにしました。
ディレクターさんは男に「映画のしゅやくが止めた。あなたは僕の新しいしゅやく。」と言いました。後で映画はとても人気になりました。男とディレクターの娘さんも人気になってけっこんしてうれしくなって長者になりました。
皆が幸せになりました。
-
Too much code...
I've obviously been reading and writing far too much code recently. I find myself mentally adding markup to my normal conversations. When I say something like "Despite having a sore back, I managed to vacuum the flat.", I mentally wrap an href round "Despite having a sore back", linking it to a previous conversation (usually with someone completely different) so that the interested listener can open that conversation in a background tab and check it out later...
As long as I don't start carrying around a small yellow sign saying 'Digg this', I'll probably recover...
-
The answer to your question
Because I've been doing lots of development work lately, I've had to spend more time than I'd like in various techie forums trying to find answers to various programming issues. I tend not to hang around forums when I don't need to because I largely find them depressingly full of people like me.
Even though these are technical forums for technically-minded people, there are still too many demonstrations of fuzzy thinking, lots of "Does anyone know how to package xulrunner for OS X", "Has anyone managed to install VLC on an iPhone", "Can anyone make the whatsit do the thing?". Keeping with the free and open sharing of ideas and nurturing of curiosity that The Internet is supposed to encourage, I've created two handy pages with the answer to all these questions.
For all those times someone asks a question like "Does anyone know how to...":
To be used in the same frame of mind as this handy tool.
-
Window Sucks.
No real surprises there, I just needed to point out that it's now five past one and I started installing IE7 just under 3 hours ago. Three. Hours.
I needed to test some layouts on IE7, I don't trust IE7 enough to not mess up my parallels install so I decided to put it on my development machine in the office in edinburgh via VNC, ran windows update... wait... security updates... wait... restart... windows update... IE7. Yes, install, please. Installing... wait... restart... run IE7.
"Do you want to run the Phishing filter?"
No."Welcome to IE7. Do you want to run the Phishing Filter?"
No."Ah, you've opened a new tab. Do you want to run the Phishing Filter?"
No.I go to the site I wanted to test. True enough, it's gebroken.
Click "Developer toolbar".
Crash... wait... restart... run IE7.
Re-download the Developer Toolbar.
"Do you want to run this?"
Yes."Finished downloading. Do you want to run this?"
Yes."This program may be unsafe. Do you want run this?"
Dear god, if this computer wasn't in a different hemisphere, I'd lamp it one right now.Run the installer, fail.
Shut down IE7, run the installer again.
Run IE7.
Go to the site again.
"This site may be unsafe, do you want to run the Phishing Filter?"
Log out of VNC. Step away from the computer, spend 10 minutes ranting to nobody in particular. Feel somewhat better.
-
Firemen's Parade
-
Banzai!
I went to the Imperial Palace today to see the Emperor and his family. Lovely people. We had tea. And biscuits.
If only there wasn't this huge crowd of people cheering the whole time...we couldn't hear ourselves think.
-
Sushi is good for you

It's also very filling. I visited a friend from Edinburgh today who's over here helping her mum pack and they made this excellent dinner.
-
Christmas Card

Before I get any concerned e-mails, I haven't been arrested. I just thought this would be a funny card. I also don't look that rough. At least, I hope not. I've included a couple more recent photos in the pop-up in case you need proof.
Everything here's going well, my Japanese is coming along slowly but surely. I'm now getting private lessons twice a week to help overcome the fact that Japanese is really hard.
I think I must have made it to every area of Tokyo by now, I've been going to a different one each weekend but I still keep finding cool new stuff. I'm also deliberately not going near Akihabara at this time of year just in case I get tempted to buy a bunch of stuff as christmas presents to myself.
-
Dooze Done
Just to keep up my current focus on extreme geekery, Dooze (formerly known as "s is small") is now available for download. It's kind of ended up as a CMS for people who could probably write their own if they wanted to but just haven't the time. It's still possible to install, customize and use it without knowing any PHP but there's a bunch more stuff you can do with it if you do.
Anyway, enjoy...
-
Monkeying about with XUL

I've been playing with XUL for a couple of days now. Kind of interesting and kind of really confusing.
It looks like it could be really useful for making cross-platform applications and the way it works means that it's not a huge jump from HTML development to XUL layouts but getting plugins to work on OS X? Ugh.
The large number of folders called 'plugins' within the standard application structure definitely didn't help. At the moment, my application works but I have no idea why. It's probably a quantum thing, you can either know what it does or how it does it but not both.
Still, it's available for download on the (almost finished) MonkeyTV site. Now I just need to go through the process again for Windows...
-
Finally Gapless...
A while back I decided to try and fully embrace 'The Mac Way' and use iTunes to listen to my music/update my iPod/browse podcasts/etc. So I fired it up, told it to catalogue my music collection and sat back hoping to be listening to Ben Folds within minutes.
Hmmmm...
It's now six weeks later and it finished processing about 10 minutes ago. During those 6 weeks, it was completely unusable while it tried to 'determine gapless playback information'. While it was waiting, I found out how you prevent it from doing this but that has to be done before you start.
Six weeks. Six. Weeks.
To be fair, it probably doesn't expect your music collection to be quite so large or – and this is where I think the problem is – live on a server on the other side of the world.
Still, it's done now. I just need to make sure I never add any more music ever.
-
Monkey TV
So, my latest little project, Monkey TV is about to shift from the aleph to the bet testing stage (Hebrew's much more fun than greek). The site's only been up in its current state for less than 3 days and already it's been hammered by hundreds of spam bots. Really, they're faster than google.
More info and cool stuff when I finish.
-
Finally, It's cold!
After an excessively long summer, it's finally beginning to cool down here. I can't believe I was getting a tan in November.
Of course, I'm now beginning to realise that this flat is built for the summer. Air conditioning, thin curtains, no heaters... but I shan't complain. I survived typhoon season unscathed and there are a lot fewer cockraches around at this time of year...
-
Earthquakes = Bad
That's it, I've decided. On the whole, earthquakes are a bad idea. Not that I've experienced any particularly bad ones while I've been here – the biggest being a 5.2 about 70 miles north-east – but the ones I have had have been...unsettling.
A particularly strange thing happens when I'm on Skype to someone during an earthquake, though. Due to the computer being on the desk, the desk being in the room and the whole room moving as one, it appears on the other end that I start swaying slightly for no apparent reason.
I have prepared myself a little emergency bag, though, just in case there's a big one. It's got spare socks, my solar charger and – when I'm not using it – my Nintendo DS. At least if there's a disaster, I'll still be able to play Mario Kart.
-
s is small
The reason I finally got round to finishing my site is that I built a neat little CMS temporarily called 's is small' and wanted to do something interesting with it. It doesn't really do anything that other CMSs don't, I just felt like making it.
It does, however, have some fairly cool things built in:
Media
- If you attach a video to a post, it'll be automatically converted from whatever format you have (AVI, MPG, WMV, MP4, MOV, etc) into FLV and embeded in your post using Jeroen Wijering's FLV Player.
- If you upload an image, it'll get resized then wrapped in Lightbox
- MP3s are automatically embedded in a flash MP3 player
Integration
- Put your last.fm username in and you can get a flash or image based list of your Top 10 artists (or most recent played or whatever...)
- Put your flickr username in and it'll include your latest photos.
- You can set up your flickr account to 'blog this' to automatically include people's flickr posts in your blog (using the Metablog API)
- Put your Open Source Food username in and it'll randomly include one of your recipes.
- You can set it to be your personal OpenID server
- Automatic inclusion of a bunch of Google stuff: calendars, analytics and maps.
Other stuff
- RSS feeds for each category
- Some nifty anti-spam stuff...
- ...which comes in handy for the comments
- A simple way to add on any kind of extra functionality as modules
- Support for MySQL and PostgreSQL
- Automatic installation and database setup (just upload the files and everything will install the first time you visit your site)
- Depending on your server setup, the whole thing generally comes in at about 2MB (including the flash movie player and everything)
Of course, the next thing I need to do is make a site for the CMS itself and let other people have a go at it.
-
Hey, It's a website...
I've finally gotten round to making my own site.
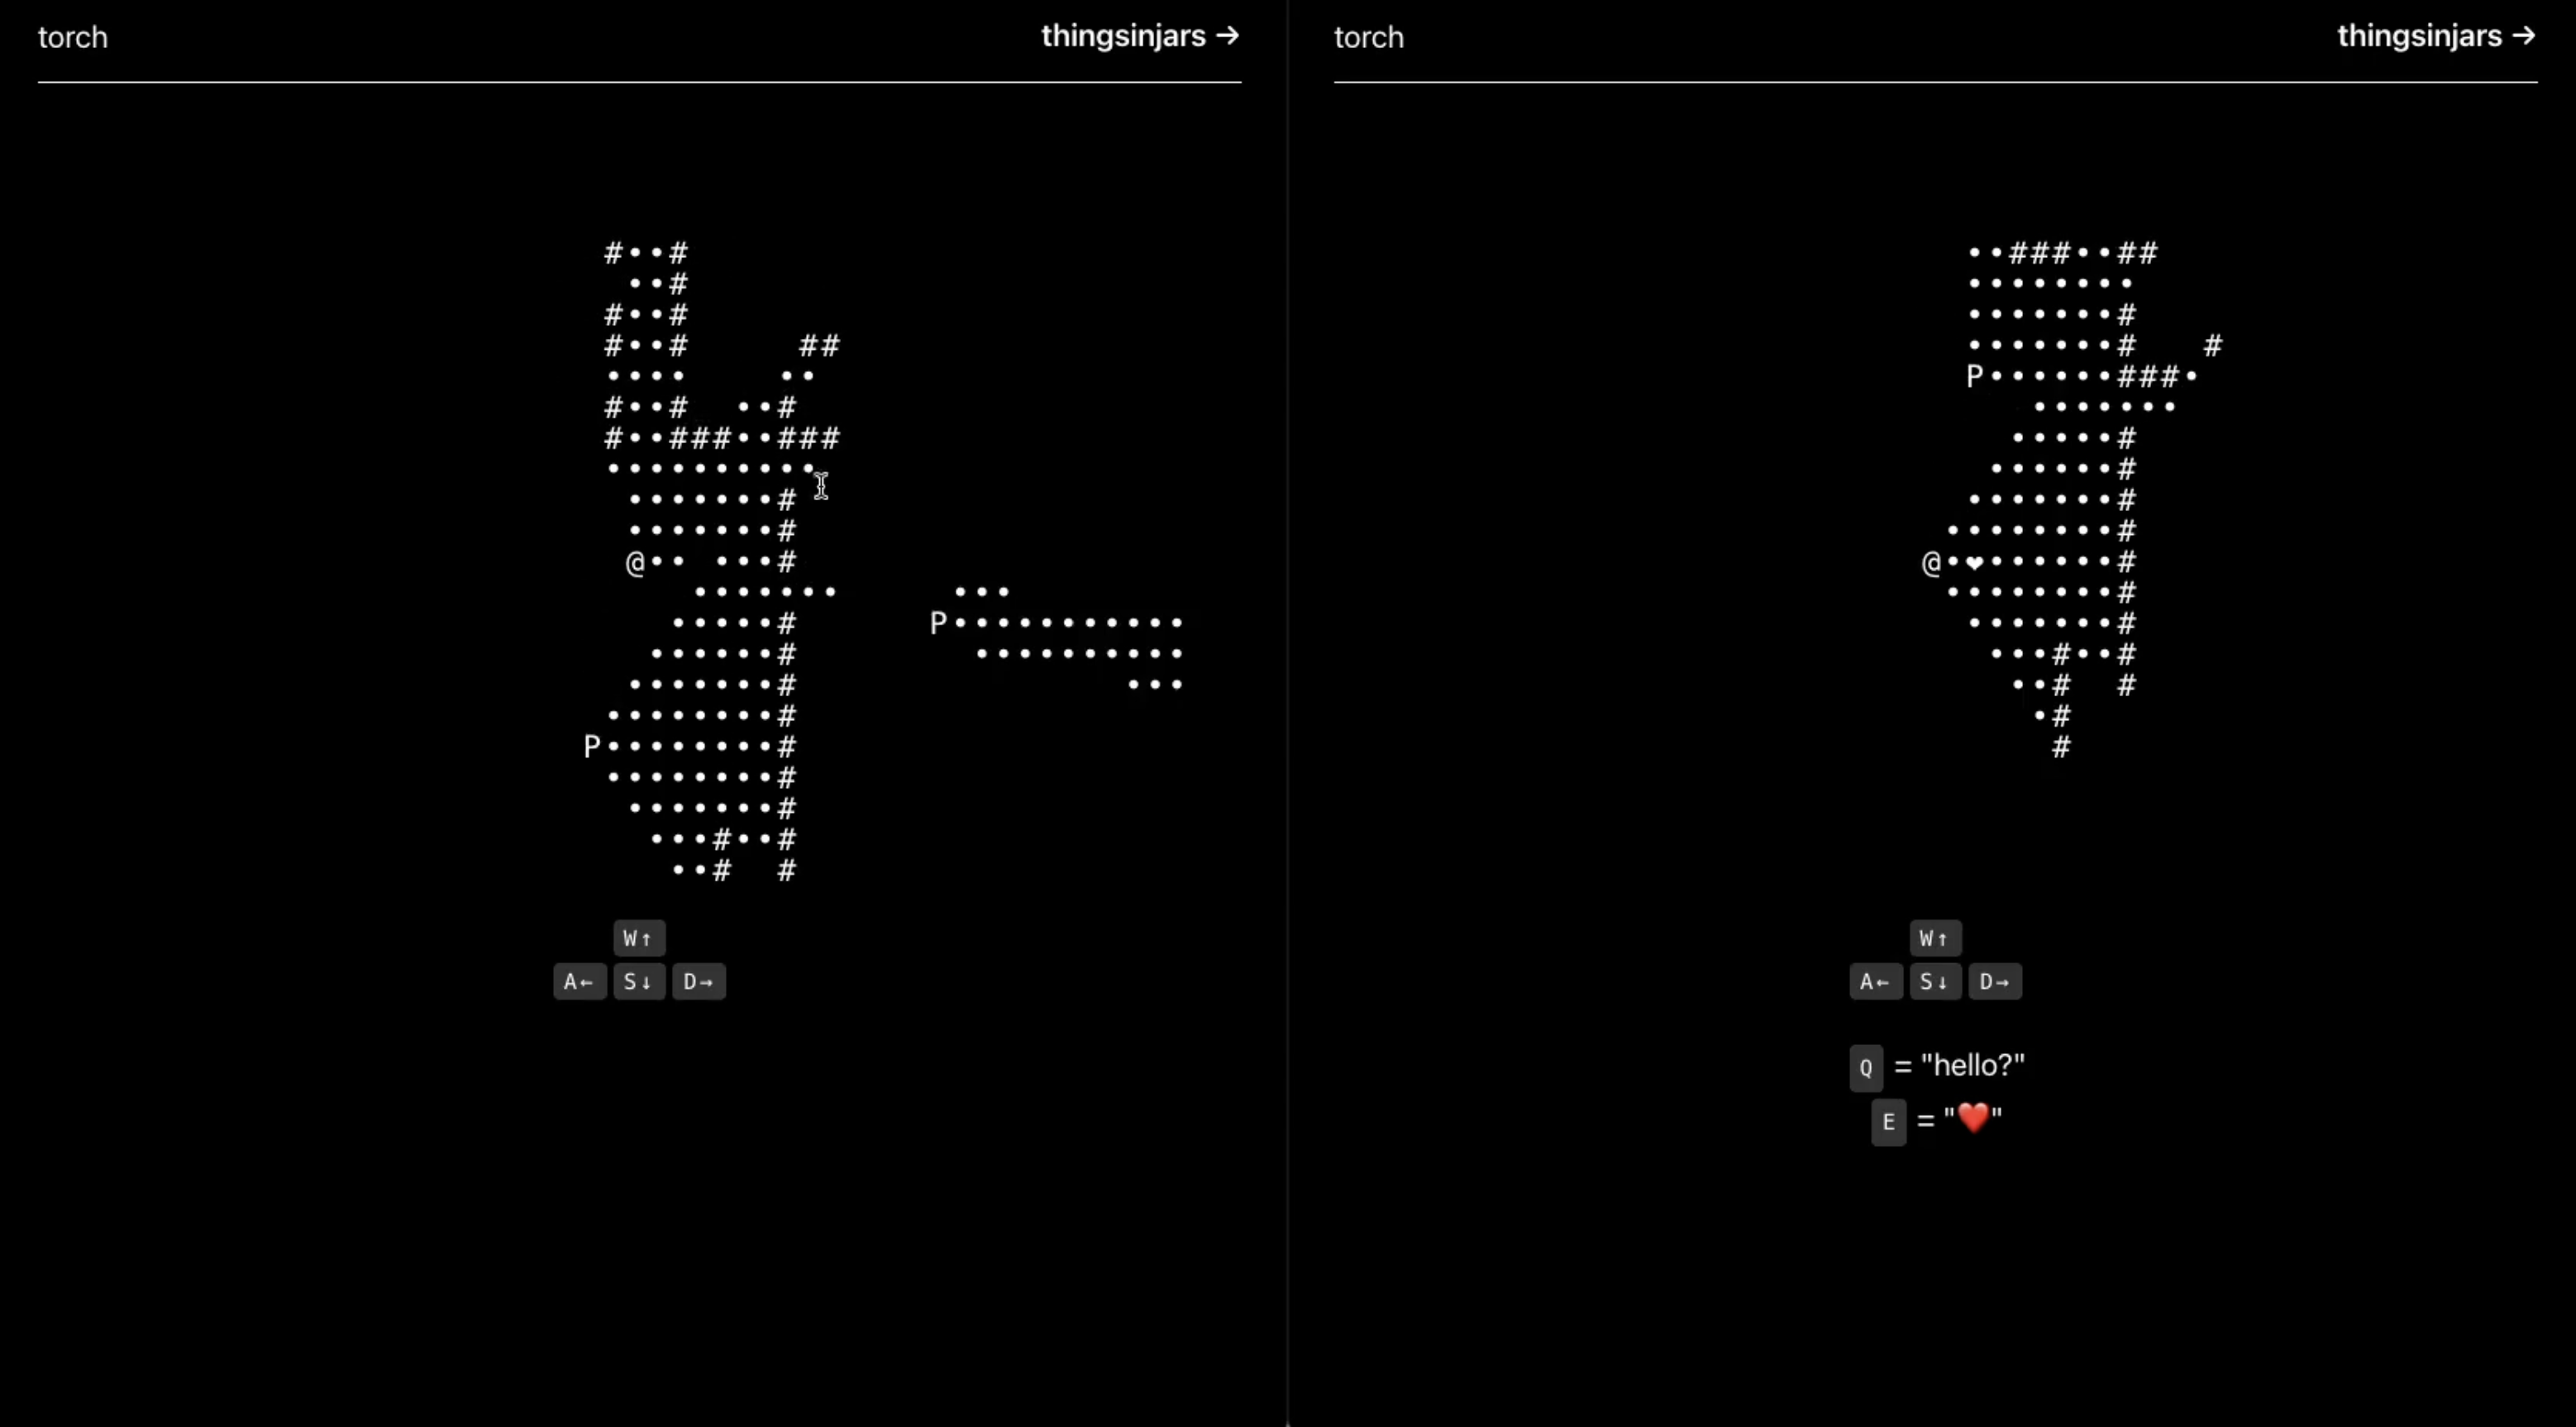
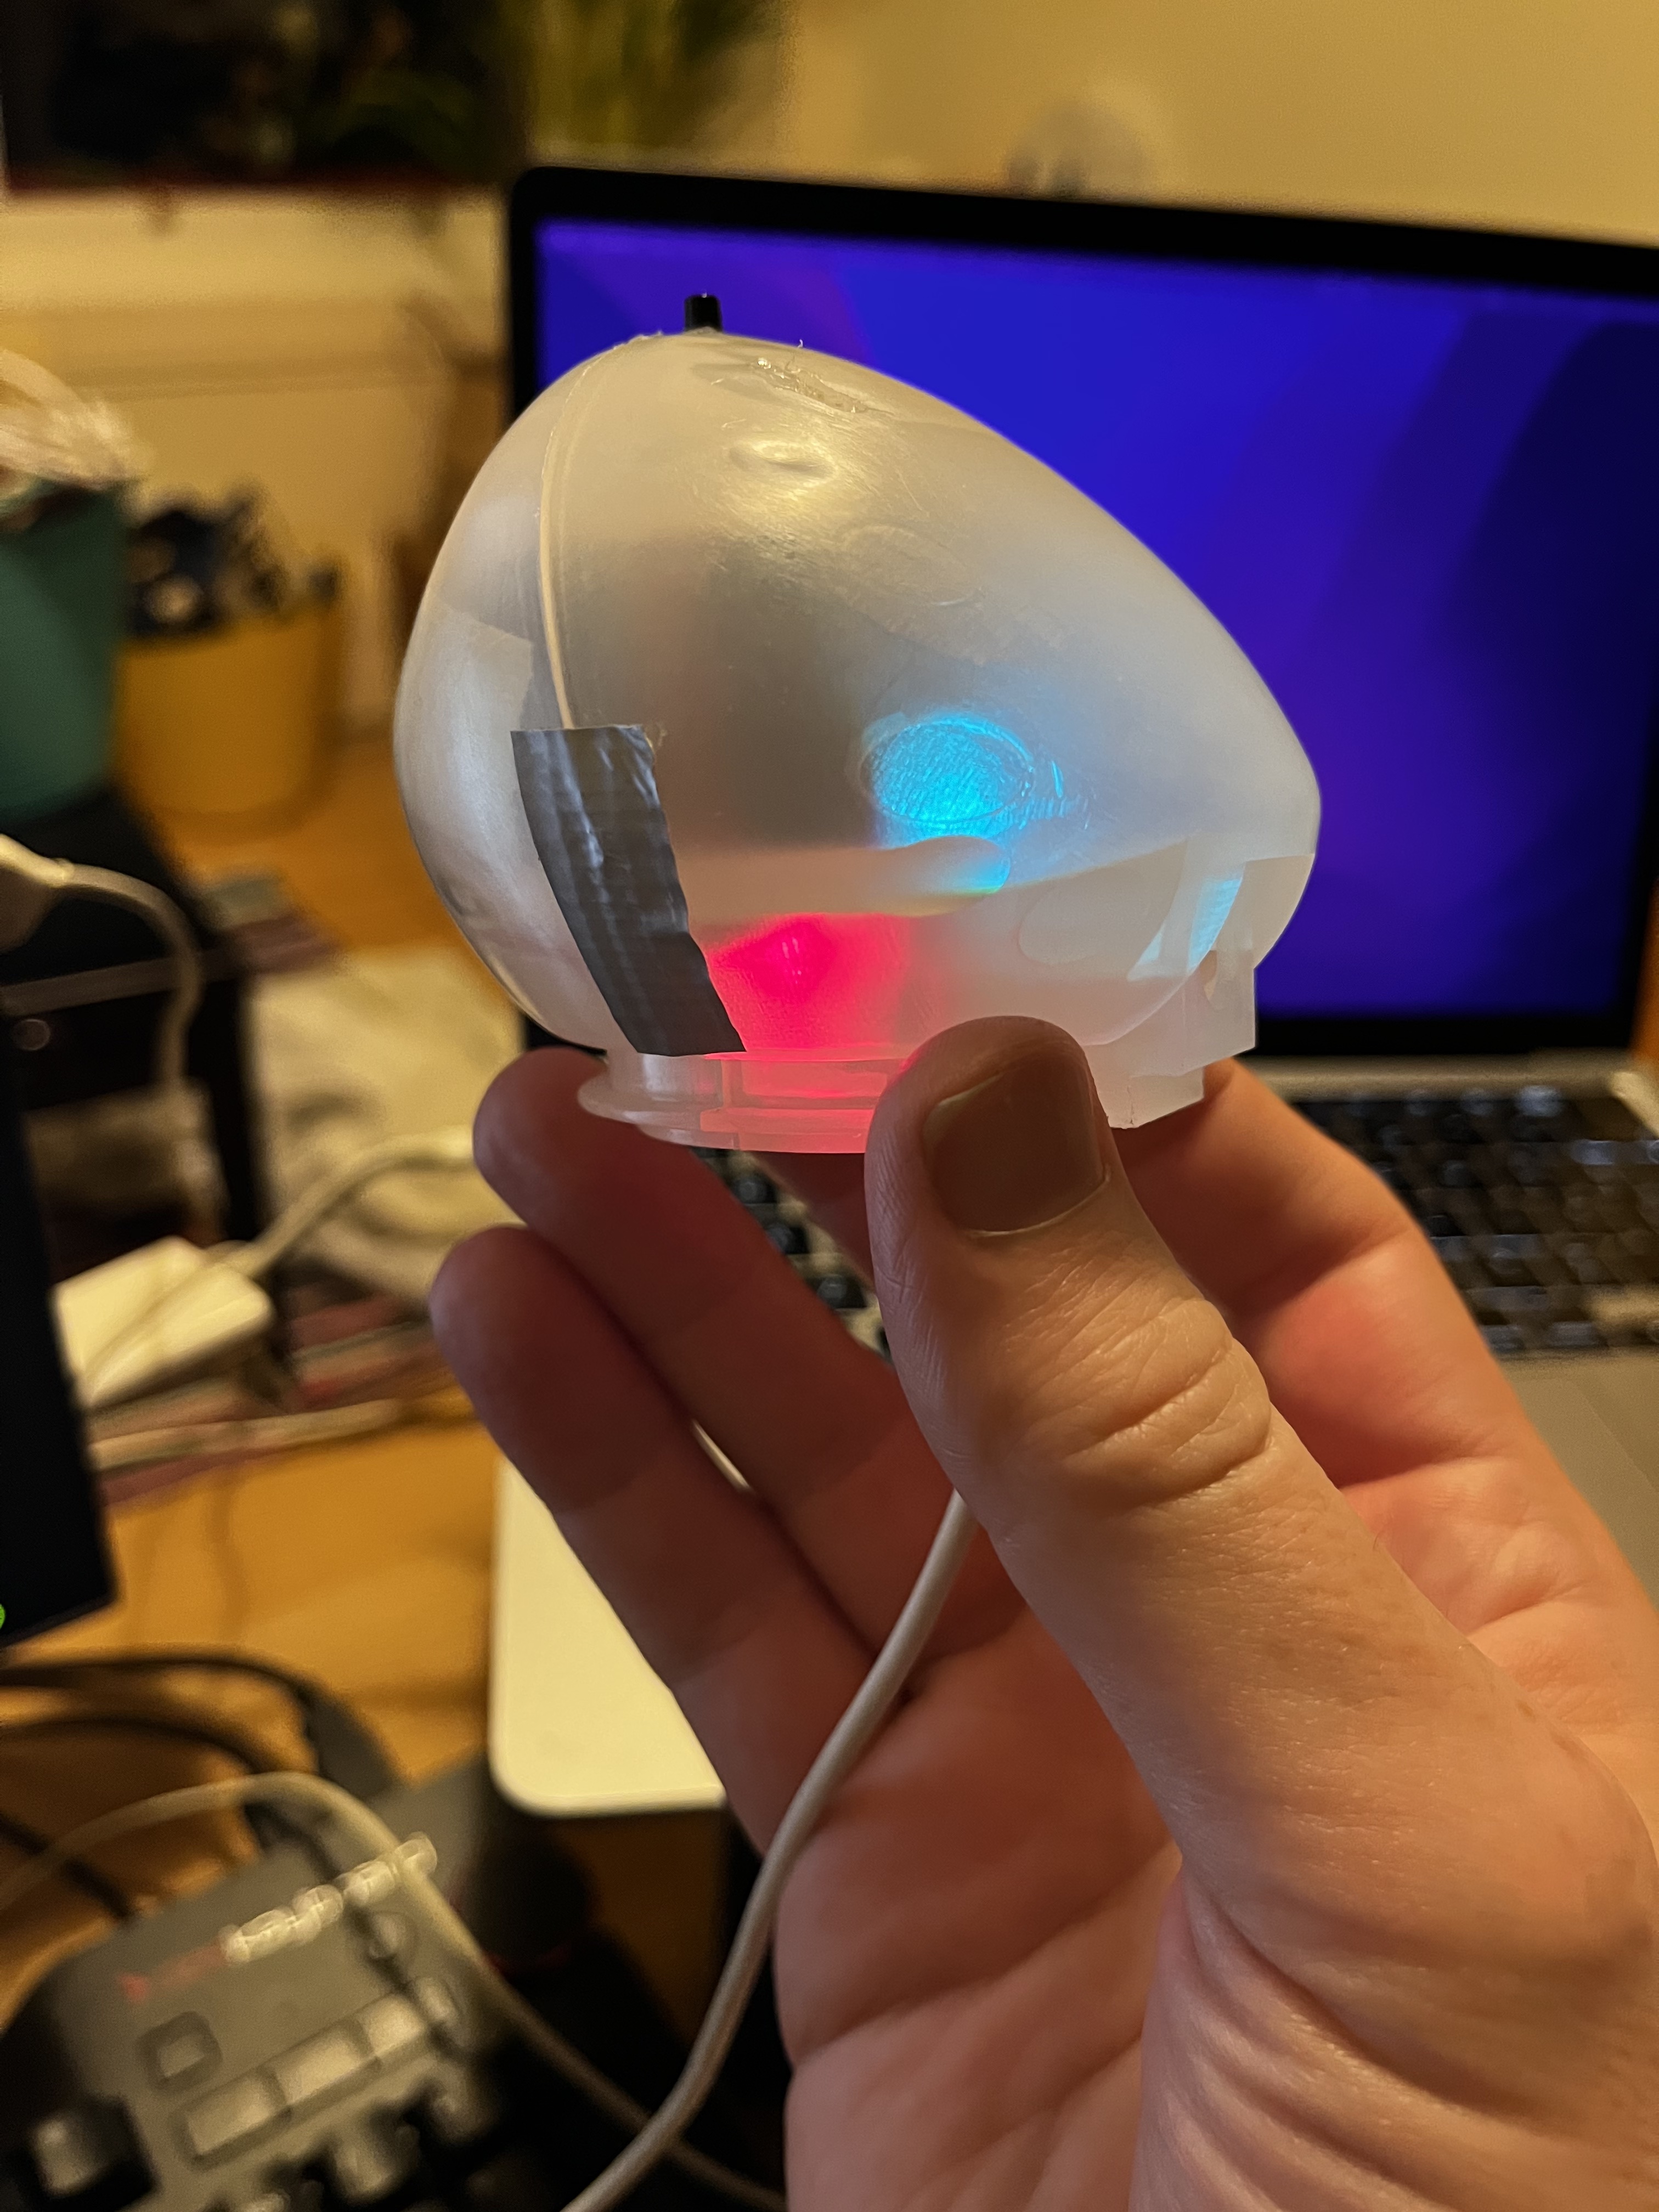
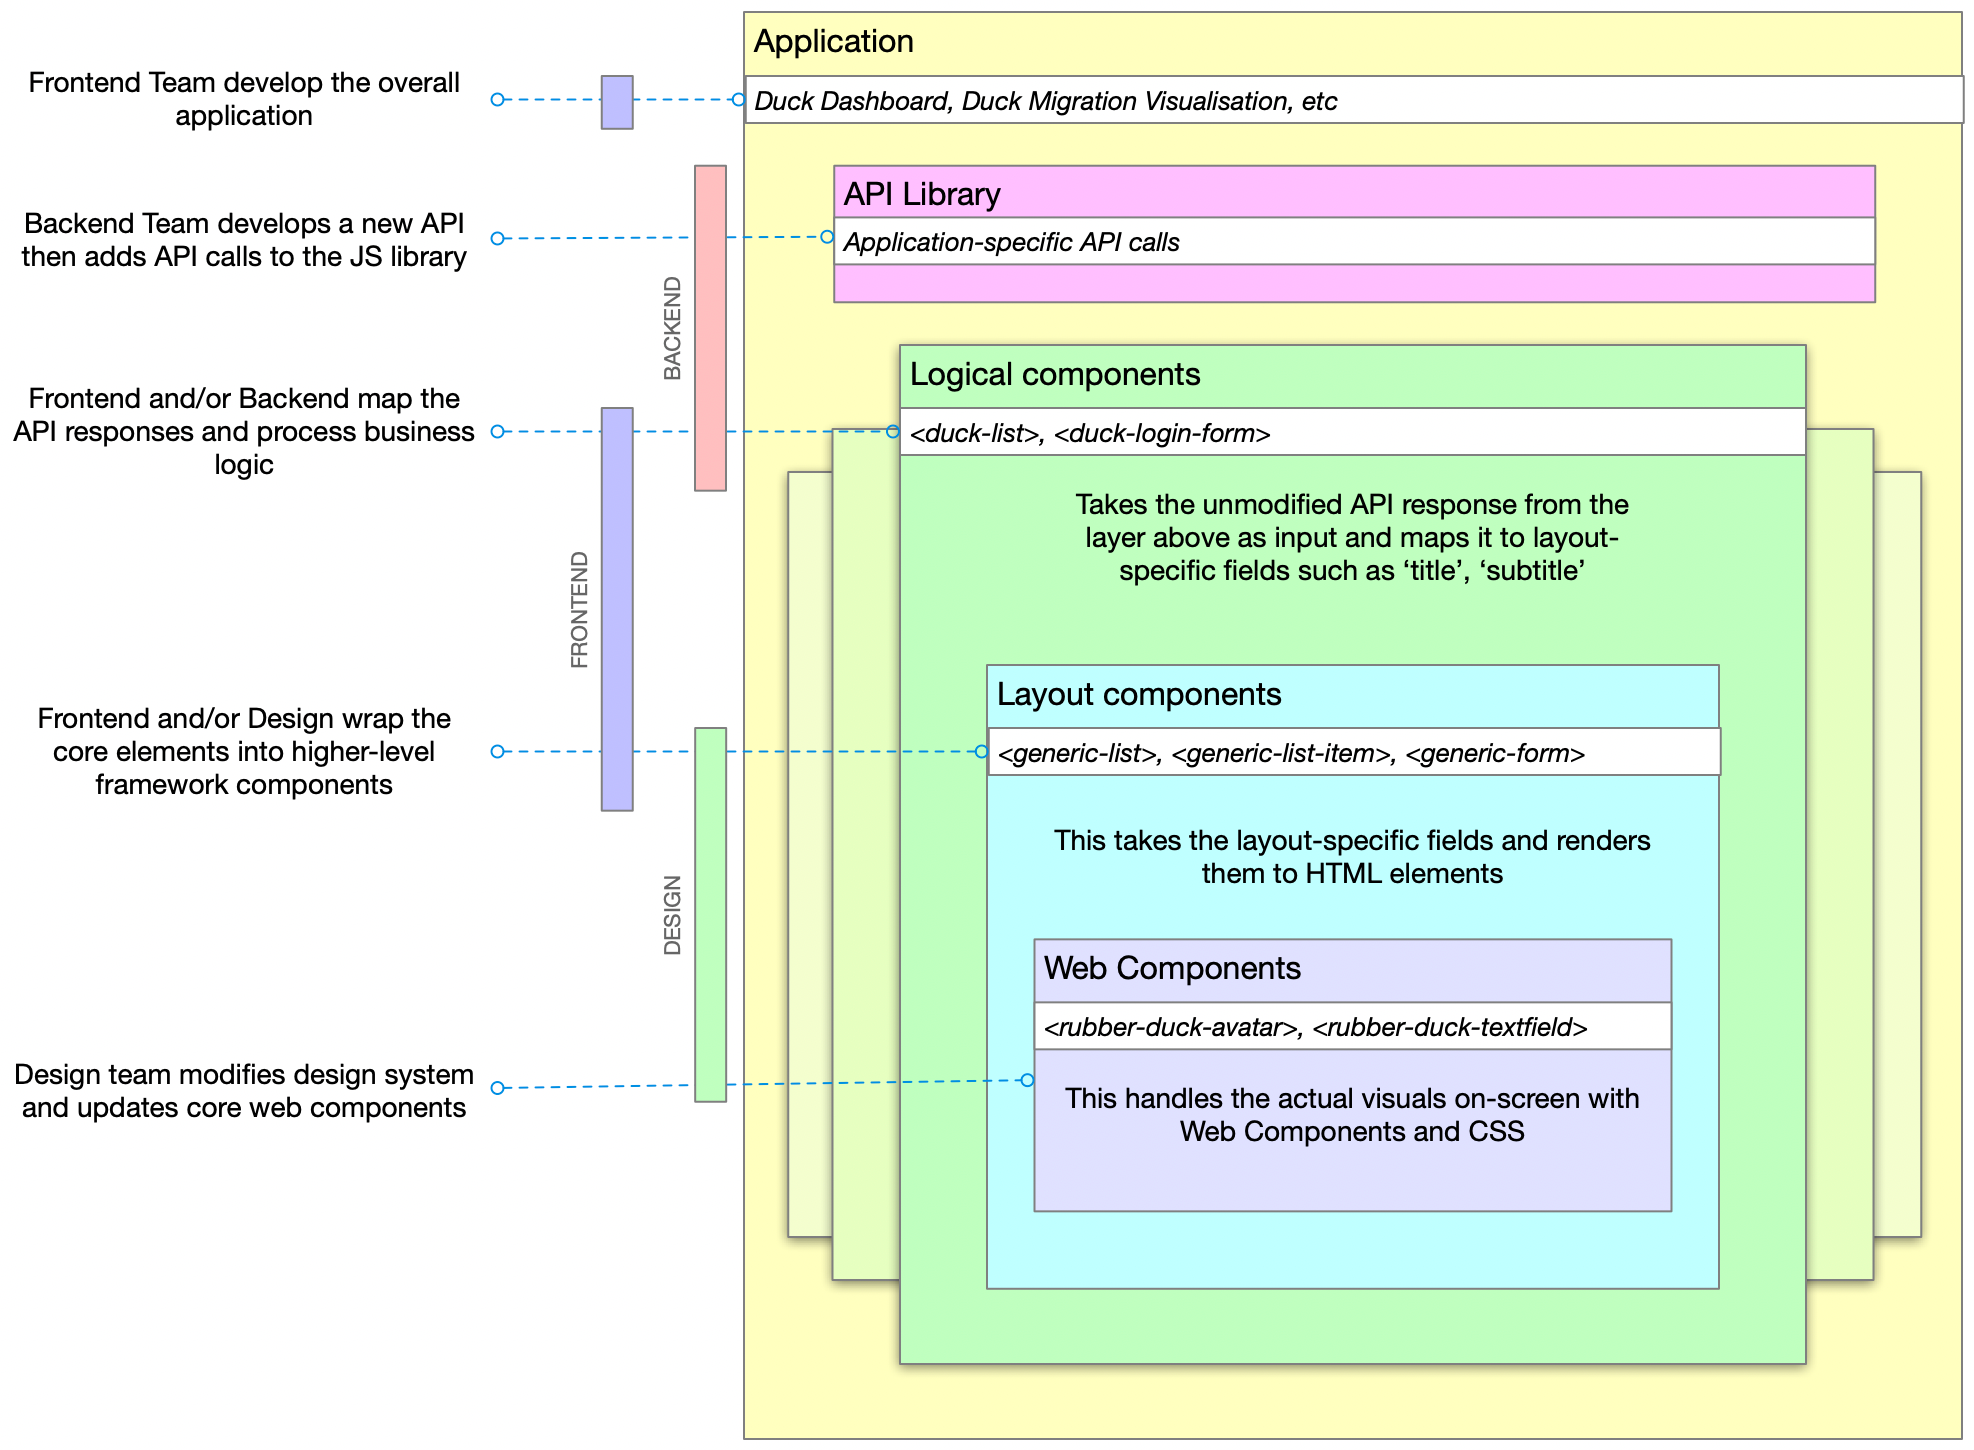


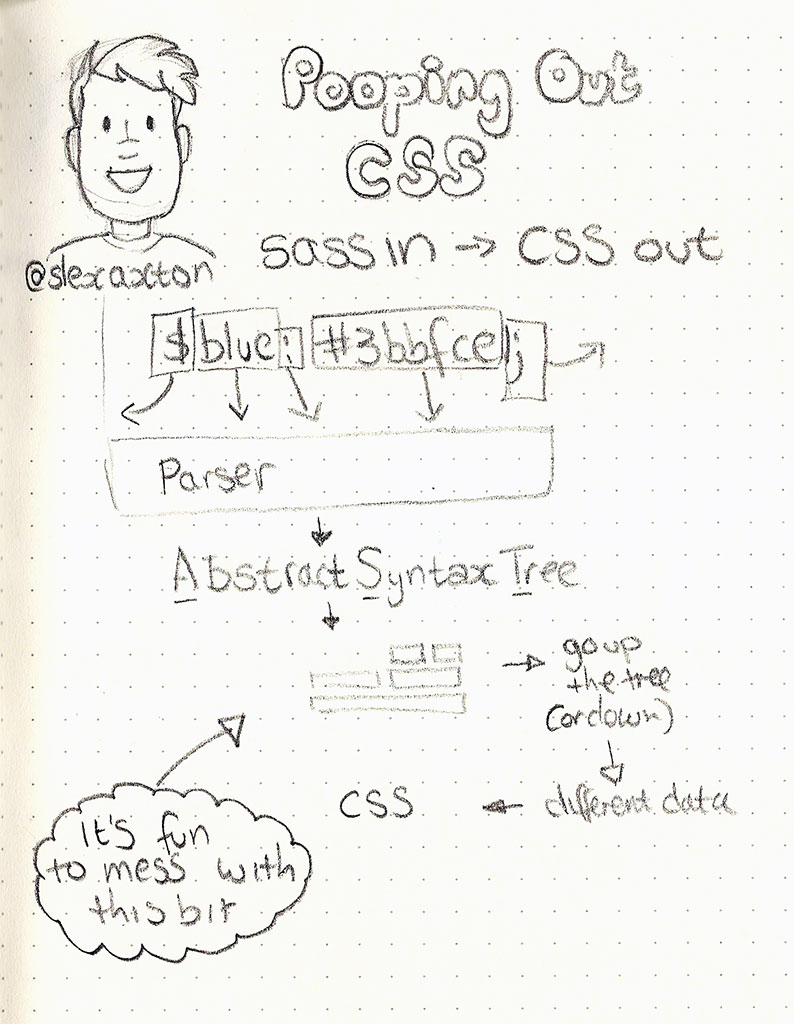


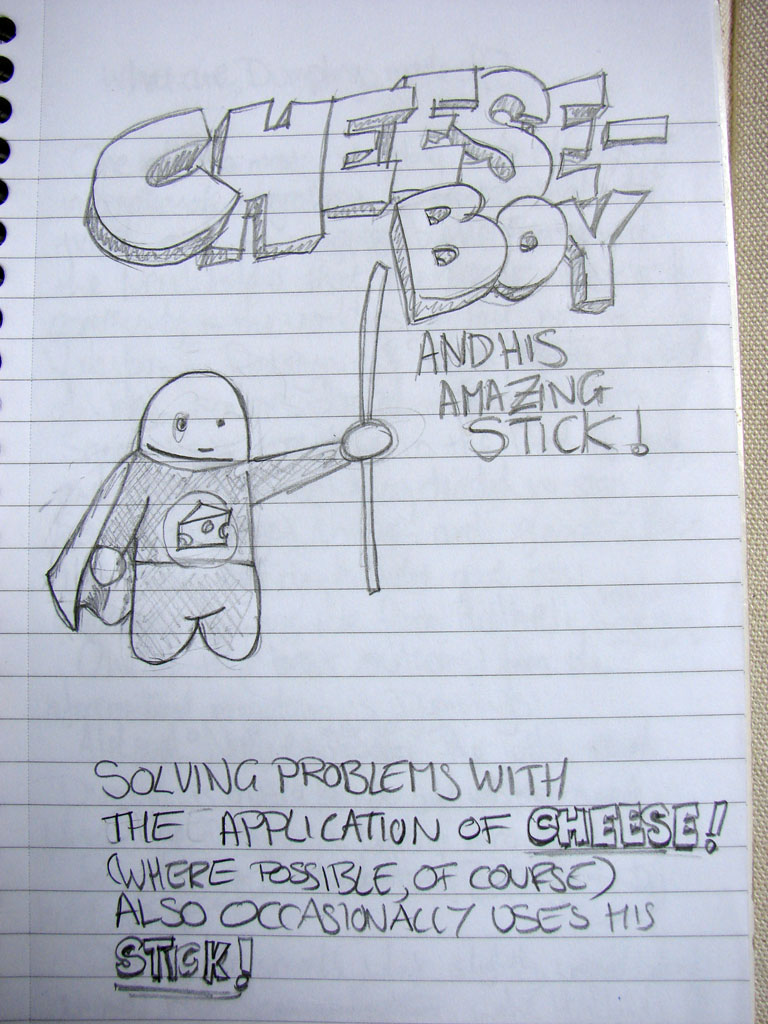


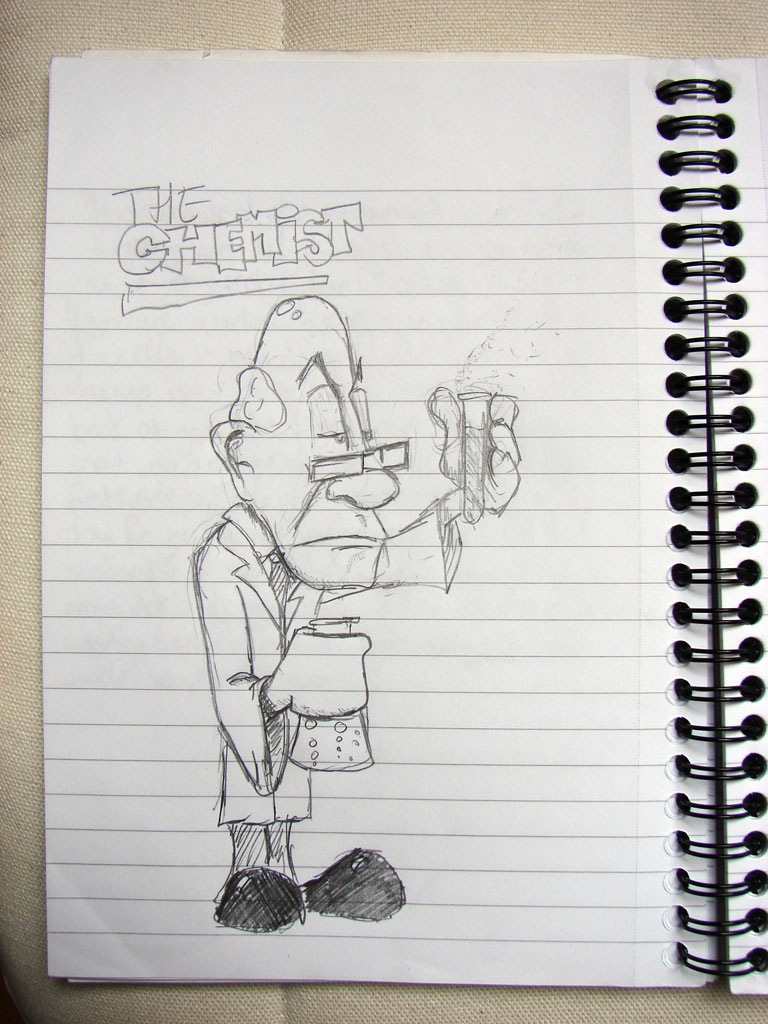
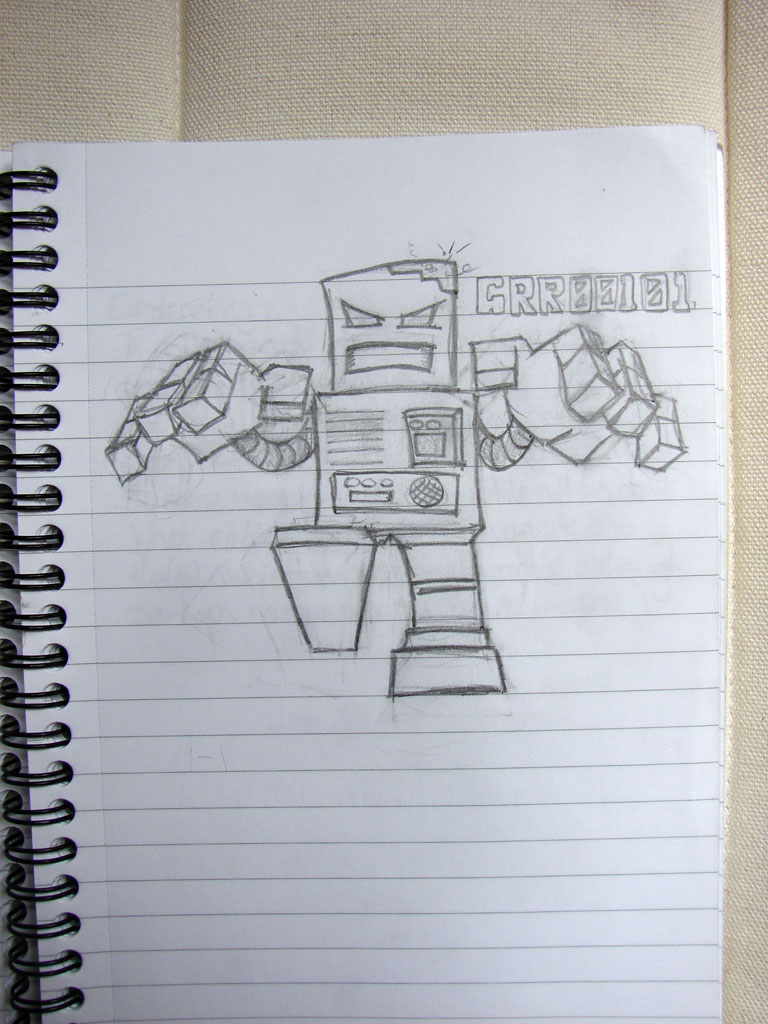


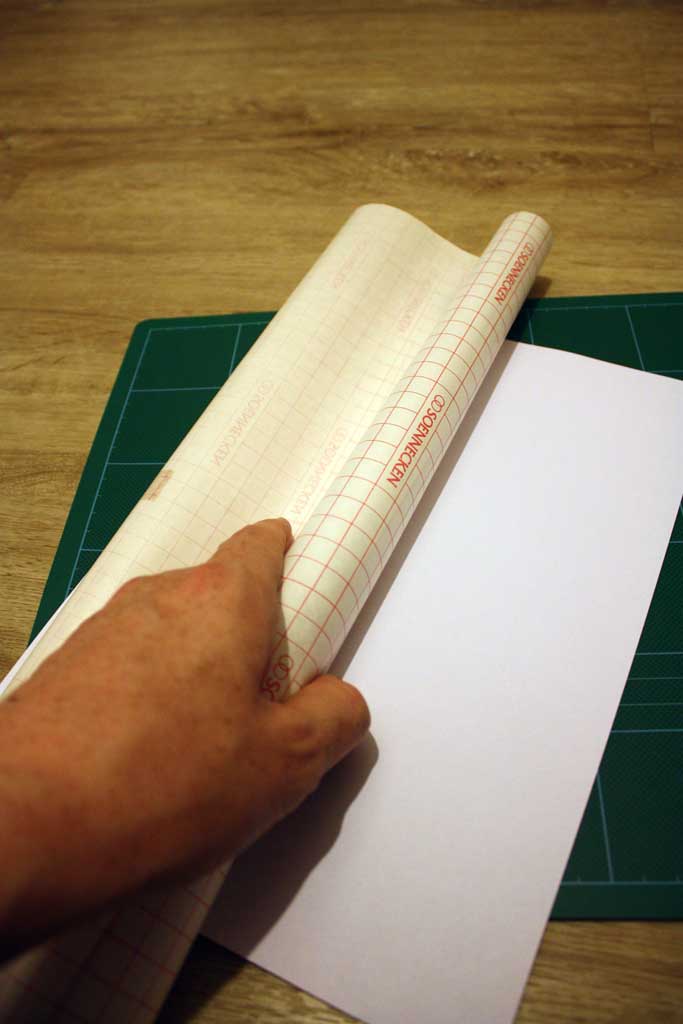


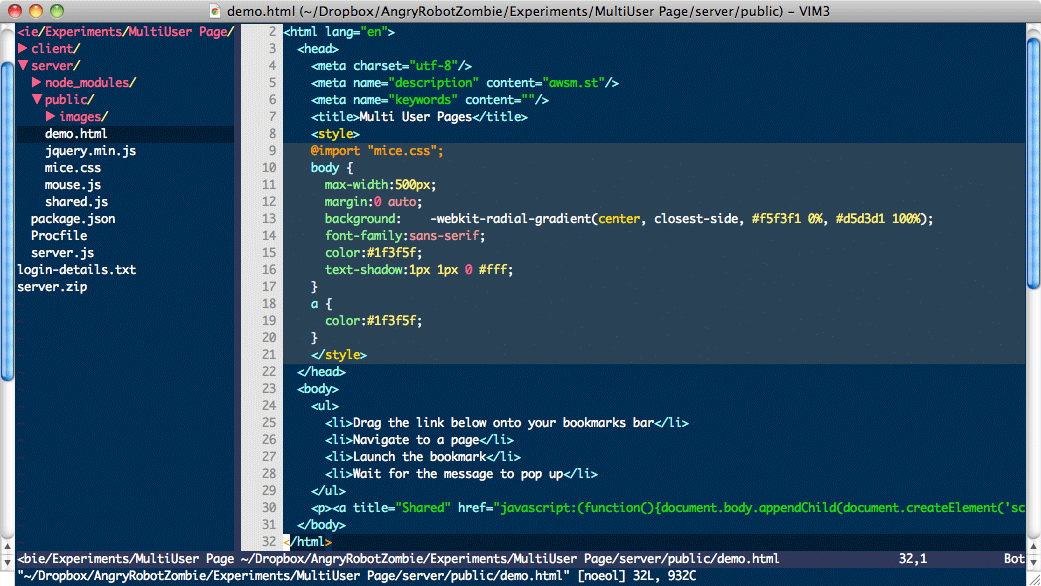


